How To Paint Acrylic On Wood: Complete Guide for Stunning Results
Painting with acrylics on wood opens up all sorts of creative paths, whether you’re revamping old furniture or making original artwork. Wood gives you a sturdy, organic surface that holds acrylic paint really well—if you prep it right. You’ll get great results by prepping the wood, using decent materials, and picking up a few key techniques for paint that lasts.

Maybe you’re a total newbie or maybe you’ve painted for years and just want to try something new—either way, painting acrylic on wood is surprisingly approachable. There’s something about the mix of wood’s natural grain and the punchy colors of acrylics that just pops in a way canvas can’t touch. Picking the right surface and learning a few finishing tricks can really make your work shine.
Get the Fail-Safe Paint Color Playbook (Free PDF)
36 proven colors • 8 ready palettes • trim & sheen guide • printable testing cards.
This guide covers everything from picking the wood to prepping it and sealing your finished piece. I’ll throw in some creative techniques that really make acrylics and wood work together, plus a few pitfalls to avoid.
Choosing The Right Wood Surface
The wood you pick totally changes how your paint goes on and how your finished work turns out. Each wood species brings its own texture and soaks up paint differently, which can be a blessing or a headache.

Types of Wood for Acrylic Painting
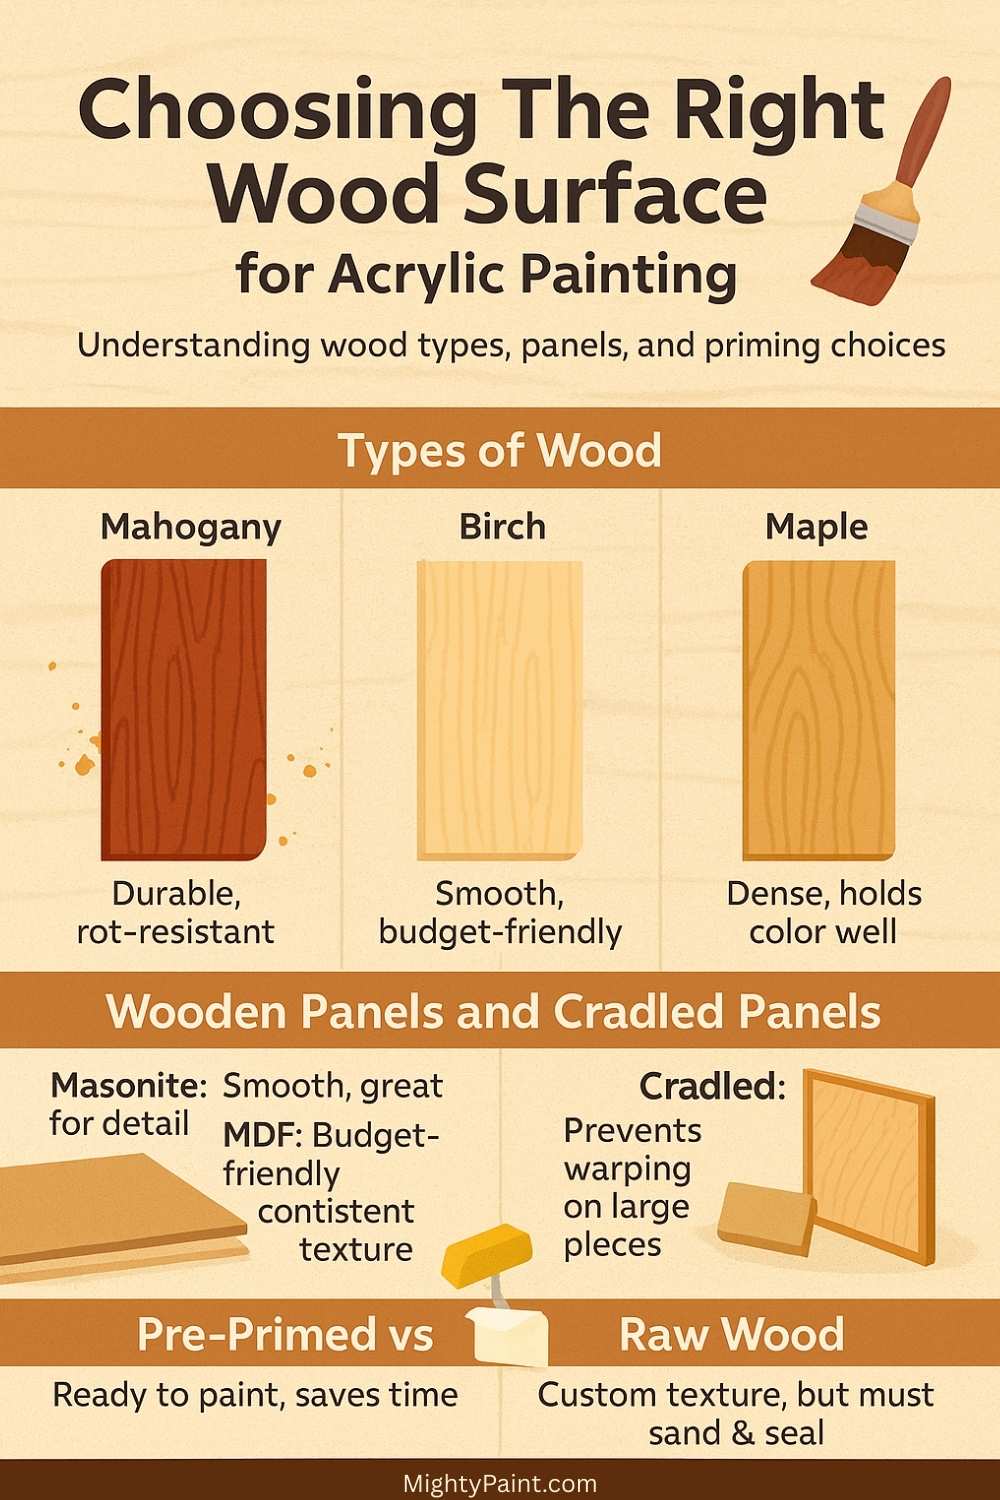
Hardwoods are the way to go if you want your painting to last. Mahogany is a real standout—it’s naturally resistant to rot and moisture, so your art has a fighting chance over time.
Birch and maple are also solid picks. They’re smooth and take paint evenly, as long as you prep them first.
Softwoods like pine? Honestly, skip them for anything you care about. They warp, which leads to cracking and disappointment.
If you’re just starting, these hardwoods won’t let you down:
- Mahogany: Super durable, resists rot
- Birch: Smooth, budget-friendly
- Maple: Dense, takes color nicely
Working with Wooden Panels and Cradled Panels
Wooden panels are lighter than solid wood but still give you a great painting surface. Masonite panels are everywhere—they’re cheap and really smooth, which is great for detail work.
Medium-density fiberboard (MDF) is even more budget-friendly and has a consistent texture. You can snag a big pack for practice without breaking the bank.
Cradled panels come with a wooden frame on the back that keeps things from warping. They’re a lifesaver for bigger pieces.
Plywood panels (especially Baltic birch) are okay, but I’ve had some warp unless I go thick and store them flat. Just something to keep in mind.
Selecting Pre-Primed vs. Raw Wood
Pre-primed wooden panels are a time-saver and honestly, they look fantastic right out of the package. Ampersand Gessobord is a popular brand, and you can get a set for a few bucks.
Since they already have gesso, you can dive right into painting. Great for anyone who wants to skip the messy prep and focus on the fun part.
Raw wood surfaces give you more control over the finished texture, but they’re more work. You’ll have to sand, seal, and prime before you even think about painting.
Get the Fail-Safe Paint Color Playbook (Free PDF)
36 proven colors • 8 ready palettes • trim & sheen guide • printable testing cards.
Go with raw wood if you want a custom size or a specific texture. Just don’t skip sealing—wood oils can mess with your paint over time if you ignore that step.
Essential Supplies and Materials
Having the right supplies makes your paint job look better and last longer. Good acrylic paint, the right brushes, and a solid primer are the real game-changers on wood.
Best Acrylic Paints for Wood
Golden and Liquitex are hard to beat when it comes to color and staying power.
Winsor & Newton Galeria is a solid choice for beginners—affordable, covers well, and mixes easily.
Heavy body acrylics just work better on wood. They’re thicker, more pigmented, and give you better coverage.
Quality over quantity, always. If you’re building a starter palette, grab these colors:
- Titanium white
- Ivory black
- Cadmium red
- Ultramarine blue
- Cadmium yellow
- Burnt umber
Cheap paint? It usually looks chalky and doesn’t hold up. If you care about the result, spring for the good stuff.
Brushes and Tools
Flat brushes are your best friend for primers and backgrounds. One-inch and two-inch sizes cover most things.
Round brushes are great for details and curves. I usually keep a size 2, 6, and 10 on hand.
Synthetic bristles are better for acrylics—they hold their shape and are easier to clean.
Foam brushes can give you a super-smooth finish, especially for big areas or sealing coats.
Get the Fail-Safe Paint Color Playbook (Free PDF)
36 proven colors • 8 ready palettes • trim & sheen guide • printable testing cards.
Don’t forget:
- Fine-grit sandpaper (220-grit is my go-to)
- Rags or paper towels
- Water cups
- Palette for mixing
- Something to protect your table or floor
Cheap brushes shed and get ruined fast. It’s worth buying a couple of decent ones and washing them as soon as you’re done.
Understanding Primers and Gesso
Gesso is what makes acrylic paint stick and look its best on wood. It’s a white primer that preps the surface and boosts color.
Wood primer seals the wood and keeps oils from messing up your paint. Use it first on raw wood, then gesso if you want.
Always put on two thin coats instead of one thick one. It dries better and won’t crack.
Golden Gloss Medium can double as a sealer and primer, and since it’s clear, you get to keep that wood grain visible.
Good gesso (like Liquitex or Golden) goes on smooth and dries evenly. The cheap stuff? It gets streaky fast.
Give each coat a light sand with fine paper. It smooths out any bumps and helps the next layer grip.
Pre-primed panels are a big time-saver. If you’re buying raw wood from a craft store, don’t skip the primer step.
Get the Fail-Safe Paint Color Playbook (Free PDF)
36 proven colors • 8 ready palettes • trim & sheen guide • printable testing cards.
Preparing and Priming The Wood
Prepping wood for acrylic is basically a two-step deal: sand it smooth, then prime or gesso so the paint actually sticks.
Cleaning and Sanding the Surface
Wipe the wood down with a damp cloth to get rid of dust and grime. Let it dry all the way before sanding.
Start sanding with 120-grit sandpaper, always going with the grain. This roughs up the surface just enough for paint to grip.
Focus on any rough or raised areas—give them a little extra attention. If you’ve got deep scratches or dents, use a coarser grit first.
After the first round, switch to 220-grit for a final pass. This leaves things nice and smooth.
Once you’re done sanding, wipe all the dust off with a clean rag. Any leftover dust will mess with your paint job.
Applying Gesso or Wood Primer
Pick gesso for art pieces or wood primer for bigger surfaces like furniture.
Brush or roll on the first coat, making sure you cover the whole thing. Don’t worry if you still see a bit of wood grain.
Let it dry for about two hours—touch it to be sure it’s dry before adding another coat.
Sand lightly between coats to help the next layer stick. Always wipe away the dust before painting again.
Two coats of primer or gesso is usually perfect for acrylics to really grab onto.
Acrylic Painting Techniques On Wood
Painting on wood opens up some cool options for texture and technique. If you get the basics down—layering, understanding how paint behaves on primed wood, maybe trying out impasto—you’ll get some really interesting effects.

Applying Base Layers
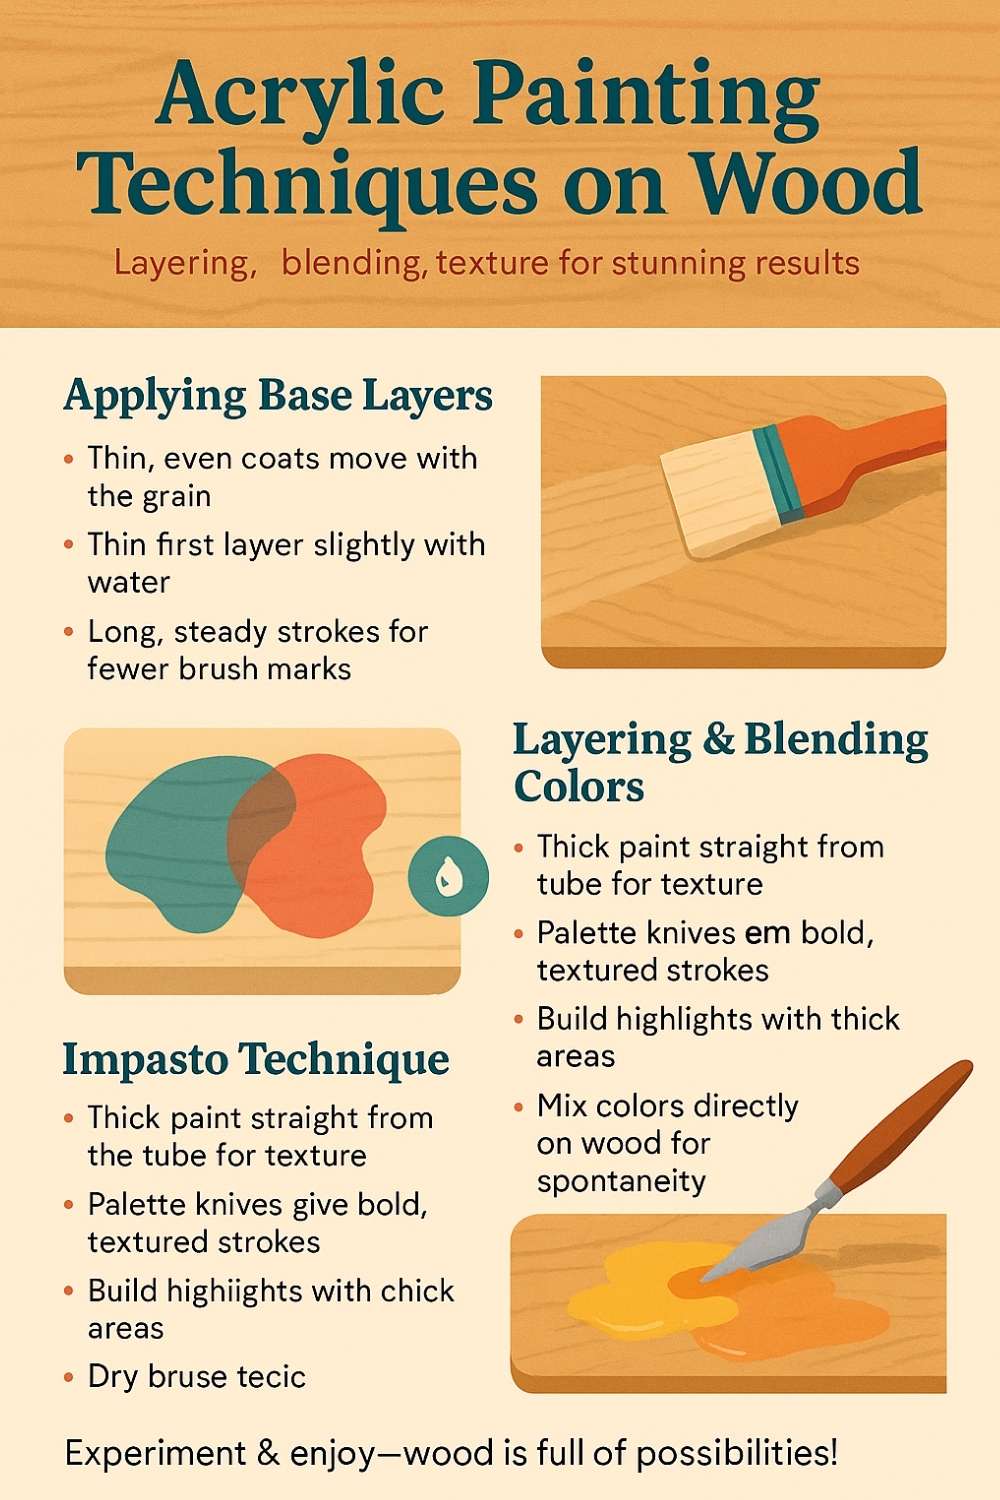
Start with thin, even coats of paint. Use a wide flat brush or foam roller and move with the grain.
Thin your first layer with just a bit of water. It helps the paint go on smooth and keeps it from getting too thick (which can crack).
Long, steady strokes look best and help hide brush marks. Stick with the grain for a more natural feel.
Let each coat dry for 15-30 minutes. Acrylic dries fast, but don’t rush it or you’ll get streaks.
It’s better to build up 2-3 thin coats than slap on one thick one. The finish is stronger and looks nicer.
Layering and Blending Colors
Layer transparent washes over your base to build depth. Mix your paint with a bit of water or medium for these glazes.
Work fast while the paint is wet if you want smooth blends. Acrylic dries quick, so keep a stay-wet palette if you can.
Use a damp, clean brush to soften any hard edges between colors. Just feather the edge lightly.
Glazing is great on wood—add thin, see-through layers over dry paint for a richer look.
Try wet-on-wet blending by putting fresh paint right into wet spots and blending gently. It’s a bit tricky, but the results are worth it.
Using Impasto Technique
Impasto means laying on thick paint straight from the tube for texture. It really pops on wood, catching light and adding interest.
Palette knives beat brushes for this. Scoop up thick paint and swipe it on confidently.
Build up thick areas where you want highlights or drama. The raised paint casts shadows and adds depth, especially on flat panels.
Try mixing colors right on the wood with your knife for some spontaneous color shifts in the thick paint.
Let these thick sections dry all the way before adding details—sometimes it takes a few hours for the paint to fully set.
Detailing and Final Touches
Switch over to smaller brushes for those last bits of detail. A round brush with a sharp point helps you get crisp lines and tiny shapes—trust me, it’s worth having a good one on hand.
Acrylic markers really shine when you need to add details on top of painted wood. They go on smooth and don’t mess up the layers underneath, which is honestly a relief.
For highlights, grab a small brush and use paint that’s just a little thicker than usual. Think about where light would naturally hit and dab it there. It doesn’t have to be perfect—sometimes a little imperfection adds character.
Get the Fail-Safe Paint Color Playbook (Free PDF)
36 proven colors • 8 ready palettes • trim & sheen guide • printable testing cards.
Masking tape is your friend if you want sharp edges or neat geometric borders. Stick it down, paint, and then pull the tape off while the paint’s still a touch wet. That’s when you get the cleanest line—though sometimes it’s a bit nerve-wracking.
The dry brush technique is a fun way to add texture. Take a stiff brush, barely load it with paint, and drag it lightly over the raised wood grain. It’s a bit unpredictable, but that’s half the charm.
Sealing and Protecting Your Artwork
If you want your acrylic painting on wood to last, you’ll need the right varnish and a little patience. The right steps can keep your colors bright and help your work survive bumps, sun, or spills—at least, that’s the hope.
Choosing the Right Varnish
Pick a varnish made for acrylic paint on wood. Water-based options dry fast and don’t yellow, which is honestly a relief if you want your work to look good years from now.
When you’re shopping, check for:
- UV protection so your colors don’t fade
- Water resistance to help with spills or humidity
- Compatibility with acrylic paints—don’t skip this
- Non-yellowing (because who wants a yellow haze?)
There are three main finishes. Matte gives a flat, modern look. Satin’s got a gentle sheen—not too shiny, not too dull. Gloss is bright and reflective, if that’s your thing.
Brands like Golden, Liquitex, and Winsor & Newton come up a lot. I’d say check out some artist reviews before you commit. Always make sure it’s labeled for acrylics.
It’s a good idea to test the varnish on a hidden spot first. That way, if it reacts weirdly, you won’t ruin the whole piece. Better safe than sorry, right?
How to Apply Sealants
Give your painting at least 48 to 72 hours to dry after you finish. If the paint’s even a little tacky, just wait—it’s not worth rushing this step.
Gently dust off your painting with a soft brush. Any dirt or fuzz trapped under the varnish will bug you forever, so take a minute here.
Here’s how I usually do it:
- Open a window or work outside if you can
- Grab a clean, soft brush or a foam applicator
- Brush on thin, even coats over the whole piece
- Keep your strokes going in one direction to avoid weird streaks
- Let each coat dry all the way before starting the next
Two or three thin coats work better than one thick one. Thick layers tend to bubble or streak, which is just frustrating. Stay gentle with your brush, and don’t fuss with spots that are still wet—it’ll leave marks you can’t fix.
Creative Ideas and Inspiration
Acrylic painting on wood opens up so many possibilities, from home decor to practical projects. Whether you’re making a sign for your kitchen or revamping old furniture, you can turn even the plainest wood into something eye-catching.
Decorative Wooden Projects
Painting wood can really brighten up a room. Try making small wooden signs with quotes or family names—they’re classic for a reason and make great gifts too.
Some fun ideas:
- Wooden photo frames with painted edges
- Serving trays with floral or abstract designs
- Wall art on old wood planks
- Painted letters for nurseries or kids’ rooms
If you like seasonal crafts, paint pumpkins on wood slices for autumn, or create holiday ornaments from thin wooden cutouts. There’s something satisfying about swapping them out as the year goes by.
Furniture gives you a bigger canvas. Try bold patterns on old chairs or an ombre dresser. Stencils are a lifesaver if you want clean shapes and lines—though freehand has its own charm.
Color combos worth trying:
- Navy blue and white for a beachy vibe
- Earthy tones for that cozy farmhouse look
- Bright colors for kids’ furniture—why not?
Tips for Outdoor and Functional Pieces
Outdoor wood painting takes a bit more prep and care. Grab an exterior primer and slap on a couple of coats of acrylic sealer—weather can be brutal on wood if you skip this step.
Get the Fail-Safe Paint Color Playbook (Free PDF)
36 proven colors • 8 ready palettes • trim & sheen guide • printable testing cards.
For garden signs or planters, you’ll want a water-resistant finish. Three coats of polyurethane sealer over your artwork usually does the trick. It’s not just about rain—sun can be just as tough on paint.
Best practices for outdoor projects:
- Sand everything thoroughly before you start
- Pick a high-quality exterior acrylic paint
- Seal every side of the wood, not just the front
- Think about reapplying the sealer every year
If you’re working on something functional, like a cutting board or serving tray, stick with food-safe finishes. Regular sealers aren’t great here—food-grade polyurethane is a better bet.
Mailbox posts and fence pickets? Spray primer works well for getting even coverage. And honestly, painter’s tape helps a lot for clean lines, especially on those bigger surfaces.
