
How to Paint Garage Door Black: A Step-by-Step Guide for a Flawless Finish
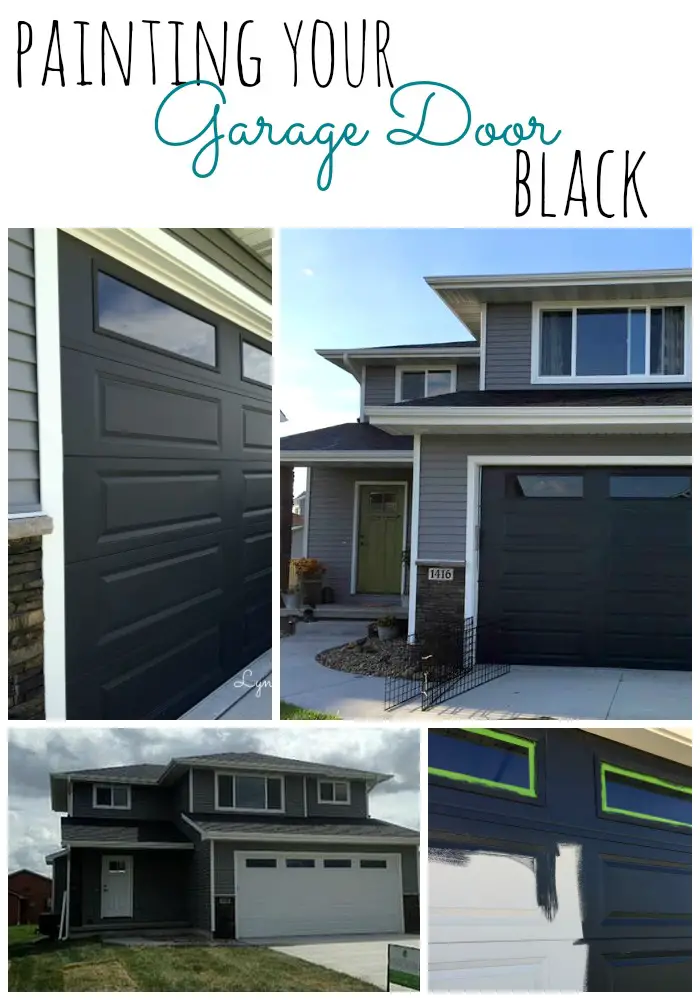
A garage door is often the most visible architectural feature of a home’s exterior, and choosing a bold color like black can transform its aesthetic, lending a sophisticated, modern, or classic farmhouse appeal. It is a dramatic statement that can dramatically elevate the curb appeal of your entire property.
While painting a garage door black offers incredible design potential, it is not a simple weekend project. Achieving a deep, durable, and flawless finish requires meticulous planning, specialized materials, and an unwavering commitment to preparation. This comprehensive guide will walk you through every step, from initial surface assessment to the final coat, ensuring your project is successful, safe, and long-lasting.
Get the Fail-Safe Paint Color Playbook (Free PDF)
36 proven colors • 8 ready palettes • trim & sheen guide • printable testing cards.
Quick answer: To paint garage door black, wash the door, sand glossy spots, prime bare metal or wood, and use exterior paint rated for doors. Black absorbs heat, so paint in mild shade and apply thin coats to reduce warping, lap marks, and slow drying. Check weatherstripping and panel edges before closing the door.
Planning Before You Start: Assessing the Project
Before you even pull out a sanding block, a detailed assessment of the door and the surrounding environment is crucial. This planning phase prevents costly mistakes and ensures the right materials are selected for longevity.
Determine the Door Material: The preparation process varies dramatically depending on whether your door is metal (steel, aluminum), wood, or a composite material.
- Metal: Requires rust treatment, degreasing (using solvents), and sanding to expose bare metal or sound paint.
- Wood: Needs assessment for rot, checking for gaps between panels, and potentially sealing the wood grain before painting.
- Composite/Fiberglass: These often require specialized primers designed for synthetic materials to ensure adhesion.
Check the Surface Condition: Look closely for signs of failure: peeling paint, deep rust spots, mildew, or significant fading. If the door is heavily corroded or the paint is flaking off in large sections, simple painting will not suffice; you may need to professionally sandblast or call a professional restorer.
Timing and Weather: Optimal painting weather is generally mild, with temperatures between 50°F and 85°F (10°C and 29°C). Avoid painting on days when rain is expected, or when the temperature fluctuates wildly, as this can disrupt the curing process and cause paint to fail prematurely. Allow at least a full weekend, or even a week, for the drying and curing times.
Materials and Tools for the Job
Gathering the right supplies is half the battle. Using low-quality paint or primer is the most common cause of premature failure, especially with dark colors like black.
Essential Painting Supplies:
- Exterior Primer: Select a high-quality, rust-inhibiting, bonding primer designed specifically for metal or the door material type.
- Black Exterior Paint: Use a high-quality, acrylic latex or alkyd enamel paint formulated for exterior use. These paints are designed to withstand UV rays, temperature extremes, and moisture.
- Cleaning Solution: A degreaser or TSP (Trisodium Phosphate) substitute to strip grease and grime.
- Tack Cloths and Sandpaper: Various grits (80-grit for stripping, 120-grit for general sanding, 220-grit for smoothing).
Tools and Safety Gear:
- Paint Applicators: High-quality paint rollers, brushes (angled sash brushes are best for corners), and paint trays.
- Protection Gear: Safety glasses, nitrile gloves, and an appropriate respirator mask (especially when sanding rust or solvents).
- Prep Materials: Drop cloths, painter’s tape, wheel brushes, and scrapers.
The Step-by-Step Painting Guide
Phase 1: Deep Cleaning and Surface Preparation
This phase is the single most important step. If the door is not perfectly clean and stable, the paint will fail, regardless of how good the paint is. Treat this process like structural repair, not just cleaning.
- Remove Hardware: Take off all handles, hinges, decorative elements, and any hardware. Paint these items separately or leave them off entirely and mask them meticulously.
- Wash and Degrease: Use the degreaser and water to wash the entire surface. Use a stiff brush or wire brush to scrub away embedded dirt, mildew, and soap scum. Rinse thoroughly with clean water.
- Rust and Loose Paint Removal: Use a wire brush and scraper to physically remove all visible rust, pitting, and any paint that is chipping, flaking, or lifting. Sanding should be used to smooth the edges of these bare spots.
- Sanding (The Key to Adhesion): Sand the entire surface lightly. Even if the paint looks good, sanding creates microscopic scratches and pores (a mechanical bond) that allow the new primer and paint to grip firmly. Wipe away all sanding dust with a vacuum or a damp cloth.
Phase 2: Priming
The primer acts as a shield and a bonding agent. It seals the bare metal and prevents the black paint from reacting unevenly with the underlying material.
Apply the specialized primer according to the manufacturer’s instructions. Use a roller for even coverage. Apply a thin, even coat, ensuring complete coverage, especially in corners and areas where rust was removed. Allow the primer to dry fully. Do not rush this step.
Phase 3: Painting and Finishing
When applying black paint, remember that black is highly absorbent and can reveal any imperfections in the underlying layers. Thin coats are always better than thick coats.
- First Coat Application: Begin by painting the edges, corners, and detailed areas with a brush. Then, use the roller to cover the main panels. Apply the paint in a consistent direction (e.g., vertical strokes) and work in manageable sections. The goal is coverage, not depth.
- Drying Time: Allow the first coat to dry completely. This time varies based on humidity and temperature, but always check the paint manufacturer’s recommendation.
- Second Coat Application: Once dry, apply the second coat. This coat builds the true depth of color and provides the durable, rich finish. Repeat the thin, even application technique.
Design and Color Tips for Black
Black is an incredibly versatile color, but its pairing with other elements defines the final look. Consider the surrounding architecture when making your final color decisions.
Contrasting Elements: When painting the door black, use contrasting hardware (door handles, knocker, etc.). Pairing matte black with polished brass, aged copper, or bright chrome can create a striking, high-end contrast that highlights the door’s architectural details. Similarly, white or cream trim around the door frame will make the black pop dramatically.
Understanding Sheen and Undertones:
- Sheen: This refers to how much light the paint reflects. For a modern, sleek look, a satin or semi-gloss finish is excellent, as it resists dirt and highlights the depth of the black. A flat or matte finish is best if you want a velvety, non-reflective look, but it is often harder to keep clean.
- Undertones: Even black paint has undertones. Some black paints lean slightly cool (blue/gray), while others lean warm (brown/charcoal). Consider your home’s primary trim color to ensure the black complements the existing undertones, rather than fighting them.
Mistakes to Avoid
The most common failures are not related to the paint itself, but to poor preparation and impatience.
1. Skipping the Degrease: If you skip degreasing, residual grease, dirt, or soap scum will prevent the primer from bonding, leading to peeling paint within months.
2. Rushing the Cure Time: Allowing the door to be used, or subjected to moisture, before the paint has fully cured (which can take days or weeks, depending on the paint) is a guaranteed way to cause damage and peeling.
3. Using the Wrong Primer: Never use a general-purpose primer. If your door is metal, you need a specialized rust-inhibiting primer. If it’s wood, you need a wood-specific sealant. Using the wrong primer will compromise the entire job.
Safety and Practical Notes
Safety must be your top priority. Painting involves chemicals, solvents, and dust, so proper protective gear is mandatory.
Ventilation is Non-Negotiable: Always work in a well-ventilated area. Open garage doors, use fans, and keep windows open to ensure fresh air circulation when mixing, priming, or painting. Never paint in an enclosed space.
Protective Gear: Always wear safety glasses, durable gloves, and a proper respirator mask rated for organic vapors, especially when sanding rust or using chemical solvents. Keep children and pets away from the work area.
When to Call a Professional: You should call a professional painter if the door requires extensive structural repair, if the rust is deep and widespread, or if the door is painted over a known lead-based paint (which requires specialized remediation protocols).
Frequently Asked Questions
What is the biggest mistake people make when painting a garage door?
The most common mistake is inadequate surface preparation. People often skip the degreasing, proper sanding, or thorough rust removal. The paint will only adhere to a clean, stable surface. Always treat the prep phase as if you were doing structural repair, not just a quick wash. If the surface is greasy, dusty, or has loose paint, the new coat will fail prematurely.
How long does it take for the paint to cure fully?
While the paint may dry to the touch in a few hours, “drying” is not the same as “curing.” Curing is the chemical process where the paint hardens and reaches maximum durability. This can take anywhere from several days to even a couple of weeks, depending on the paint type, climate, and manufacturer recommendations. Do not subject the door to heavy moisture, scraping, or extreme weather until the manufacturer confirms the full cure time. This is crucial for the longevity of the black finish.
Get the Fail-Safe Paint Color Playbook (Free PDF)
36 proven colors • 8 ready palettes • trim & sheen guide • printable testing cards.
Do I need to sandblast the door, or is sanding enough?
If the door is only faded or has minor blemishes, sanding the entire surface lightly is sufficient to create the necessary mechanical bond for adhesion. However, if the door has deep, widespread rust, peeling paint in large flakes, or severe pitting, simple sanding will not work. In these cases, professional sandblasting or chemical stripping is necessary to create a stable, clean substrate that can accept the primer.
Should I paint the hinges and hardware the same color as the door?
For a high-end, modern look, it is often best to use a contrasting color on the hardware and hinges. Pairing matte black paint on the door with polished brass, aged copper, or bright chrome hardware creates a dramatic, deliberate contrast that highlights the architectural details. If you choose to paint the hardware, ensure you use the same specialized, rust-inhibiting primer on those metal pieces as well.
When should I call a professional painter?
You should call a professional if any of the following apply: 1) The rust is deep, widespread, and structural (meaning the metal itself is compromised). 2) The door is painted over known lead-based paint (this requires specialized safety protocols). 3) The door requires major structural repair (e.g., broken panels, significant warping). For surface cleaning and painting, a careful DIY approach is possible, but safety and structural integrity are key.
Conclusion
Painting your garage door black is a high-impact, high-reward project. By treating the preparation phase with the same care you give the final application, you significantly increase your chances of achieving a stunning, durable finish.
Remember that the longevity of this beautiful transformation is directly tied to the quality of your initial clean and the patience you show during the drying and curing process. With time, care, and the right materials, your black-painted garage door will become a lasting feature that enhances your home’s curb appeal for years to come.