
How to Paint Headlights Black: A Step-by-Step Guide for a Custom Look
Giving your vehicle a customized, aggressive, or stealthy look can dramatically change its aesthetic appeal, and blacking out the headlights is one of the most popular modifications. These smoked or blacked-out headlights give a deep, uniform, and modern appearance, instantly giving your car a more cohesive and customized profile on the road.
However, this modification is not simply a matter of spraying black paint on the plastic. Headlight lenses are complex, highly curved, and often made of polycarbonate or acrylic plastic that has accumulated years of UV damage, oxidation, and grime. Successfully painting them black requires meticulous preparation, specialized materials, and careful execution to ensure the paint adheres properly and, crucially, remains durable against the harsh elements of the road.
Get the Fail-Safe Paint Color Playbook (Free PDF)
36 proven colors • 8 ready palettes • trim & sheen guide • printable testing cards.
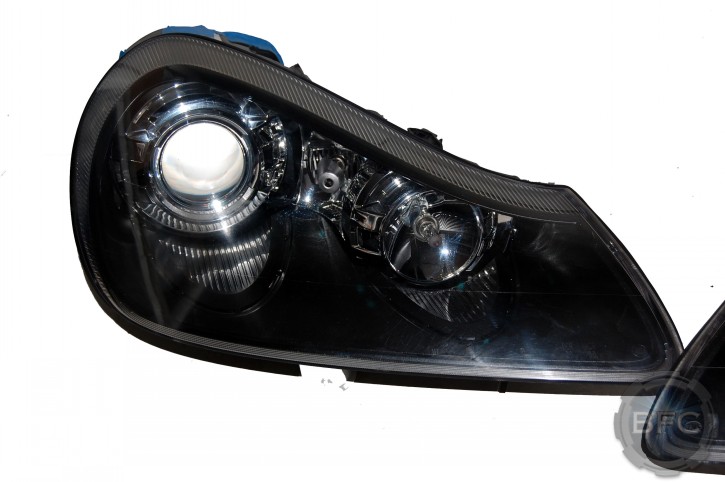
Quick answer: To Paint Headlights Black, start with the safest first step for the material involved, test a small area when needed, and follow the process in thin, controlled stages. Use proper ventilation and protective gear when chemicals, sanding, spraying, or solvents are involved.
Planning and Preparation: Assessing Your Project
Before you even open a can of paint, a thorough planning phase is non-negotiable. The success of a black headlight finish hinges entirely on the preparation. You must assess the condition of the plastic, the specific paint required, and the working environment.
Assessing the Headlight Lens Condition
Examine your headlights closely. Do they show deep yellowing, haziness, or visible cracks? This oxidation is the primary enemy of any paint job. If the plastic is severely yellowed, sanding and polishing are mandatory. If the lens is cracked or has deep pitting, painting might only be a temporary cosmetic fix, as the structural integrity of the plastic is compromised. For best results, the plastic should be smooth and clean down to the bare material.
Do not use general spray paint. Automotive plastic requires specific primers and paints designed to adhere to non-porous, curved plastic surfaces and withstand extreme temperature fluctuations. You must select a three-part system: a specialized plastic cleaner, a durable plastic primer, and an automotive-grade black paint. Remember that the clear coat you use for protection must also be UV-resistant, or the black paint will fade and flake off within months.
Timing and Environment
Work on a clean, well-ventilated day. High humidity or rain can affect the curing process. Furthermore, plan for adequate drying time between every single step—cleaning, priming, painting, and sealing. Rushing this process is the fastest way to guarantee failure.
Materials and Tools Checklist
Gathering the right tools saves time and prevents costly mistakes. Since this is a DIY project, having the correct supplies is paramount.
Essential Tools
- Safety goggles and respirators (essential for handling solvents and paint fumes).
- Masking tape and plastic sheeting (for protecting surrounding vehicle paint and hardware).
- Microfiber cloths and lint-free towels.
- Small orbital sander or sanding block.
- Variety of sandpaper grits: starting coarse (120-220 grit), progressing to medium (400 grit), and finally fine (600-1000 grit).
Required Materials
- Plastic/Polycarbonate Cleaner (IPA or dedicated plastic prep solution).
- Plastic adhesion primer (must be rated for automotive plastic).
- Automotive Black Paint (Spray can format is easiest for DIY).
- UV-Resistant Clear Coat Sealer (Crucial for longevity).
- Wax remover or degreaser.
The Headlight Blackout Process: Step-by-Step Guide
Follow these steps sequentially. Skipping or rushing any step, especially cleaning or priming, will result in paint failure.
Step 1: Deep Cleaning and Oxidation Removal
Begin by washing the lenses with soap and water to remove loose dirt. Next, use an IPA (isopropyl alcohol) or specialized plastic cleaner to degrease the entire surface. If the plastic is heavily oxidized or yellowed, you must sand it. Start with 120-grit sandpaper to level any major imperfections, then move through 220, 400, and finally 600-grit sandpaper. The goal is to achieve a uniform, matte surface that is structurally sound. The sanding process removes the aged, oxidized top layer, providing a perfect canvas for the primer.
Step 2: Preparation and Priming
After sanding, thoroughly wipe the lens with the degreaser again to remove all sanding dust. Mask off the surrounding vehicle bodywork and hardware using painter’s tape. Apply the specialized plastic adhesion primer according to the manufacturer’s instructions. Allow the primer to cure completely—do not skip this step. The primer creates the necessary bonding surface for the paint to grip onto.
Step 3: Painting the Lenses
Once the primer is dry, apply the black paint. Use a light, even coat, keeping the spray can moving consistently. It is better to apply three thin coats than one thick coat, as thick coats tend to run and create uneven spots. Allow the full recommended drying time between each coat. Apply the paint until the entire lens is uniformly coated and black. Remember, the paint should look matte or semi-gloss, not wet.
Step 4: Sealing and Finishing
This is perhaps the most critical step for durability. Once the black paint is fully cured (check paint instructions, but this can take 24-48 hours), you must apply the UV-resistant clear coat sealer. Apply several thin, even coats of this clear coat. The clear coat protects the black paint from the sun’s damaging UV rays, which would otherwise cause the color to fade, chalk, and peel off. After the final clear coat layer has cured, the project is complete.
Common Mistakes to Avoid
DIY car modifications often run into predictable pitfalls. Being aware of these common mistakes can save you hours of frustration and costly repaints.
- Insufficient Cleaning: Failing to completely remove all oils, grime, and oxidation before priming means the paint will have nothing to stick to, leading to immediate peeling or flaking.
- Using Wrong Paint: Using general enamel or spray paint that isn’t designed for curved, non-porous plastic will result in poor adhesion and rapid failure.
- Skipping the Clear Coat: Black paint, especially on a clear plastic surface, will fade rapidly without a UV-protective clear coat. This is the single biggest mistake in the entire process.
- Over-Sanding: While sanding is necessary, sanding too aggressively or leaving deep gouges means the primer and paint will fill those imperfections, making them visible when the paint wears down.
- Improper Masking: If the surrounding body paint or trim gets paint splatter, cleanup becomes difficult, and you may damage the vehicle’s original finish.
Safety and Practical Notes
Because this process involves solvents, primers, and paints, safety must be your absolute top priority. Never compromise on protective gear or ventilation.
- Ventilation: Always work outdoors or in a professional garage with excellent ventilation. Solvents and paints can be toxic when inhaled.
- Protective Gear: Wear chemical-resistant gloves, safety goggles, and a respirator rated for organic vapors.
- Follow Directions: Adhere strictly to the drying and curing times specified on all product containers. Rushing the process is unsafe and ineffective.
- Professional Help: If you are dealing with heavily damaged or irreplaceable lenses, or if you are uncomfortable with the chemical process, it is always best to consult a professional body shop or detailing service.
Blacking out headlights is a dramatic cosmetic change that requires dedication to preparation and precision application. By treating the process as a multi-step restoration—starting with deep cleaning, moving through specialized priming, and finishing with a durable, UV-protected clear coat—you can achieve a professional, deep black finish that significantly enhances your vehicle’s aggressive and customized look. Remember that patience is your greatest tool; taking your time with the preparation steps is the key to a lasting, flawless result.
Frequently Asked Questions
Are blacked-out headlights legal to drive?
Legality varies significantly by location and state. Some jurisdictions have strict regulations regarding headlight appearance, beam pattern, and required brightness. Before proceeding, you must research your local vehicle safety and modification laws. If the blacking process significantly reduces light output or alters the beam pattern, it may be illegal for road use. Always prioritize compliance with local regulations.
How long does the black paint and clear coat last?
The longevity depends heavily on the quality of materials used, the thoroughness of preparation, and the UV-resistant clear coat applied. With proper preparation (deep cleaning, specialized priming, and multiple coats of UV-resistant sealer), the finish can last for several years. However, no paint job is permanent, and regular inspection is required. If the clear coat starts to chip or fade, re-sealing the headlights is necessary to maintain the protective barrier.
Get the Fail-Safe Paint Color Playbook (Free PDF)
36 proven colors • 8 ready palettes • trim & sheen guide • printable testing cards.
Do I need to sand the headlights even if they aren’t yellow?
If the plastic is not yellowed but feels sticky, oily, or has accumulated grime, cleaning and degreasing are sufficient. However, if the plastic surface feels rough, has micro-scratches, or is generally dull, a light sanding (starting around 400-600 grit) is highly recommended. This process removes the invisible buildup layer and creates a consistent, matte surface that allows the primer to bond optimally. Never skip the degreasing step, regardless of whether you sand.
What is the biggest mistake beginners make?
The single most common and critical mistake is skipping or rushing the preparation steps, particularly the degreasing and the application of the specialized plastic primer. If the surface is not perfectly clean and primed, the paint will not adhere properly, leading to peeling, flaking, or failure within weeks. Treating the preparation phase with the same care as the painting itself is mandatory for success.
Is it possible to do this at home, or should I use a professional service?
This modification is achievable at home with the right tools, specialized products, and patience. However, if the headlights are extremely damaged, or if you are unfamiliar with handling solvents, primers, and the precise, multi-step process, consulting a professional body shop or automotive detailer is highly advisable. Professionals often have specialized equipment and industrial-grade materials that guarantee the best, most durable results.
Conclusion
How To Paint Headlights Black works best when the plan, materials, safety steps, and finish goals all line up before work begins. Review the surface or tool condition, choose compatible products, and leave enough time for drying, cleanup, and final checks.
Use the guidance above as a practical checklist, then adjust it to the specific surface, workspace, product directions, and risk level. When the project involves fumes, damaged materials, business liability, or uncertain conditions, slow down and get qualified help before moving forward.