
How to Paint Over Water Stains
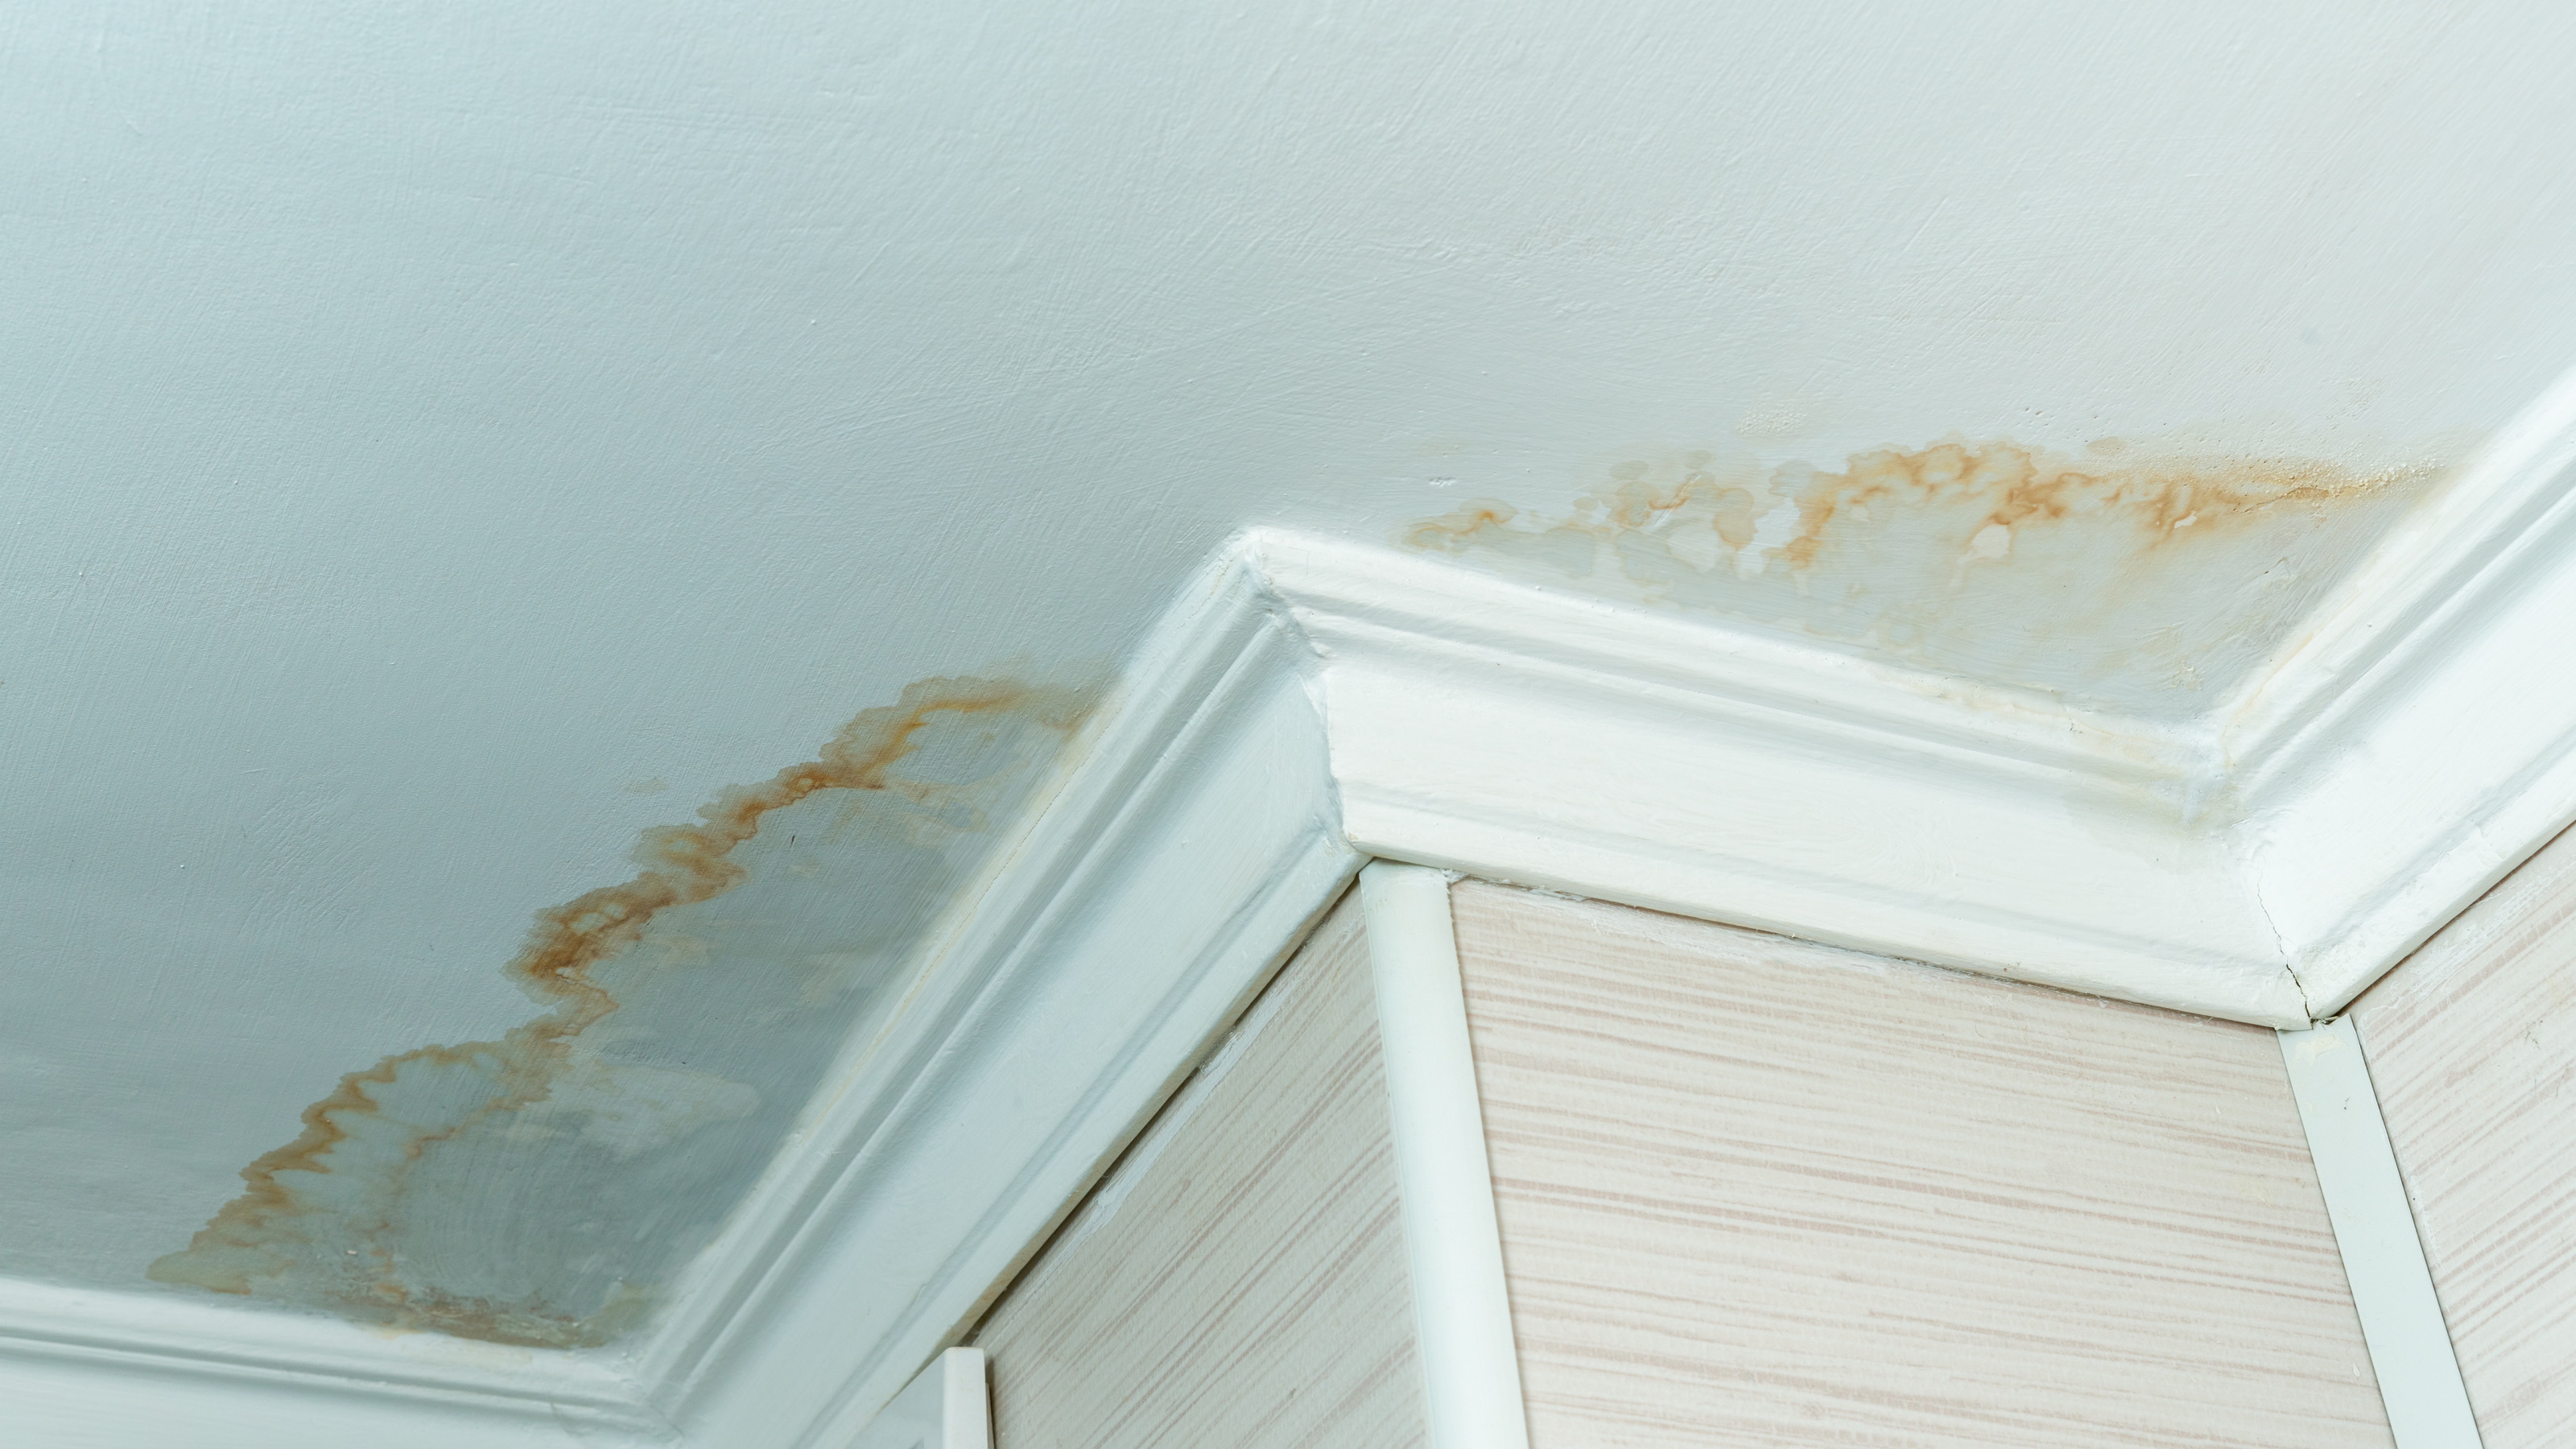
Discovering a water stain on your wall or ceiling can be disheartening, transforming a beautiful room into a constant reminder of underlying plumbing or structural issues. These visible marks are more than just cosmetic problems; they signal that something deeper needs attention, whether it’s a minor leak, seasonal seepage, or simple material degradation.
While the thought of painting over damage can feel daunting, successfully tackling water stains is a manageable, multi-stage process. It requires patience, systematic preparation, and the right materials. By following a structured approach—prioritizing source repair and surface preparation before touching the paint can—you can restore your space to a fresh, uniform, and lasting finish.
Get the Fail-Safe Paint Color Playbook (Free PDF)
36 proven colors • 8 ready palettes • trim & sheen guide • printable testing cards.
Quick guide: For most projects, the better choice depends on the surface, durability needs, finish, cleanup, drying time, and indoor or outdoor exposure. Compare the options by use case rather than assuming one is always better.
Initial Assessment and Planning
Before gathering any tools or mixing a single drop of paint, comprehensive planning is non-negotiable. You must determine if the stain is merely superficial paint damage, or if it indicates structural material failure (like compromised drywall or plaster). This initial diagnosis dictates the entire scope of work, ranging from simple patching to major remediation.
Diagnosing the Stain and Source
A successful project starts with understanding the problem’s root cause. Do not assume the stain will disappear with a coat of paint.
- Identify the Source: Carefully trace the stain’s path. Is it coming from above (suggesting a roof leak or plumbing line)? Is it concentrated near a window or bathroom fixture (suggesting condensation or minor seepage)? Always address the leak or seepage point first.
- Assess the Damage Type: Differentiate between various types of staining:
- Cosmetic Paint Failure: The stain is visible through flaking or discolored paint on a stable substrate.
- Material Staining: The stain has penetrated the porous material (drywall, plaster) itself, leaving a visible water mark that cannot be covered by paint alone.
- Mold/Mildew Growth: Visible black, green, or fuzzy patches indicate biological growth, which requires specialized remediation, not just painting.
Structural Evaluation: If the stain involves bubbling, crumbling, or significant warping of the wall surface, stop and call a professional. Structural integrity must be confirmed before any cosmetic repairs are attempted.
Preparing the Environment and Budget
Water damage projects are messy and time-consuming. Factor in time, labor, and material costs. Consider the scope: Are you painting a small bathroom ceiling, or an entire basement wall? The scale will affect material quantities and drying time.
- Timeline: Build in significant time for drying. Water-damaged areas can take weeks to dry fully, especially in high humidity. Rushing this stage is the most common mistake.
- Budgeting: Allocate funds not just for paint, but for patch compounds, specialized primers, protective sheeting, and potentially professional labor (plumbers, remediators).
The Step-by-Step Guide to Repairing and Painting
This guide assumes that the immediate source of the water leak has been fixed and the area is thoroughly dried. If the area is still damp, no further steps can be taken.
Phase 1: Deep Cleaning and Removal
The goal of this phase is to return the surface to its cleanest, most stable state possible, removing all contaminants.
- Protect the Area: Move all furniture and lay down heavy-duty drop cloths. Use painter’s tape around trim and baseboards to contain paint splatter.
- Remove Debris: Use scrapers and stiff brushes to remove all loose, peeling, or flaking paint. The surface must be solid enough to support new paint layers.
- Deep Cleaning: Use a mild detergent solution or a specialized cleaner (depending on the stain source—mildew requires specific remediation agents). Scrub the entire affected area thoroughly to remove mineral deposits, dirt, and contaminants. Rinse thoroughly with clean water and allow the area to air-dry completely.
Phase 2: Structural Repair and Patching
This step addresses physical damage to the substrate (drywall, plaster) caused by water saturation.
- Repairing Drywall/Plaster: Use appropriate patching compounds (e.g., lightweight joint compound for drywall, or specific plaster filler). Cut out any severely compromised sections and use the compound to fill the void. Apply the compound in layers, following the manufacturer’s curing instructions.
- Sanding (Drying): Once the patch compound is fully cured, lightly sand the area to smooth out ridges and ensure it is level with the surrounding wall. Wipe away all dust with a tack cloth.
Phase 3: Priming and Sealing (The Critical Step)
This is the most crucial stage for preventing stains from bleeding through the final paint layer. Primer is not optional when dealing with water damage.
- Stain-Blocking Primer Application: Apply a high-quality, specialized stain-blocking primer (such as shellac-based or mildew-resistant latex primer) directly over the patched and stained areas. This primer acts as a barrier, encapsulating the stain’s tannins or mineral residue and preventing it from reacting with the new paint.
- Full Coverage Priming: For maximum adhesion and color uniformity, prime the entire surrounding area (the whole wall/ceiling, not just the patch). This ensures the color difference between the patched area and the surrounding wall is minimized after the final coats.
- Drying Time: Allow the primer to dry completely. Check the manufacturer’s recommended drying time; this is often longer than anticipated.
Phase 4: Applying the Finish Coat
Once the primer is dry and the surface is stable, you can apply the final paint color.
- Cut In: Use a small brush to “cut in” the edges of the stained area and surrounding trim, painting right up to the patch boundaries.
- Rolling: Use a roller with the appropriate nap size for the surface texture to apply the paint over the primed and repaired areas. Work in manageable sections, overlapping strokes to prevent visible seams.
- Second Coat: Allow the first coat to dry fully. Apply a second coat, following the same rolling technique. Two coats are almost always necessary to achieve sufficient opacity and completely obscure the stain’s underlying tones.
Materials and Tools Checklist
Having the right supplies is half the battle. Here is a comprehensive list of tools and chemicals required for this specific type of repair:
Tools
- Scrapers and Putty Knives: For removing loose paint and compound.
- Stiff Brushes: For scrubbing and cleaning.
- Sanding Sponge or Sandpaper (medium grit): For smoothing patched areas.
- Drop Cloths and Painter’s Tape: For protecting floors and trim.
- Paint Roller and Tray: Appropriate size for the surface.
- High-Quality Paint Brushes: For cutting in and detailed work.
- Utility Knife and Measuring Tape: For precise preparation.
Materials
- Specialized Stain-Blocking Primer: (e.g., Shellac or specialized latex). This is critical for sealing water stains.
- Patching Compound/Joint Compound: Appropriate for the substrate (drywall, plaster, etc.).
- Cleaning Detergent/Mold Remediation Agent: For deep cleaning.
- High-Quality Interior Paint: Chosen for its opacity and finish (see Design Tips).
- Tack Cloths and Rags: For final cleaning of dust.
Design and Color Considerations
The choice of paint finish and color can significantly impact how visible the stain is, even after extensive repair. These decisions should be made in conjunction with the room’s natural light and existing décor.
Understanding Paint Sheen (Finish)
The sheen refers to how light reflects off the dried paint. This choice affects both durability and how visible imperfections are. When covering water stains, the sheen must be chosen carefully.
- Flat/Matte: Best for hiding minor wall imperfections and providing a non-reflective, seamless look. This is often ideal for ceilings and bathroom walls, as it is less prone to showing minor water marks. However, it is the least durable and hardest to clean.
- Eggshell: A good balance of durability and appearance. It offers a subtle luster, making it easier to clean than flat paint, while still looking soft and sophisticated. It is excellent for living areas.
- Semi-Gloss/Gloss: Highly durable and extremely easy to clean, making it ideal for high-moisture areas like bathrooms, laundry rooms, and kitchens. However, its reflective nature means it will highlight any imperfections, such as uneven patches or visible seams.
Water stains often appear yellowish, grayish, or brown due to mineral deposits (rust, calcium). When selecting a new color, consider the stain’s underlying undertone.
- Contrast Management: If the stain has a strong yellow or brown cast, choosing a very light, neutral color (like a warm white or light gray) can sometimes intensify the contrast.
- Neutralizing Shades: Consult with a paint professional. They can suggest colors that contain slight undertones (e.g., a cool gray or a slightly creamy beige) that are known to neutralize the yellow/brown cast of the stain, resulting in a more harmonious final appearance.
Common Mistakes to Avoid
Many DIY attempts fail because of overlooking these critical steps. Prevention is always better than remediation.
- Ignoring the Source: This is the biggest mistake. Painting over a leak simply guarantees the stain will reappear. Always fix the plumbing or structural issue first.
- Insufficient Drying Time: Rushing the drying process—especially after patching or cleaning—will trap moisture, weaken the patch, and guarantee paint failure.
- Skipping the Stain-Blocking Primer: Assuming that the paint itself is enough is a costly gamble. The specialized primer is the chemical barrier needed to prevent mineral bleed-through.
- Under-Sanding: Not properly sanding the patched area means the new compound will not adhere correctly to the old surface, leading to a weak patch that cracks or peels.
Safety and Practical Notes
Safety must be the absolute priority. Water damage can involve more than just paint; it can involve mold, asbestos, or electrical hazards.
- Personal Protective Equipment (PPE): When dealing with mold, mildew, or strong chemical cleaners, always wear gloves, safety goggles, and a respirator (N-95 or better).
- Ventilation: Maintain excellent airflow throughout the entire process. Open windows, use fans, and dehumidifiers to draw out moisture and fumes. Never paint in a poorly ventilated space.
- Professional Boundaries:
- Structural Damage: If you suspect structural issues (rot, shifting foundations), call a structural engineer.
- Major Mold Remediation: If the mold covers a large area (over 10 square feet) or if you suspect toxic mold (e.g., from sewage), do not attempt remediation yourself. Hire a certified mold remediation professional.
- Electrical Issues: Never attempt to repair electrical wiring or fixtures in a wet or suspect area.
Successfully painting over water stains is a testament to thorough preparation and patience. By adopting the “Repair-First, Paint-Last” philosophy, you transform a daunting cosmetic fix into a controlled, professional restoration project. Remember that the goal is not just to cover the stain, but to stabilize the surface and ensure the underlying structure is sound. Following these detailed steps will give you the confidence and knowledge needed to achieve a lasting, flawless finish.
Credit: www.homebuilding.co.uk Tools Materials Paintbrushes Paint Paint rollers Stain-blocking primer Drop cloths Sandpaper Painter’s tape Cleaning solution Putty knife Patching compound Plastic sheeting Drywall or plaster repair kit Frequently Asked Questions
How long must the area dry before I attempt to paint it?
This is perhaps the most critical step. The area must be completely dry—not just surface dry—before any patching or painting. If the material remains damp, the paint will not adhere properly and the residual moisture will continue to cause paint failure. Depending on the source of the leak and the humidity, drying can take anywhere from several days to several weeks. Use a dehumidifier and maintain excellent ventilation throughout the drying process.
Get the Fail-Safe Paint Color Playbook (Free PDF)
36 proven colors • 8 ready palettes • trim & sheen guide • printable testing cards.
Is a stain-blocking primer truly necessary, or can I just use regular paint?
A specialized stain-blocking primer is highly recommended and often essential. Water stains are not just color; they are mineral deposits (like rust or calcium) or tannins that are chemically reactive. Regular paint is designed to cover color, but it is not designed to seal these mineral deposits. The stain-blocking primer acts as a chemical barrier, preventing these residues from bleeding through and causing the stain to reappear through the final coat.
What should I do if the water damage has compromised the structural integrity of the wall?
If the damage involves significant crumbling, deep pitting, or warping of the drywall or plaster, do not proceed with cosmetic repairs. Structural failure requires professional attention. If you suspect underlying issues like rot, shifting foundations, or major compromised material, immediately stop the project and call a structural engineer or a licensed contractor specializing in water remediation. Your safety and the integrity of the building must come first.
Can I just paint over the stain without doing any deep cleaning or patching?
No. Attempting to paint directly over a stain without first identifying and fixing the source, cleaning the surface, and patching the underlying material is guaranteed to fail. Painting merely covers the problem temporarily. The stain will reappear because the source of the moisture or the compromised material remains. Always follow the structured process: Repair Source > Clean Surface > Patch > Prime > Paint.
Conclusion
How to Paint Over Water Stains works best when the plan, materials, safety steps, and finish goals all line up before work begins. Review the surface or tool condition, choose compatible products, and leave enough time for drying, cleanup, and final checks.
Use the guidance above as a practical checklist, then adjust it to the specific surface, workspace, product directions, and risk level. When the project involves fumes, damaged materials, business liability, or uncertain conditions, slow down and get qualified help before moving forward.