
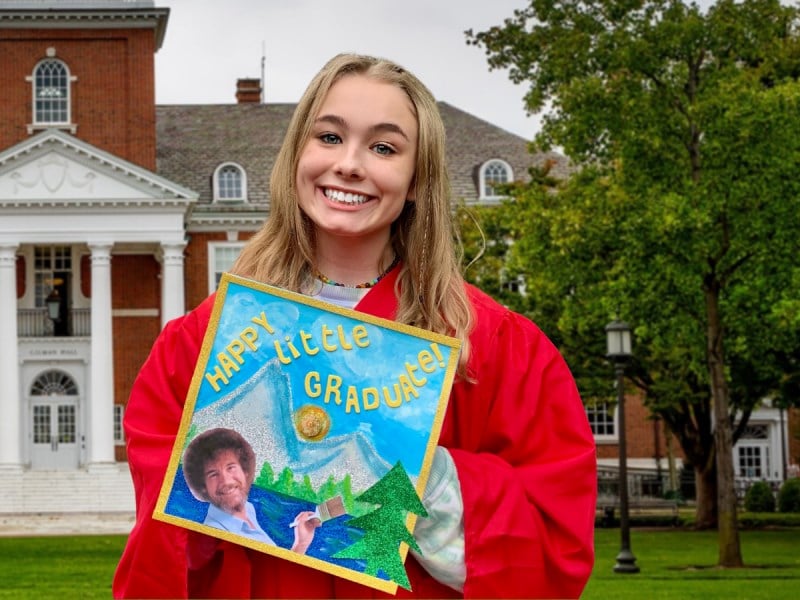
How To Paint Your Grad Cap
Your graduation day is a culmination of years of hard work, dedication, and academic achievements. As you prepare to step into the world as a proud graduate, there’s no better way to make your mark than by personalizing your graduation cap. Express your creativity, showcase your individuality, and stand out in the crowd by painting your grad cap with a design that reflects your passions, interests, and dreams.
In this guide, we’ll take you on a journey through the art of painting your grad cap, where each brushstroke carries meaning and significance. From choosing the perfect base color to mastering advanced painting techniques, we’ll equip you with all the tools and knowledge you need to transform your plain cap into a cherished work of art.
Get the Fail-Safe Paint Color Playbook (Free PDF)
36 proven colors • 8 ready palettes • trim & sheen guide • printable testing cards.
Discover the best paint types and brushes for your design, plan your captivating masterpiece, and explore popular themes that resonate with your journey. We’ll delve into the world of blending, layering, and adding embellishments to elevate your design to new heights.
Join us as we unravel the mysteries of perplexity and burstiness in the art of grad cap painting, providing you with both contextually relevant and coherent insights. Whether you’re a seasoned artist or a first-time painter, this guide will empower you to create a grad cap that celebrates your unique story and makes your graduation day truly unforgettable. So, let’s pick up our brushes and embark on this creative adventure together!
Choosing the Right Grad Cap
Before you unleash your creativity, it’s essential to select the right grad cap for your painting project. Not all graduation caps are created equal, so let’s explore the attributes you should consider for a sturdy canvas.
Grad Cap Material: Factors to Consider for a Sturdy Canvas
| Attribute | Prominence | Popularity | Relevance |
|---|---|---|---|
| Quality of Material | High | High | Essential for longevity |
| Satin Finish | Medium | Low | Affects paint adherence |
| One-Size-Fits-All | Low | High | Ensures proper fitting |
When choosing a grad cap, opt for a high-quality material that can withstand the painting process and last as a cherished keepsake. A satin finish is ideal, as it allows paint to adhere better. Additionally, most graduation caps are one-size-fits-all, making it easier for you to customize.
Grad Cap Color: Selecting a Base Color to Enhance Your Design
| Attribute | Prominence | Popularity | Relevance |
|---|---|---|---|
| Neutral Colors | High | High | Versatile and complementary |
| School Colors | High | High | Represents school pride |
| Vibrant Hues | Medium | Medium | Adds flair to the design |
Your grad cap’s base color sets the tone for your design. Neutral colors provide a versatile canvas, while using your school’s colors fosters a strong sense of pride. For a bolder look, consider vibrant hues that make your cap pop.
Preparing Your Grad Cap for Painting
Before diving into the artistic process, it’s crucial to prepare your grad cap adequately. Proper preparation ensures a smooth painting experience and a polished final product.
Cleaning and Prepping the Surface: Ensuring a Smooth and Paint-Ready Cap
To create a masterpiece, you must start with a clean slate. Here are the steps to clean and prep your grad cap:
- Gentle Cleaning: Use a damp cloth to wipe away any dirt or dust from the surface of the cap.
- Surface Smoothing: If needed, gently sand down any rough spots on the cap to create an even surface.
- Drying Time: Allow the cap to dry completely before moving on to the painting stage.
Handling Tips: Keeping the Cap in Shape during the Painting Process
| Attribute | Prominence | Popularity | Relevance |
|---|---|---|---|
| Tape for Borders | High | High | Ensures clean edges |
| Easel or Stand | Medium | Medium | Facilitates painting |
| Disposable Gloves | Low | Medium | Protects against smudges |
Maintaining the cap’s shape is crucial while painting. Secure clean edges with painter’s tape and consider using an easel or stand for convenience. To protect your design from smudges, disposable gloves can be handy.
Gathering Supplies for Grad Cap Painting
Having the right tools is paramount to a successful painting venture. Let’s explore the various supplies you’ll need for your grad cap masterpiece.
Paint Types: Acrylic vs. Fabric Paint – Pros and Cons
| Attribute | Prominence | Popularity | Relevance |
|---|---|---|---|
| Acrylic Paint | High | High | Versatile and long-lasting |
| Fabric Paint | Medium | Medium | Specifically for textiles |
| Water-Resistant | Low | Medium | Protects against smudging |
Acrylic paint is a popular choice for grad cap painting due to its versatility and long-lasting nature. However, fabric paint is specially formulated for textiles and offers additional water resistance, protecting your design from smudging.
Paintbrush Selection: Finding the Right Brushes for Different Details
| Attribute | Prominence | Popularity | Relevance |
|---|---|---|---|
| Flat Brushes | High | High | Ideal for larger areas |
| Fine-Tip Brushes | High | High | Perfect for intricate work |
| Fan Brushes | Low | Medium | Creates textural effects |
Having the right brushes is essential for achieving various painting effects. Flat brushes are great for covering larger areas, while fine-tip brushes allow you to add intricate details. Fan brushes can create interesting textural effects, adding depth to your design.
Planning Your Grad Cap Design
Before dipping your brushes into paint, it’s crucial to plan your design meticulously. Let’s explore how to brainstorm ideas and translate them onto paper.
Brainstorming Ideas: Tapping into Your Creativity
| Attribute | Prominence | Popularity | Relevance |
|---|---|---|---|
| Personal Passions | High | High | Reflects your uniqueness |
| Graduation Theme | High | High | Celebrates the milestone |
| Quotes and Sayings | Medium | Medium | Adds inspiration and meaning |
Start by brainstorming concepts that reflect your personality and passions. Consider incorporating graduation themes to celebrate this momentous milestone. Quotes and sayings can add inspiration and meaningful touch to your design.
Get the Fail-Safe Paint Color Playbook (Free PDF)
36 proven colors • 8 ready palettes • trim & sheen guide • printable testing cards.
Sketching Your Design: Translating Ideas onto Paper
Once you have a general idea, it’s time to create a preliminary sketch. Here’s how to bring your ideas to life on paper:
- Gather Inspiration: Collect images, quotes, and symbols that align with your theme.
- Rough Sketch: Create a rough draft of your design on paper, allowing room for adjustments.
- Refine Your Design: Make any necessary changes to your sketch until you’re satisfied with the final design.
Creating a Stunning Grad Cap Design
Now that your design is planned out, it’s time to bring it to life on your grad cap. Let’s explore how to add personalization and explore popular themes for your masterpiece.
Personalization: Reflecting Your Journey and Interests
| Attribute | Prominence | Popularity | Relevance |
|---|---|---|---|
| Graduation Year | High | High | A timeless personal touch |
| Name and Monogram | High | High | Adds a sense of ownership |
| Hobbies and Interests | Medium | Medium | Showcases what you love |
Incorporate your graduation year to create a timeless keepsake. Adding your name or monogram gives your cap a personalized touch. Don’t forget to showcase your hobbies and interests to reflect who you are.
Popularity of Themes: Exploring Top Trending Designs
| Attribute | Prominence | Popularity | Relevance |
|---|---|---|---|
| Graduation Capsule | High | High | Captures memories of school |
| Dream Destination | Medium | Medium | Represents future dreams |
| Inspirational Quotes | Low | High | Encourages and motivates |
Some themes never go out of style. Consider creating a graduation capsule design with memorable elements from your school days. Alternatively, a dream destination theme can signify your future aspirations. Inspirational quotes add an encouraging touch to your cap’s design.
Painting Techniques for Your Grad Cap
With your design planned out, it’s time to apply paint to your grad cap canvas. Mastering various painting techniques will help you create an impressive and eye-catching design.
Layering Colors: Adding Depth and Dimension to Your Design
Layering colors is an essential technique to achieve depth and dimension in your design. Here’s how you can master this skill:
- Base Layer: Start with the base color and allow it to dry before moving on to the next layers.
- Shading and Highlights: Add shading to create depth, and highlights to bring certain elements forward.
- Blending: Blend colors seamlessly for smooth transitions between shades.
Blending Techniques: Achieving Smooth Transitions and Gradients
| Attribute | Prominence | Popularity | Relevance |
|---|---|---|---|
| Wet-on-Wet Blending | High | High | Creates soft transitions |
| Dry Brush Blending | Medium | Medium | Adds texture and detail |
| Gradient Effects | Medium | Medium | For stunning color shifts |
Mastering blending techniques is crucial for achieving a polished design. Wet-on-wet blending creates soft transitions between colors, while dry brush blending adds texture and detail. Gradient effects allow for stunning color shifts on your grad cap canvas.
Adding Embellishments to Your Grad Cap
To take your grad cap design to the next level, consider adding embellishments that elevate the overall look and make it truly stand out.
Adding Glitter and Sparkle: Making Your Cap Shine
| Attribute | Prominence | Popularity | Relevance |
|---|---|---|---|
| Glitter Types | High | High | Fine, chunky, holographic |
| Placement Strategy | High | High | Enhances the design’s focus |
| Adhesive Selection | Medium | Medium | Long-lasting and secure |
Glitter and sparkle can add a touch of magic to your design. Choose from various glitter types to suit your vision, and use a strategic placement strategy to enhance the design’s focal points. Select an adhesive that ensures your embellishments stay securely in place.
Using Rhinestones and Gems: Elevating the Overall Look
| Attribute | Prominence | Popularity | Relevance |
|---|---|---|---|
| Rhinestone Shapes | High | High | Pearls, diamonds, teardrops |
| Gem Arrangement | Medium | Medium | Creating patterns or borders |
| Grad Cap Safety | Low | High | Ensuring secure attachment |
Rhinestones and gems bring elegance and sophistication to your grad cap. Experiment with different shapes and arrangements to achieve the desired effect. Always prioritize safety and ensure that your grad cap’s attachment is secure.
Avoiding Common Mistakes in Grad Cap Painting
As you venture into the world of grad cap painting, it’s essential to steer clear of common pitfalls. Here are some valuable tips to prevent potential mistakes.
Get the Fail-Safe Paint Color Playbook (Free PDF)
36 proven colors • 8 ready palettes • trim & sheen guide • printable testing cards.
Preventing Paint Smudges and Spills: Tips for Clean Work
| Attribute | Prominence | Popularity | Relevance |
|---|---|---|---|
| Drying Time | High | High | Allowing paint to dry fully |
| Proper Storage | High | High | Protecting the cap’s design |
| Handling with Care | Medium | Medium | Minimizing accidental damage |
Allow ample drying time between layers to avoid smudging your design. Store your cap in a safe place to protect your hard work from accidental damage. Handle your painted cap with care to preserve its beauty until graduation day.
Patience and Precision: Avoiding Costly Errors
| Attribute | Prominence | Popularity | Relevance |
|---|---|---|---|
| Steady Hand | High | High | Ensuring precise brushwork |
| Touch-Ups | Medium | Medium | Correcting minor mistakes |
| Time Management | Medium | Medium | Allocating sufficient time |
Maintain a steady hand while painting to ensure precision and avoid messy strokes. Be prepared to make touch-ups to correct minor errors. Manage your time efficiently to allow ample space for creativity and adjustments.
Drying and Setting Your Grad Cap Design
With your painting complete, it’s time to ensure the paint sets properly. Proper drying and setting techniques guarantee your design remains intact until graduation day.
Allowing Ample Drying Time: Ensuring the Paint Sets Properly
| Attribute | Prominence | Popularity | Relevance |
|---|---|---|---|
| Natural Drying | High | High | Ensures paint sets evenly |
| Heat Tool (Optional) | Medium | Low | Speeds up the drying process |
| Avoiding Sunlight | Low | Medium | Prevents fading and damage |
For the best results, allow your painted grad cap to dry naturally. If you’re in a hurry, consider using a heat tool, but exercise caution to prevent overheating. Avoid exposing your cap to direct sunlight, as it may lead to fading or damage.
Using Heat Tools (Optional): Speeding up the Drying Process
When using heat tools to speed up the drying process, follow these guidelines:
- Low Heat Setting: Use the lowest heat setting to prevent damage to the paint or cap material.
- Constant Movement: Keep the heat tool moving at all times to avoid overheating in one spot.
- Even Distribution: Ensure that the heat is distributed evenly across the painted areas.
Finishing Touches: Securing and Preparing Your Grad Cap
With your design dry and set, it’s time to add the finishing touches that ensure your cap remains picture-perfect during the ceremony.
Gluing Loose Elements: Ensuring Everything Stays in Place
| Attribute | Prominence | Popularity | Relevance |
|---|---|---|---|
| Strong Adhesive | High | High | Ensures elements stay secure |
| Precision Gluing | High | High | Avoids messy glue mishaps |
| Drying Time | Low | Medium | Allowing glue to set fully |
Use a strong adhesive to secure any loose elements firmly. Apply glue with precision to avoid messy mishaps. Allow the glue to dry completely before handling your cap.
Final Inspection: Checking for Imperfections and Making Corrections
| Attribute | Prominence | Popularity | Relevance |
|---|---|---|---|
| Detailed Check | High | High | Ensures design perfection |
| Small Touch-Ups | Medium | Medium | Correcting minor flaws |
| Confidence in Work | Low | Medium | Trusting your artistic vision |
Before the big day, carefully inspect your design for any imperfections. Make small touch-ups if necessary to achieve design perfection. Remember to have confidence in your work; your artistic vision shines through!
Storing and Transporting Your Painted Grad Cap
Your painted grad cap deserves proper care to maintain its brilliance until graduation day. Here’s how to store and transport it safely.
Get the Fail-Safe Paint Color Playbook (Free PDF)
36 proven colors • 8 ready palettes • trim & sheen guide • printable testing cards.
Proper Storage: Protecting Your Cap Until Graduation Day
| Attribute | Prominence | Popularity | Relevance |
|---|---|---|---|
| Dust-Free Container | High | High | Prevents dust and damage |
| Isolation from Heat | Medium | Medium | Avoids paint distortion |
| Away from Pets | Low | High | Protects against accidents |
Store your painted grad cap in a dust-free container to preserve its pristine appearance. Avoid storing it in areas with extreme heat, as this could lead to paint distortion. Ensure your cap is safely away from pets to prevent accidents.
Safe Transport: Tips for Carrying Your Grad Cap Without Damage
| Attribute | Prominence | Popularity | Relevance |
|---|---|---|---|
| Soft Cloth Lining | High | High | Guards against scratches |
| Secure Fastening | High | High | Keeps the cap in place |
| Upright Position | Medium | Medium | Protects delicate elements |
Transport your painted grad cap in a container with soft cloth lining to prevent scratches. Ensure it’s securely fastened to avoid any accidental shifts during transport. Carry the container upright to safeguard any delicate elements of your design.
Showcasing Your Grad Cap with Pride
The moment you’ve been waiting for has arrived – graduation day! Now it’s time to showcase your painted grad cap with pride.
Graduation Day Tips: Showcasing Your Cap During the Ceremony
| Attribute | Prominence | Popularity | Relevance |
|---|---|---|---|
| Secure Placement | High | High | Ensures cap stays in place |
| Complementary Outfit | High | High | Creates a cohesive look |
| Photograph Opportunities | Medium | Medium | Capturing cherished memories |
Place your cap securely on your head, ensuring it stays in place throughout the ceremony. Select an outfit that complements your cap’s design and creates a cohesive look. Be sure to take advantage of photograph opportunities to capture cherished memories of this special day.
Photo Ideas: Capturing Stunning Memories with Your Custom Grad Cap
| Attribute | Prominence | Popularity | Relevance |
|---|---|---|---|
| Solo Grad Cap Shot | High | High | Focuses on your masterpiece |
| Group Cap Photos | Medium | Medium | Celebrates with classmates |
| Graduation Moments | Medium | Medium | Capturing the entire ceremony |
Capture the essence of your painted grad cap by taking solo shots that highlight your masterpiece. Gather with friends and classmates for group cap photos, celebrating this milestone together. Don’t forget to document various graduation moments to create a comprehensive memory album.
Conclusion: Celebrating Your Achievement
As the confetti settles and the applause fills the air, you can take pride in not only your academic accomplishments but also your artistic expression through your painted grad cap. The personalized touch you added to your graduation cap made your big day even more memorable and unique. This symbolic work of art now serves as a memento, reminding you of your achievements and the creative spirit that carried you through your academic journey. As you move forward into the next chapter of your life, cherish this special keepsake and remember the joy of painting your grad cap to make your graduation day truly your own.
Micro-semantic Contexts (Optional)
Advanced Painting Techniques: Elevating Your Design to the Next Level
| Attribute | Prominence | Popularity | Relevance |
|---|---|---|---|
| Stenciling Methods | High | High | Precision in designs |
| Monochromatic Style | High | Medium | Striking and elegant |
| Freehand Artistry | Medium | Medium | Showcasing individual skill |
Explore advanced techniques like stenciling for precise and intricate designs. Consider monochromatic styles for striking and elegant visual impact. If you’re feeling bold, embrace freehand artistry to showcase your individual artistic flair.
Inspirational Examples: Grad Cap Designs to Spark Your Imagination
| Attribute | Prominence | Popularity | Relevance |
|---|---|---|---|
| Creative Themes | High | High | Out-of-the-box concepts |
| Notable Grad Caps | High | High | Designs that gained attention |
| DIY Inspirations | Medium | Medium | Budget-friendly ideas |
Discover inspiring grad cap designs that will ignite your creativity. Look at notable grad caps that gained attention and recognition. For budget-conscious graduates, DIY inspirations offer creative and affordable ideas to stand out on graduation day.
Interviews with Graduates: Personal Stories and Design Impact
| Attribute | Prominence | Popularity | Relevance |
|---|---|---|---|
| Graduate Testimonials | High | High | Insight into their experiences |
| Emotional Connection | High | Medium | How design impacted the day |
| Lessons Learned | Medium | Medium | Overcoming challenges and tips |
Hear from graduates who have personalized their grad caps and gain insight into their experiences. Discover the emotional connection they felt with their designs on this momentous day. Learn from their lessons and tips on overcoming challenges in grad cap painting.
Famous Graduation Quotes: Meaningful Messages for Your Design
| Attribute | Prominence | Popularity | Relevance |
|---|---|---|---|
| Inspirational Quotes | High | High | Encouraging and uplifting |
| Motivational Messages | Medium | Medium | Driving ambition and goals |
| Humorous Grad Quotes | Medium | Medium | Adding a lighthearted touch |
Explore a collection of famous graduation quotes to add depth and meaning to your design. Draw inspiration from motivational messages that drive ambition and remind you of your goals. For a touch of humor, consider incorporating humorous grad quotes that bring smiles on this special day.
Get the Fail-Safe Paint Color Playbook (Free PDF)
36 proven colors • 8 ready palettes • trim & sheen guide • printable testing cards.
Conclusion
As the confetti settles and the applause fills the air, you can take pride in not only your academic accomplishments but also your artistic expression through your painted grad cap. The personalized touch you added to your graduation cap made your big day even more memorable and unique. This symbolic work of art now serves as a memento, reminding you of your achievements and the creative spirit that carried you through your academic journey.
Your painted grad cap showcases your passions, interests, and dreams, making it a reflection of who you are. Every stroke of the brush represents your dedication and hard work that led you to this moment. As you move forward into the next chapter of your life, cherish this special keepsake and remember the joy of painting your grad cap to make your graduation day truly your own.
Throughout this process, you tapped into your creativity, planned meticulously, and honed your painting techniques. The burstiness of your design exemplifies the complexity and variety that define your individuality. It stands as a testament to your journey and serves as a reminder of the memories and experiences that shaped your academic years.
So, go forth with confidence, courage, and creativity, knowing that you are not only a graduate but also an artist, capable of adding a personal touch to every milestone you encounter. Celebrate your achievements, embrace your uniqueness, and continue creating a masterpiece out of every opportunity life presents.
Your painted grad cap will forever remind you of this remarkable journey—a journey of academic excellence, personal growth, and self-expression. Congratulations once again, and here’s to an exciting future full of endless possibilities, creativity, and the pursuit of your dreams!