
How Many Coats of Paint Over Primer
Painting a room or piece of furniture is one of the most rewarding and transformative home improvement projects you can undertake. It’s a process that breathes new life into a space, but it can also feel overwhelming when faced with a mountain of paint cans and conflicting advice. The most common question, and often the most confusing, is: how many coats of paint should I apply over primer?
The truth is that there is no single, universal answer. The ideal number of coats depends on a complex interplay of factors, including the type of paint you choose, the original surface condition, the degree of color change, and even the specific lighting in the room. Understanding these variables is the key to achieving a professional, flawless, and durable finish that lasts for years.
Get the Fail-Safe Paint Color Playbook (Free PDF)
36 proven colors • 8 ready palettes • trim & sheen guide • printable testing cards.
Quick answer: How Many Coats of Paint Over Primer depends on the unit being measured, the product formula, and the surface or container involved. Use the manufacturer’s coverage chart, label, or technical data sheet, then calculate with the stated gallons, square feet, coats, or weight rather than relying on a one-size estimate.
Planning Your Project Before You Dip the Brush
Before you even open the paint can, the most critical work happens in the planning phase. Skipping preparation steps is the fastest way to an uneven, patchy, or lackluster finish. This initial assessment phase involves more than just checking your paint budget; it requires assessing the entire environment.
Assessing the Surface and Substrate
The surface material dictates the primer and paint you need. Drywall, for instance, requires a different primer and handling process than bare, knotty wood, or smooth plaster. Inspect every square foot of your intended painting area. Look for hairline cracks, bubbling paint, loose edges, or deep scratches. These imperfections must be addressed—filled, sanded, and treated—before priming. If the surface is compromised, the paint will merely follow the flaw, making the issue visible.
Understanding Porosity and Adhesion
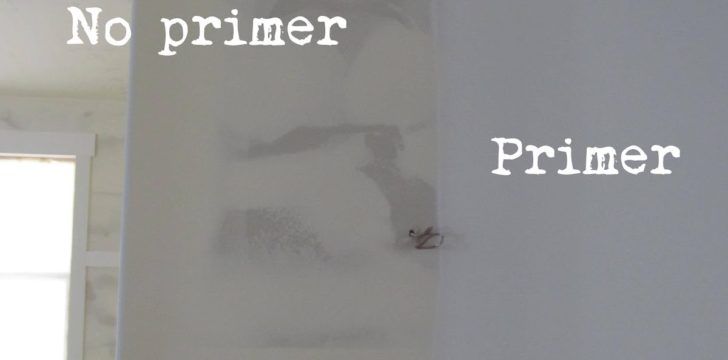
A key technical concept to grasp is ‘porosity.’ Porous surfaces, such as new drywall, bare wood, or unsealed concrete, are highly absorbent. When paint hits a porous surface, it soaks up the liquid quickly, which can dramatically reduce the paint’s effective coverage area. This rapid absorption necessitates a dedicated primer or sealer. The primer’s job is not just to color-match, but to seal the surface, creating an even, consistent barrier that ensures the topcoat has a predictable amount of material to cover.
Timing and Environment
Consider the environmental factors, particularly humidity and temperature. Extreme conditions can drastically slow down curing or drying times, leading to improper application. For optimal results, most paints require moderate temperatures (usually 50°F to 85°F) and adequate ventilation. If you are painting in a bathroom (high humidity) or a garage (temperature swings), you must adjust your drying time expectations and select moisture-resistant paints accordingly. Never rush the drying time between coats.
The selection of paint type—latex, oil-based, or specialized—is perhaps the most influential factor determining coat requirements. Each paint system has unique properties regarding breathability, durability, and drying time.
Latex (Water-Based) Paints
Latex paints are the most common choice for interior residential painting due to their low odor, quick clean-up, and generally good breathability. They are ideal for most drywall and interior wood surfaces. When using latex, the number of coats is primarily dictated by the visibility of the underlying color or surface inconsistencies. While they generally require only one topcoat over a quality primer, a second coat is highly recommended when transitioning across a large color shift (e.g., painting from deep burgundy to crisp white) to ensure the new color fully masks the previous pigment.
Oil-Based Paints (Alkyd)
Oil-based paints are renowned for their superior durability, hardness, and excellent adhesion, making them historically popular for trim, doors, and high-wear surfaces. They create a very tough, protective shell. However, they have a stronger odor, dry slower than latex, and can yellow over time if not properly sealed. Because of their high density and strong coverage, oil paint can sometimes mask underlying colors very effectively, but they also tend to be more difficult to apply evenly. They are often best used in combination with high-quality oil-based primers on bare wood or metal.
Specialized Paints and Coatings
Beyond standard latex and oil, there are specialized coatings for specific environments. For instance, high-humidity areas like bathrooms or laundry rooms benefit from mildew-resistant or semi-gloss acrylic enamels. If you are painting over old, deeply stained wallpaper, you must use a specialized shellac or stain-blocking primer, as a standard primer will fail to seal the intense staining power, requiring more topcoats to achieve coverage.
How Paint Sheen and Color Theory Affect Coverage
The final aesthetic outcome is heavily influenced by the paint’s sheen (or finish) and how color theory interacts with light. These factors are critical to determining if a single coat will look patchy or if multiple coats are necessary to achieve depth.
Understanding Paint Sheen
Sheen refers to how much light a painted surface reflects. It is not just a cosmetic choice; it affects durability and cleaning.
- Matte/Flat: Absorbs light and is best for large wall areas where you want a subtle, non-reflective finish. It is excellent at hiding minor surface imperfections, but it is the hardest sheen to clean.
- Satin/Eggshell: Offers a slight, soft glow. This is the most versatile choice for living areas. It balances washability (making it easy to wipe down) with a good disguise for minor wall imperfections.
- Semi-Gloss: Highly durable and washable. Ideal for high-contact areas like trim, doors, and kitchen cabinets. The high reflection makes imperfections visible, so prep work must be impeccable.
- High-Gloss/Enamel: Provides maximum reflectivity and extreme durability. Best used on small, visible architectural elements or specialized furniture restoration.
If you are switching from a matte wall to a semi-gloss trim, the difference in reflectivity may require careful color matching and potentially an additional coat to ensure a seamless transition.
Color is rarely just “red” or “blue”; it has undertones (hints of yellow, green, or purple). These undertones interact dramatically with the natural and artificial light in your room. A light gray paint, for example, might look cool and bluish in the morning sun but warm and greenish under incandescent evening light. When you test your paint, do not rely solely on the sample card; test it in the actual room at different times of day. If the undertones clash or shift dramatically, a second coat with a high-quality, opaque paint is often needed to ‘settle’ the color and achieve consistency.
Materials and Tools Checklist
Proper tools are essential for maximizing coverage and minimizing waste. Investing in quality equipment ensures that paint is applied evenly, reducing the need for corrective coats.
- Primer/Sealer: Always select a primer formulated specifically for your substrate (e.g., drywall compound primer, bare wood conditioner).
- Paint: Choose a high-quality paint brand known for its coverage and opacity ratings.
- Tools: Use extension poles for rollers and high-quality, synthetic-bristle brushes suitable for the paint type.
- Prep Supplies: Sandpaper (various grits), patch filler, paintable caulk, cleaning solvents (TSP substitute), drop cloths, painter’s tape.
- Safety Gear: Gloves, safety glasses, and appropriate respirators (especially when sanding or dealing with old paint).
Common Painting Mistakes to Avoid
Even experienced DIY painters make mistakes. Knowing these pitfalls can save you hours of frustration and multiple coats of paint.
- Skipping Surface Cleaning: Dust, grease, and residue are the enemies of adhesion. Always wash the area thoroughly with a suitable cleaner before priming.
- Ignoring Drying Times: Applying a coat before the previous one is fully dry leads to poor adhesion, cracking, and difficulty in leveling the finish. Always check the manufacturer’s recommended minimum drying time.
- Using the Wrong Primer: Using a general-purpose primer on bare metal or highly porous wood will fail. Always match the primer to the substrate.
- Inconsistent Technique: Applying paint in uneven passes (some areas thick, some thin) will cause blotchiness, making it look like the paint coverage is insufficient, even if it isn’t.
Safety and Practical Considerations
Safety must always be the top priority. When dealing with chemicals, solvents, or old building materials, protective measures are non-negotiable. Always ensure proper ventilation by opening windows and using fans, even if the product label suggests otherwise. When sanding or scraping old paint, wear a respirator to prevent inhaling potentially hazardous materials, especially if the paint is suspected to be lead-based. If you encounter lead paint or asbestos, stop immediately and call a professional abatement specialist. Always consult local building codes and manufacturer specifications regarding product usage and handling.
Achieving a Professional Finish
In summary, while the instinct may be to apply three or four coats to be safe, the most professional results come from meticulous preparation and thoughtful material selection. By correctly priming the surface, selecting a paint system that complements your substrate and desired sheen, and allowing adequate drying time between coats, you can achieve a beautiful, durable, and consistent finish.
Remember that the number of coats is less about brute force and more about process efficiency. Take your time, clean thoroughly, and always test your color and coverage in a small, inconspicuous area before committing to the entire room. With careful planning and adherence to manufacturer guidelines, you are well-equipped to transform your space with confidence and skill.
Frequently Asked Questions
How many coats of paint do I really need over primer?
There is no single rule, but successful painting is about coverage and consistency. Generally, one high-quality coat of paint over a properly applied primer is sufficient. However, you must apply a second coat if you are making a significant color shift (e.g., dark to light), painting over deeply stained surfaces, or if the paint brand recommends it. Always check the manufacturer’s instructions, as they are specific to the paint type and substrate.
Get the Fail-Safe Paint Color Playbook (Free PDF)
36 proven colors • 8 ready palettes • trim & sheen guide • printable testing cards.
What is the difference between a primer and a sealer?
While both prepare the surface, they serve different primary functions. A primer is designed to improve adhesion and provide a uniform base for the paint to stick to, especially on difficult materials like bare metal or glossy surfaces. A sealer is primarily used to block absorption (porosity) or to stabilize the substrate, such as when sealing raw wood or old wallpaper. If your surface is extremely porous, a quality sealing primer is essential to prevent the paint from soaking in too quickly.
What if I am painting over old, stained wallpaper or deeply colored wood?
Do not use a standard primer. These surfaces require a specialized stain-blocking or shellac-based primer. Standard primers will fail to fully seal intense stains, causing the stain to bleed through the topcoats. For heavily soiled or stained surfaces, you may need multiple coats of the specialized primer, followed by two coats of topcoat, to ensure the desired color is achieved consistently.
What are the safety precautions I must take before starting?
Safety is paramount. Always wear appropriate personal protective equipment (PPE), including safety glasses and gloves. If you are sanding, scraping, or dealing with paint older than 40 years, you must assume the presence of lead paint and use a respirator rated for lead particulates. Always ensure adequate ventilation by opening windows and using fans. If you suspect lead paint or asbestos, stop immediately and hire a professional abatement specialist.
Conclusion
How Many Coats of Paint Over Primer works best when the plan, materials, safety steps, and finish goals all line up before work begins. Review the surface or tool condition, choose compatible products, and leave enough time for drying, cleanup, and final checks.
Use the guidance above as a practical checklist, then adjust it to the specific surface, workspace, product directions, and risk level. When the project involves fumes, damaged materials, business liability, or uncertain conditions, slow down and get qualified help before moving forward.