
How Much Does It Cost to Paint a Car Bumper? A Step-by-Step Guide
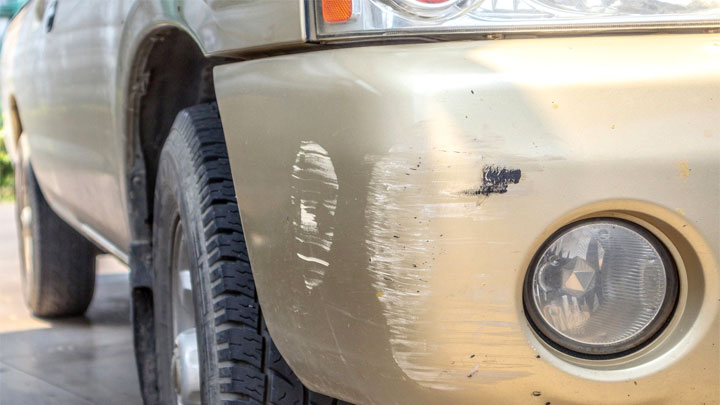
The bumper is far more than just a protective barrier; it is a critical component of both the structural integrity and the overall aesthetic appeal of your vehicle. Whether dealing with minor scuffs from parking or deep gouges from a minor collision, restoring the bumper’s finish is an excellent way to revitalize the car’s appearance and maintain its curb appeal. However, because bumpers are subjected to extreme environmental factors—UV exposure, road grit, temperature swings, and physical impact—the restoration process is complex and demands careful attention to detail.
Achieving a factory-quality finish requires far more than simply applying paint. It involves a multi-stage process that includes meticulous surface preparation, specialized material application (such as automotive-grade fillers and primers), and a controlled painting regimen. Understanding the scope of work, the correct materials, and the proper safety protocols is the key to a durable and visually flawless outcome, whether you choose to tackle the project yourself or hire a professional.
Get the Fail-Safe Paint Color Playbook (Free PDF)
36 proven colors • 8 ready palettes • trim & sheen guide • printable testing cards.
Quick answer: Painting a car bumper costs $50 to $200 for a DIY restoration with automotive-grade fillers, primer, and paint, or $300 to $1,000+ at a professional body shop. The cost depends on damage severity ranging from minor scuffs and fading to deep gouges requiring body filler and structural reinforcement, the bumper material (thermoplastic polyurethane or metal), and the multi-stage process of surface cleaning, sanding, adhesion priming, and controlled paint application.
Planning Before You Start: Assessing the Damage and Scope
Before purchasing a single can of paint or piece of sandpaper, you must accurately assess the damage. This initial damage assessment dictates the entire scope, the required materials, and the budget. Are we talking about simple surface fading, or are we dealing with structural damage?
1. Damage Categorization:
- Minor Scuffs/Fading: These are superficial scratches or color degradation. A specialized automotive touch-up paint or rubbing compound may suffice.
- Dings/Scratches (Cosmetic): The paint layer is broken, but the underlying plastic/metal is intact. This requires surface filling and careful sanding to create a smooth transition before painting.
- Deep Gouges/Impact Damage: The plastic or metal itself is cracked, missing, or significantly deformed. This necessitates body filler, structural reinforcement, and careful sanding to rebuild the contour before any paint can be applied.
2. Material Identification:
Knowing whether your bumper is made of thermoplastic polyurethane (common on modern plastic bumpers) or if it is metal (older vehicles) is crucial. These materials require different primers, fillers, and adhesion techniques. Plastic bumpers are often porous and sensitive to heat, while metal requires rust treatment and specific rust-inhibiting primers. Always consult a professional or a detailed parts diagram if you are unsure of the base material.
The Automotive Bumper Restoration Process: Step-by-Step Guide
This process is broken down into five critical phases. Skipping any step, especially surface cleaning or proper priming, will lead to paint failure, peeling, or poor adhesion, regardless of how good the paint job looks initially.
Phase 1: Deep Cleaning and Degreasing
This is arguably the most neglected step. Paint will not adhere properly if the surface has residual oil, wax, dirt, or road grime. The bumper must be thoroughly cleaned and degreased. Start by washing the bumper with a strong car wash soap to remove loose debris. Next, use a dedicated automotive degreaser (not household cleaners) and a stiff brush to scrub the entire area. Rinse thoroughly and allow the surface to dry completely. If possible, lightly sanding the entire surface with 320-grit sandpaper after degreasing can help remove the remaining oily residue and create a perfect ‘tooth’ for the primer to grip.
Phase 2: Repairing Damage and Filling
If the bumper has dents, gouges, or deep scratches, fillers are required. Do not simply use household spackle; you must use automotive-grade body filler designed for plastic or metal. Apply the filler in thin, even layers, allowing each layer to cure completely according to the manufacturer’s instructions. Once the filler is dry, begin sanding. Start with a coarse grit (e.g., 80-grit) to remove the bulk of the filler material, gradually moving to medium grits (180-grit) to smooth the contour, and finally finishing with 220-grit to achieve a prep-sanding smoothness.
Phase 3: Priming for Adhesion
Primer is the glue that holds the paint to the surface. It seals the filler, prevents rust (if applicable), and provides a uniform base coat.
- Material Choice: Use a specialized self-etching primer or a dedicated plastic primer, depending on the bumper material. Never use a general-purpose paint primer on bare plastic.
- Application: Apply the primer according to the manufacturer’s recommended thickness and number of coats. The primer must be allowed to cure fully—do not rush this step.
Phase 4: Base Coat Application (Color Match)
The base coat provides the actual color. This is where having the vehicle’s original manufacturer (OEM) color code is absolutely non-negotiable. Automotive paint color is highly specific, and even slight variations will be noticeable.
Apply the base coat using an HVLP (High Volume Low Pressure) spray system if possible, as this provides the most professional, even coverage. Apply several thin, even coats, allowing adequate flash time (the time needed for solvents to evaporate between coats) between each application. Do not try to cover the entire area in one thick coat, as this will lead to drips and uneven saturation.
Phase 5: Clear Coating (Protection and Shine)
The clear coat is the protective shield that gives the bumper its final deep shine and durability. It seals the base color and protects it from UV degradation and minor abrasions.
- Application: Apply the clear coat evenly over the entire painted area. Clear coats are highly sensitive to temperature and humidity, so ensure ideal conditions.
- Curing Time: The clear coat requires a significant curing time—often 24 to 72 hours, depending on the manufacturer and weather—before the bumper can be exposed to moisture or subjected to impacts. Do not rush the curing process.
Materials and Tools Checklist
Successful painting relies on having the right tools, not just the right paint. Organizing your supplies by function will streamline the process and prevent costly mistakes.
- Automotive Degreaser and Wax Remover
- Various Grit Sandpaper (80, 180, 220, 320 grit)
- Plastic Sanding Discs and Block
- Cleaning Rags and Tack Cloths
- Painter’s Masking Tape and Plastic Sheeting
Repair and Priming Materials
- Automotive Body Filler (appropriate for plastic or metal)
- Self-Etching Primer or Specialized Plastic Primer
- Automotive Primer Surfacer (optional, for extra depth)
- OEM Color-Matched Automotive Base Coat Spray (with color code)
- 2K Urethane Clear Coat (highly durable, professional grade)
- HVLP Spray System and Air Compressor (recommended for best results)
- Paintbrushes (for touch-ups only)
Design and Color Tips: Achieving a Perfect Match
Color matching for automotive paint is an art science, requiring more care than painting a wall. The final look is influenced by three major factors: the original factory finish, the undertones, and the ambient lighting.
Understanding Undertones and Sheen:
Every color has undertones—the subtle color that shows through the main hue. A “grey” paint might have blue undertones in certain light and brown undertones in others. When choosing a color, always compare samples under various lighting conditions (direct sunlight, overcast sky, indoor garage light). Similarly, the finish (sheen) matters:
- Gloss: Highly reflective, providing a deep, mirror-like finish. Excellent for modern, high-impact looks.
- Semi-Gloss: Offers a noticeable shine but is slightly more forgiving than high gloss. A good balance of durability and appearance.
- Matte/Satin: Non-reflective, providing a subdued, sophisticated, or “stealth” look. Requires careful preparation to avoid visible texture.
Color Pairing and Context:
While the bumper color should ideally match the original factory paint, sometimes a slight departure in sheen or tone can be desirable to match other trim pieces. If the bumper is painted to complement the body, ensure the base coat and clear coat are mixed and applied with the same consistency. Never mix paint types or sheens from different sources, as they will not bond chemically or visually.
Mistakes to Avoid When Painting a Bumper
The biggest pitfall in bumper restoration is rushing the process. These common mistakes are the leading causes of paint failure and costly repairs.
- Skipping Degreasing: Applying paint over oily residue is the fastest way to cause the paint to peel or bubble months later.
- Using Household Paint: Standard spray paint or wall paint is not formulated for the extreme temperatures, chemicals, and physical stresses of a vehicle. It will fade, crack, and peel quickly.
- Insufficient Sanding: If the surface filler or primer isn’t sanded perfectly smooth, the final paint coat will highlight the texture, leaving visible ripples or uneven spots.
- Ignoring Curing Time: Attempting to clean or use the bumper before the clear coat has fully cured can damage the surface and compromise the entire finish.
Safety and Practical Notes
Due to the use of solvents, fillers, and specialized chemicals, safety cannot be overstated. Treat this project with the same respect you would a professional auto body shop.
- Personal Protective Equipment (PPE): Always wear a certified respirator mask (rated for organic vapors), chemical-resistant gloves, and safety goggles. These items protect you from paint fumes, sanding dust, and chemical burns.
- Ventilation: Work outdoors or in a professional-grade, extremely well-ventilated garage. Never attempt this process in a confined or poorly ventilated indoor space.
- Disposal: Follow all local regulations for the disposal of paint waste, solvents, and sanding dust. Do not pour these chemicals down household drains.
- When to Call a Professional: If the damage involves structural metal damage, extensive rust, or if you are unsure about the chemical composition of the original bumper, it is strongly recommended that you consult a licensed auto body technician. They have specialized equipment and knowledge that DIY kits cannot replicate.
Frequently Asked Questions
When should I hire a professional auto body shop instead of DIY?
If the damage is structural (e.g., deep rust, extensive metal deformation, or if the bumper mounting points are damaged), professional intervention is strongly recommended. Furthermore, if you are unsure of the original bumper material, or if the vehicle is an antique requiring specialized methods, a professional has the necessary equipment (like proper paint booths and specialized fillers) and knowledge to ensure the best outcome. Always prioritize safety and structural integrity over cost savings.
What is the most critical step to prevent paint from peeling or failing?
The most critical step is the preparation, specifically the thorough degreasing and cleaning (Phase 1). Paint will not adhere properly if the surface retains any residual oils, wax, road grime, or silicone residue. You must use a dedicated automotive degreaser, scrub the area, and rinse completely. Skipping or rushing this step guarantees adhesion failure, regardless of how high-quality the paint or primer is.
Get the Fail-Safe Paint Color Playbook (Free PDF)
36 proven colors • 8 ready palettes • trim & sheen guide • printable testing cards.
The physical labor (cleaning, sanding, filling, applying coats) can take several hours spread over a day or two. However, the total time required is dictated by the drying and curing times. You must plan for multiple days: Day 1 (Prep/Filling/Primer), Day 2 (Base Coat), and then a mandatory waiting period of 24 to 72 hours for the clear coat to fully cure before the bumper can be handled or exposed to weather. Rushing the cure time is the biggest mistake.
If I don’t know if my bumper is plastic or metal, what should I do?
Do not proceed with painting until the material is identified. The required primers, fillers, and preparation methods are completely different. If the bumper is plastic, you need a specialized plastic primer and caution against heat. If it is metal, rust treatment and specific rust-inhibiting primers are mandatory. If you cannot confirm the material, consulting a professional auto body technician or referencing the vehicle’s manufacturer parts diagram is necessary to ensure you buy the correct adhesion materials.
Are standard household paints adequate for bumper restoration?
No. Standard household paint or general-purpose spray paint is not formulated to withstand the extreme environmental factors a car bumper encounters, such as UV radiation, temperature fluctuations, chemical exposure, and physical impacts. These paints are designed for indoor, controlled environments. You must use specialized, two-part (2K) automotive urethane systems for both the base coat and the clear coat to achieve durability and proper adhesion.
Conclusion
Restoring a car bumper is a rewarding project that dramatically improves the vehicle’s appearance. However, the success of the job is measured not by the paint itself, but by the preparation that precedes it. Dedicate ample time to cleaning, filling, and priming, and treat the final painting stages with precision.
By understanding the difference between basic touch-up paint and professional-grade urethane systems, and by prioritizing safety at every stage, you can achieve a durable, deep, and factory-quality finish that will last for years to come.