
How to Apply General Finishes Milk Paint: A Step-by-Step Guide
Transforming old furniture or dull wooden surfaces with General Finishes Milk Paint is one of the most satisfying and accessible DIY projects. This beautiful, water-based paint allows you to achieve the timeless, rustic charm of traditional milk paint while benefiting from the robust durability of modern acrylic binders. Whether you are tackling a delicate antique dresser or revamping kitchen cabinetry, this guide will elevate your skills from beginner to confident DIY expert.
Unlike simple decorative paints, General Finishes Milk Paint requires a methodical approach, ensuring that the final piece is not only beautiful but also structurally sound and resistant to wear. We will guide you through every stage—from initial surface assessment and priming to advanced application techniques and protective topcoating—so you can achieve a professional, gallery-quality finish that lasts for years to come.
Get the Fail-Safe Paint Color Playbook (Free PDF)
36 proven colors • 8 ready palettes • trim & sheen guide • printable testing cards.
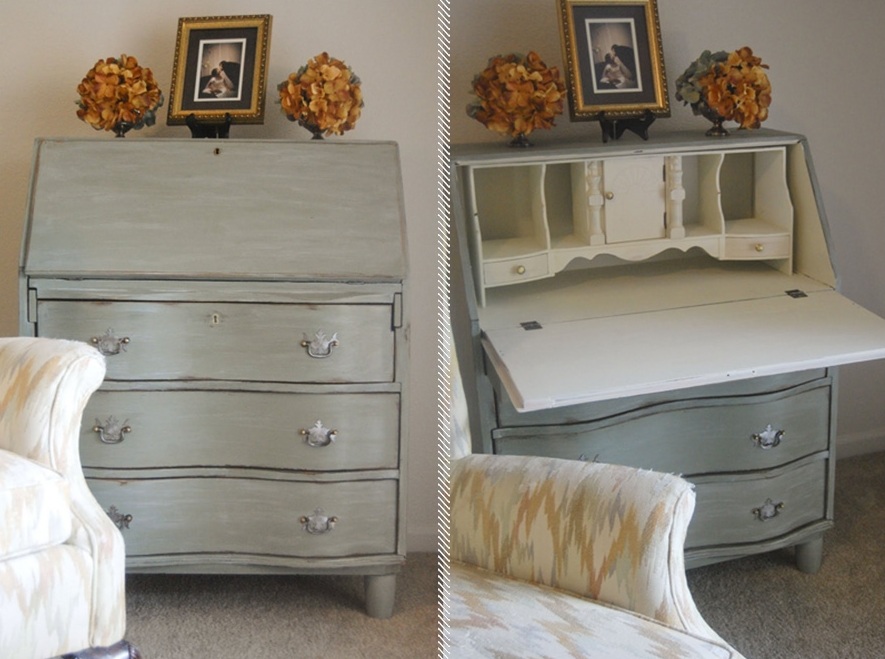
Quick answer: To Apply General Finishes Milk Paint, start with the safest first step for the material involved, test a small area when needed, and follow the process in thin, controlled stages. Use proper ventilation and protective gear when chemicals, sanding, spraying, or solvents are involved.
Planning Your Project Before the First Brushstroke
A successful painting project begins long before the paint can is opened. Proper planning is the single most critical step, as it dictates the outcome, required materials, and timeline. Before you even look at a color swatch, you must assess your piece and your environment.
Assessing the Surface and Structure
Take inventory of the piece you plan to paint. Is it solid wood, particleboard, laminate, or metal? Note any structural weaknesses, loose joints, or flaking paint. If the furniture is structurally compromised, address those repairs first—don’t rely on paint to fix rotten wood. Inspect the surface for any underlying contaminants, such as residual varnish, heavy grease, or sticky residue, as these will prevent proper paint adhesion.
Furthermore, consider the piece’s function. Will this piece be a side table (low wear) or a dining table (high wear, liquid contact)? This assessment directly influences which protective topcoat you must select later.
Understanding Light and Undertones
Color selection is not just about the visible shade; it’s about how that shade interacts with light. Where will the piece live? Is it in a bright, south-facing window with intense natural light, or in a cozy, north-facing room with soft, cool light? Different lighting conditions will make the same paint color appear dramatically different. Always buy sample pots and test them on a piece of scrap wood in the actual room to observe how the color shifts throughout the day.
Be mindful of undertones. Some “creamy whites” might have a slight yellow or beige undertone, while others might be cooler and lean gray. Understanding these subtle undertones is key to achieving a cohesive, intentional look rather than an accidental mismatch.
General Finishes Milk Paint: A Step-by-Step Guide to Application
This detailed process ensures that every surface is prepared to accept the paint and that the application is flawless, giving you the confidence to tackle any piece.
1. Surface Preparation: The Foundation of Success
This stage is non-negotiable. Skipping it is the number one cause of paint failure. The goal is to create a surface that is clean, stable, and receptive to paint adhesion.
Cleaning: Begin by thoroughly cleaning the entire piece. Use a mild detergent or a specialized degreaser (like TSP substitute) to remove all accumulated grime, oils, and wax. Rinse completely with clean water and allow the piece to dry for at least 24 hours. The surface must be completely free of moisture.
Sanding: Use a progression of sandpaper grits. Start with 120-grit sandpaper to remove existing layers of paint, varnish, or major imperfections. Once the bulk of the old finish is removed, switch to 150-grit sandpaper to smooth the entire surface. Finally, use 220-grit sandpaper to smooth the areas that will receive the topcoat. Always sand gently and follow the natural grain of the wood.
Dust Removal: After sanding, wipe down the entire piece multiple times with a tack cloth or a microfiber cloth dampened with mineral spirits (if appropriate for the surface) to remove all fine sanding dust. Vacuuming is also helpful.
2. Priming for Adhesion and Consistency
Priming is essential for two reasons: blocking stains and ensuring adhesion. Do not skip this step.
Tannin Blocking: If your piece is made of raw or stained woods (like oak or cherry), which are high in tannins, they will bleed through the paint and stain the final finish, regardless of the color you choose. Use a dedicated stain-blocking primer for these woods.
Surface Transition: If you are painting over a very glossy, lacquered, or heavily varnished surface, the primer acts as a ‘grip’ for the paint, preventing the paint from simply sliding off the slick underlying finish. Apply the primer according to the manufacturer’s instructions, allowing it to dry completely before proceeding.
3. Mixing and Applying the Paint
Mixing: Gently stir the General Finishes Milk Paint with a stir stick. Do not whisk or agitate the can vigorously, as this will introduce excessive air bubbles. If the paint feels too thick to apply smoothly, follow the manufacturer’s guidelines for thinning; often, a small amount of water or a dedicated retarder is needed to achieve the perfect consistency.
Application Techniques:
- Brushing: Ideal for intricate details, curved edges, and smaller furniture items. Dip the brush, wiping off excess paint by gently scraping the bristles on the inside of the can. Apply in smooth, even, overlapping strokes, always working with the wood grain.
- Rolling: Best for large, flat, and consistent surfaces (like cabinet doors). Load the roller evenly and apply the paint using a steady, overlapping ‘W’ or ‘M’ pattern. Use minimal pressure to avoid creating visible roller marks.
- Spraying (Advanced): Offers the most uniform and professional finish, especially on large areas. This requires specialized equipment (HVLP or airless sprayer) and careful ventilation. Always thin the paint specifically for the sprayer type and follow all safety protocols.
Building the Finish: Apply the first coat, then allow it to dry fully. Once dry, lightly sand the surface with 220-grit sandpaper to smooth out any brush strokes, roller marks, or imperfections. Wipe away the sanding dust. Repeat this sanding and cleaning process, applying 2-4 additional thin coats, building up color and depth gradually.
The finish you select is as important as the color itself, as it dictates the durability, the aesthetic feel, and how the piece will age.
Understanding Sheens
General Finishes Milk Paint offers various sheens, each with unique properties:
- Satin: This is the most popular choice for a vintage, elegant, or shabby chic look. It provides a soft, velvety sheen that is durable enough for general use but doesn’t look overly glossy. It is excellent for decorative furniture.
- Semi-Gloss: Offers a noticeable shine and increased durability. It is highly resistant to moisture and general wear, making it the preferred choice for high-use areas like kitchen cabinets, bathroom vanities, and dining furniture.
- Gloss: Provides maximum shine and maximum protection. While visually stunning and extremely durable against spills and moisture, the high reflectivity can also highlight every minor imperfection in the underlying surface.
Selecting for Use: For pieces that will be frequently wiped down or exposed to moisture (like bathroom furniture), Semi-Gloss or Gloss is recommended. For purely decorative items that will be kept away from liquids, Satin is perfect.
Mistakes to Avoid for a Flawless Finish
Even experienced DIYers can make costly mistakes. Knowing these common pitfalls will save you time, paint, and frustration.
- Skipping the Primer: This is the biggest error. If you paint directly onto raw wood or a glossy varnish, the paint will either stain (due to tannins) or peel/peel off (due to lack of adhesion). Always prime.
- Painting Too Thickly: Applying heavy, thick coats of paint in one go is a recipe for disaster. It leads to drips, uneven curing, and poor adhesion. Always prioritize thin, even coats.
- Ignoring Curing Time: The paint feeling dry to the touch is not the same as being fully cured. If you use or clean the piece before the recommended curing time (often 30 days), the surface can chip, stain, or lose its integrity.
- Poor Ventilation: Working in a poorly ventilated space means you are breathing concentrated fumes. This can cause headaches, nausea, and, over time, respiratory issues. Always ensure maximum cross-ventilation.
Safety, Care, and Professional Considerations
Safety is paramount in any painting project. Treat all solvents, primers, and paint components with respect. Always consult the specific General Finishes Safety Data Sheet (SDS) for the products you are using, as manufacturer guidelines supersede general advice.
Personal Protective Equipment (PPE): When sanding, staining, or especially when spraying, you must wear appropriate PPE. This includes:
- A proper respirator (not just a dust mask) to filter paint and solvent fumes.
- Chemical-resistant gloves to protect skin from stains and solvents.
- Safety goggles or glasses to protect eyes from dust and splatter.
Ventilation: Always work in a well-ventilated area—ideally outdoors or in a garage with multiple open windows or an industrial fan system. Never paint in a small, enclosed, unventilated room.
Calling a Professional: If the piece is structurally massive, made of highly exotic or fragile materials, or if the underlying paint is suspected to be lead-based, do not attempt the project yourself. Call a licensed professional who specializes in furniture restoration.
Safety and Practical Notes
Work in a well-ventilated space and wear gloves, eye protection, and a respirator when needed. Keep children and pets away from wet surfaces and open containers.
Follow manufacturer drying times between coats. Dispose of rags and leftover materials according to local regulations. If the project involves heights, lead paint, or structural work, consider hiring a licensed professional.
Frequently Asked Questions
What is the absolute minimum surface prep I need to do before painting?
The minimum required prep involves three steps: thorough cleaning, sanding, and dust removal. First, use a mild detergent or degreaser to remove all oils and grime, rinsing completely. Second, sand the piece following the wood grain, progressing from 120-grit (to remove old finishes) to 150-grit (to smooth) and finally 220-grit (to prepare for the topcoat). Third, wipe down the entire piece with a tack cloth or mineral spirits to ensure zero sanding dust remains. Skipping any of these steps will severely compromise paint adhesion.
Do I always need to use a primer?
Yes, using a primer is highly recommended and often non-negotiable. If your piece is made of raw or stained wood (like oak or cherry), a dedicated stain-blocking primer must be used to prevent tannins from bleeding through and staining the final finish. Furthermore, if you are painting over a highly glossy or lacquered surface, the primer acts as a necessary ‘grip’ to ensure the new paint adheres properly and does not peel or slide off the slick underlying finish.
Get the Fail-Safe Paint Color Playbook (Free PDF)
36 proven colors • 8 ready palettes • trim & sheen guide • printable testing cards.
How long do I have to wait before I can use the painted piece?
The paint may feel dry to the touch much sooner than it is safe to use. General Finishes paint requires a significant curing time—often up to 30 days—before it achieves maximum durability and protection. Do not expose the piece to heavy moisture, liquid contact, or aggressive cleaning methods until the full curing period has passed. Always consult the specific product’s instructions for the precise curing timeline.
What is the difference between Satin and Semi-Gloss sheen for my project?
The sheen choice dictates both the aesthetic look and the piece’s durability. Satin provides a soft, elegant, vintage look, ideal for purely decorative items. Semi-Gloss offers a noticeable increase in shine and, more importantly, superior resistance to moisture and general wear. For high-traffic areas like kitchen cabinets, bathroom vanities, or dining tables, Semi-Gloss or Gloss is the safer, more durable choice.
What if my furniture has old, flaking paint or is structurally weak?
Do not rely on paint to fix structural issues; address any loose joints or damaged wood first. For flaking paint, sanding is necessary, but if the damage is extensive, or if the piece is very valuable or antique, it is best to call a professional furniture restorer. Always prioritize safety: if you suspect the underlying paint is lead-based, do not attempt the project yourself and hire a licensed specialist.
Conclusion
General Finishes Milk Paint is a truly transformative medium that allows you to give old, tired furniture a beautiful, modern, and enduring life. By approaching the project with meticulous planning, respecting the technical steps of preparation, and understanding the nuances of color and sheen, you can confidently achieve a professional, museum-quality finish.
Remember that the quality of your final piece is directly proportional to the care you take in the preparation phase. Take your time, use thin coats, allow the proper curing time, and enjoy the process. Happy painting!