
How To Paint A Tie Dye Pattern On Wood
Are you ready to embark on a colorful journey of creativity? Painting a tie dye pattern on wood is a delightful, highly rewarding way to infuse ordinary wooden surfaces with vibrant hues and mesmerizing designs. This craft allows you to combine the free-spirited joy of tie-dye art with the permanence and structural beauty of natural wood, creating truly unique pieces of functional or decorative art.
Whether you are a seasoned artisan or a complete beginner, this comprehensive guide will walk you through every stage of the process—from selecting the perfect wood canvas and preparing the surface, to mastering the color application techniques and achieving a durable, gallery-quality finish. By following these detailed steps, you will transform a simple plank of wood into a vibrant, conversation-starting piece of home decor.
Get the Fail-Safe Paint Color Playbook (Free PDF)
36 proven colors • 8 ready palettes • trim & sheen guide • printable testing cards.
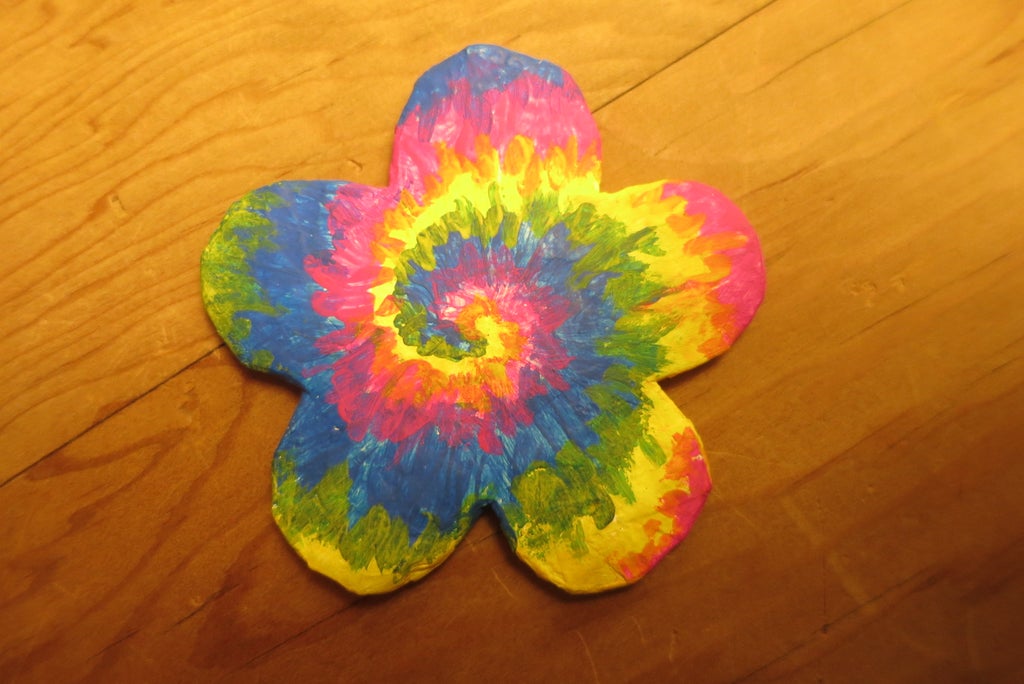
Quick answer: To Paint A Tie Dye Pattern On Wood, start with the safest first step for the material involved, test a small area when needed, and follow the process in thin, controlled stages. Use proper ventilation and protective gear when chemicals, sanding, spraying, or solvents are involved.
Planning and Preparation Before You Start
Before the first brushstroke touches the wood, careful planning is essential. The success of a painted piece depends heavily on the preparation of the canvas and the design concept. Treat this phase as critically as the painting itself.
Assessing Your Wood Canvas
Not all wood is created equal, especially when dealing with paint absorption. Consider the following factors:
- Wood Type and Porosity: Woods like pine or raw plywood tend to be highly porous, meaning they absorb paint quickly and unevenly, which can cause colors to look dull or patchy. Hardwoods like oak or maple are generally denser, but if they are raw, they will still require sealing.
- Surface Condition: If the wood is already finished (e.g., varnished, oiled, or stained), you must determine if the paint will adhere properly. It is often best to paint on raw, sanded wood, or use a specialized adhesion primer designed for sealed surfaces.
- Intended Use: Will this piece be a decorative wall plaque, a serving tray, or part of furniture? Knowing the function dictates the required durability and finish. A serving tray, for instance, requires a food-safe, durable sealant.
Conceptualizing the Design
Tie-dye is spontaneous, but the best designs have a guiding structure. Instead of going for random splashes, consider integrating the pattern with the function or style of the piece. For example, if the piece is for a farmhouse kitchen, use muted blues, creams, and greens. If it’s a vibrant entryway sign, embrace high-contrast, jewel-toned colors.
- Inspiration Mapping: Collect visual references that not only show tie-dye patterns but also incorporate the desired color palette and the wood’s natural grain.
- Scale and Flow: Sketching the piece on paper first helps you map the flow. Ensure the design elements are balanced and that the pattern doesn’t appear too dense, which can overwhelm the natural beauty of the wood grain.
Materials and Tools for the Project
Gathering the right tools and materials is crucial for a smooth process. Do not skimp on quality primers and sealants, as these determine the longevity of your artwork.
| Attribute | Description |
|---|---|
| Wood Type | Opt for a smooth and flat wood surface that is commonly used for crafting or painting, such as birch plywood or pine boards. These types of wood provide a solid base for your tie dye pattern and allow the colors to stand out. |
| Grain Orientation | Pay attention to the grain orientation of the wood. Vertical grain patterns tend to work best for tie dye patterns as they provide a visually appealing flow to the design. |
| Surface Preparation | Ensure that the wood surface is clean, free from dust, and sanded smoothly. This helps the paint adhere better and ensures a professional-looking finish. |
- Sandpaper: A range of grits (80 grit for rough smoothing, 120 grit for general sanding, and 220 grit for final smoothing).
- Wood Cleaner/Degreaser: To remove any oils or contaminants from the wood.
- Wood Primer/Sealer: A penetrating primer (like shellac or gesso) to seal the wood’s pores and ensure even paint absorption.
- Adhesion Primer: If the wood is already painted or varnished, a dedicated adhesion primer is necessary.
- Acrylic Paints: High-quality, artist-grade acrylic paints are recommended for their vibrant pigment load and durability. Choose a range of colors that complement your chosen palette.
- Mediums: Use a slow-drying medium (such as acrylic retarder) to extend working time, allowing for better blending and blending techniques.
- Brushes and Tools: An assortment of synthetic brushes (flat, round, filbert), sponges (for dabbing/stippling), and palette knives.
Finishing and Safety Gear
- Protective Sealant/Varnish: Polyurethane or clear acrylic varnish, chosen based on desired sheen (matte for rustic, semi-gloss for visibility).
- Personal Protective Equipment (PPE): Nitrile gloves, dust mask (when sanding), and safety goggles.
- Workspace Protection: Drop cloths, newspaper, and a well-ventilated area.
Step-by-Step Guide to Painting the Tie Dye Pattern
Once prepared, the actual painting process is systematic. Follow these steps meticulously for professional results.
Step 1: Initial Surface Prep and Sealing
- Cleaning and Sanding: Wash the wood thoroughly to remove dust, oils, and grime. Lightly sand the entire surface with 120-grit sandpaper to smooth out any rough edges or splinters. Wipe away all sanding dust with a tack cloth.
- Priming: Apply one or two coats of the recommended wood primer/sealer. This step is non-negotiable, as it prevents the wood from soaking up the paint unevenly, which would compromise the color vibrancy and adhesion.
- Curing the Primer: Allow the primer to dry completely according to the manufacturer’s instructions.
Step 2: Sketching the Composition
Using a very light pencil or a diluted, removable chalk pastel, lightly sketch the general boundaries of your tie-dye pattern. Focus on the flow and major color zones rather than intricate details at this stage. This sketch serves as a guide, not a restriction.
Step 3: Mixing and Base Coating
Start by creating your main color blends. Mix paints on a non-porous palette, testing ratios on a scrap piece of wood. Apply the base coat (the background color) evenly across the wood. This base coat should be thin and uniform, allowing the next layers of color to interact properly.
Step 4: Applying the Pattern Layers
Begin painting the pattern using the lightest colors first and working outwards to the darkest tones. Do not paint the pattern in one go; build it up in layers, allowing each layer to dry partially before adding the next. This controlled process ensures that the colors interact and blend rather than muddying.
Advanced Color Theory and Design Tips
The magic of tie-dye lies in its color interaction. Understanding color theory elevates the pattern from a simple splash of paint to a cohesive piece of art.
Mastering Color Pairings
- Complementary Colors: These are colors directly opposite each other on the color wheel (e.g., blue and orange, red and green). Using complementary colors creates maximum contrast and visual ‘pop,’ making the pattern incredibly vibrant and eye-catching.
- Analogous Colors: These are colors adjacent to each other on the color wheel (e.g., blue, blue-green, and green). Using analogous colors creates a softer, more harmonious, and often more sophisticated background or overall mood.
- Considering Undertones: Pay attention to the undertones of both your chosen paint colors and the wood itself. If your wood has warm, yellow undertones, cool-toned paints (like deep blues or grays) will provide a striking contrast. If the wood is cool, warm colors will pop.
Achieving the Perfect Tie-Dye Effect
To move beyond simple blending, incorporate these techniques:
- The Dry Brush: Dip your brush lightly into paint, then wipe almost all the paint off on a paper towel. Use the brush to skim over the intersection of two colors. The residual pigment will pick up the texture of the wood and create a soft, feathered transition, mimicking the look of aged, dyed fabric.
- Stippling and Sponging: Use a clean sponge or the back of a brush to dab paint onto the surface. This creates a textured, speckled look that adds depth and dimension, perfect for filling large areas or adding a speckled background effect.
- Resist Painting: For sharp, defined lines or areas you want to keep untouched, use masking tape or temporary resist materials (like wax crayons or oil sticks). Paint around these elements, and once dry, remove the resist to reveal the original wood color or base coat beneath.
Mistakes to Avoid in Tie-Dye Painting
Even experienced artists make mistakes. Recognizing common pitfalls can save you time, paint, and frustration.
- Rushing the Cure Time: This is the most common mistake. If you apply a new color before the previous layer has dried sufficiently (even if it feels dry to the touch), the colors will mix improperly, leading to muddy, dull patches that cannot be corrected. Always follow the manufacturer’s recommended drying time.
- Ignoring the Primer: Attempting to paint directly onto raw, unsealed wood guarantees poor paint adhesion and uneven absorption. The primer is your foundation; do not skip it.
- Over-Saturating the Wood: Using too many thick coats of paint, especially in one area, can make the wood look heavy or mask its beautiful grain. Plan for the paint to be a vibrant overlay, allowing the wood’s natural character to peek through.
- Inconsistent Brushes: Switching between too many different types of paint or brushes without cleaning them thoroughly can lead to cross-contamination, resulting in unintended color streaks.
Safety and Practical Working Notes
Working with paints, solvents, and sealants requires respect for your workspace and your personal safety. Always prioritize safety protocols.
- Ventilation is Critical: When using solvents, thinners, or specialized sealers, always work in a well-ventilated area. Open windows, use fans, or work outside to prevent the buildup of fumes, which can be harmful to your respiratory system.
- Personal Protective Equipment (PPE): Always wear nitrile gloves when handling paint and solvents to protect your skin. If sanding or mixing large quantities of materials, wear a dust mask to prevent inhaling fine particulate matter.
- Handling Cured Pieces: Once the final protective finish is applied, allow the piece to cure fully—this can take days. Do not handle or move the piece until the manufacturer confirms it is stable and cured.
Safety and Practical Notes
Work in a well-ventilated space and wear gloves, eye protection, and a respirator when needed. Keep children and pets away from wet surfaces and open containers.
Follow manufacturer drying times between coats. Dispose of rags and leftover materials according to local regulations. If the project involves heights, lead paint, or structural work, consider hiring a licensed professional.
Achieving the Final Professional Finish
The final coat is what protects your art and gives it its gallery-ready sheen. This step is critical for longevity.
- Selecting the Sheen: Choose your finish based on the intended display location. A matte or satin finish is excellent for a rustic, farmhouse, or minimalist aesthetic, as it absorbs light gently. A semi-gloss or gloss finish is ideal for high-traffic areas or pieces meant to be viewed from a distance, as it enhances vibrancy and provides easy cleaning.
- Application Technique: Apply the sealant in multiple thin, even coats, following the grain of the wood. Do not try to cover the entire surface with one thick coat; this can lead to drips or uneven spots.
- Drying and Curing: Allow ample time between coats and wait for the final curing time specified by the varnish manufacturer. This ensures the protective layer is fully hardened and ready to face the elements of daily life.
Congratulations! You have successfully created a vibrant, durable, and personalized piece of art. By integrating these detailed steps—from careful surface preparation and color theory application to proper finishing and sealing—you have elevated a simple craft project into a sophisticated home décor endeavor. Display your finished tie-dye piece with pride, knowing you used both artistic flair and careful craftsmanship.
Get the Fail-Safe Paint Color Playbook (Free PDF)
36 proven colors • 8 ready palettes • trim & sheen guide • printable testing cards.
Frequently Asked Questions
What kind of wood is best for tie-dye painting?
While you can use most woods, woods with a relatively consistent grain and moderate porosity are easiest for beginners. Pine and birch are often good starting points. If you are using highly porous wood, remember that proper sealing and priming are absolutely critical to prevent the paint from soaking in unevenly and losing vibrancy. Always consider the wood’s intended use when selecting the canvas.
How do I achieve a true “dyed” look rather than just painted blobs?
The secret lies in layering and using blending mediums. Instead of applying thick layers, build the pattern up in thin, translucent coats. Use a slow-drying acrylic retarder medium to extend your working time, allowing the colors to interact and bleed into each other naturally. Techniques like the dry brush and stippling help mimic the feathered, aged look of true dye.
Can I use this painted wood as a serving tray or for food prep?
Yes, but food safety must be your top priority. If the piece will contact food, the final sealant must be a food-safe, non-toxic varnish or lacquer. After painting and sealing, allow the piece to cure fully (often requiring several days) before using it. Always check the manufacturer’s guidelines for food-safe preparation.
What if my wood is varnished or sealed already?
Do not skip the adhesion primer. If the wood surface is already finished, the paint will struggle to adhere properly to the slick, non-porous sealants. You must apply a specialized adhesion primer designed for varnished surfaces. This acts as a mechanical bridge, giving the subsequent layers of paint something stable to grip onto, ensuring long-term durability.
How should I clean or maintain the finished piece?
Maintenance depends on the finish you chose. For most painted wood pieces, a gentle wipe with a soft cloth and mild soap solution is sufficient. Avoid abrasive cleaners, harsh solvents, or excessive soaking, as these can damage the sealant, dull the finish, or degrade the paint adhesion over time.