
How to Paint Ceiling Tiles: A Step-by-Step Guide for DIY Success
Are you looking to revitalize a dull, outdated space with a simple, yet dramatic change? Painting ceiling tiles can be a highly effective and cost-efficient way to refresh the look of any room. Instead of facing the expense and complexity of a full structural remodel, updating your ceiling color or pattern can immediately elevate the aesthetic of your home.
While the process might seem daunting, achieving a professional, flawless finish is entirely within reach with careful preparation, the right materials, and a structured approach. This comprehensive guide walks you through every step, from initial surface assessment to the final, perfect coat of paint, ensuring you feel confident and prepared to tackle this rewarding DIY project.
Get the Fail-Safe Paint Color Playbook (Free PDF)
36 proven colors • 8 ready palettes • trim & sheen guide • printable testing cards.
Quick answer: To Paint Ceiling Tiles, start with the safest first step for the material involved, test a small area when needed, and follow the process in thin, controlled stages. Use proper ventilation and protective gear when chemicals, sanding, spraying, or solvents are involved.
Planning and Preparation Before You Begin
The success of painting ceiling tiles hinges almost entirely on the preparation phase. Before you even open a can of paint, a thorough assessment of the room and the tiles themselves is mandatory. This planning stage prevents costly mistakes, minimizes wasted paint, and ensures the paint adheres properly for years to come.
Assessing the Tile Material and Surface Condition
The first critical step is identifying what you are actually painting. Ceiling tiles are not monolithic; they can be made from acoustical mineral fiber, tin/metal, fiberglass, or polystyrene. Each material reacts differently to cleaning, priming, and paint. For instance, porous acoustical tiles absorb moisture and paint unevenly, requiring specialized sealers, while painted metal tiles need surface prep to prevent rust and ensure a smooth coat.
You must also evaluate the existing condition. Look closely for signs of water damage, mildew, persistent stains (especially oil or grease), and paint flaking. If the stains are deeply embedded or the tiles are structurally compromised, you may need to patch or, in extreme cases, replace the tiles entirely before proceeding.
Making the Key Decision: Tiles vs. Whole Ceiling
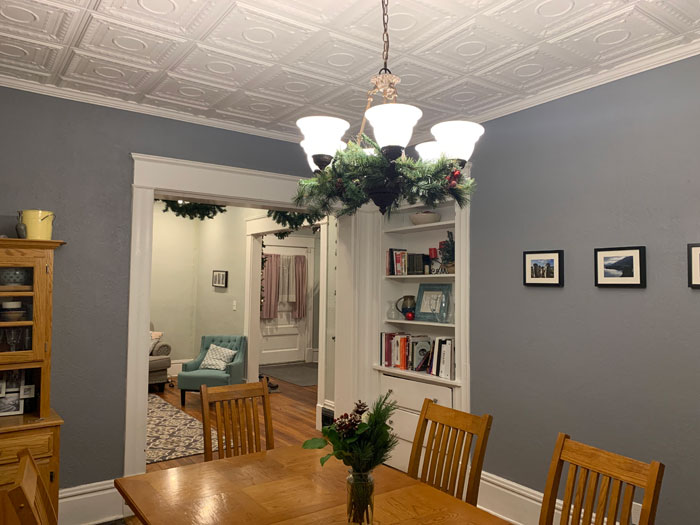
A crucial decision point is whether painting the tiles alone is sufficient, or if you should paint the entire ceiling surface. Painting only the tiles can create a segmented, intentional look, but if the grout lines or seams are visually distracting, painting the whole surface with a cohesive paint color often yields a more seamless, uniform, and traditionally professional finish. Consider the overall architectural style and the grout lines when making this call.
Materials and Tools Checklist
Gathering the right supplies is half the battle. Do not skimp on quality tools or, most importantly, the correct cleaning and priming agents. Here is a comprehensive list of everything you will need:
- Cleaning Agents: Mild detergent (TSP substitute is often recommended for heavy grease), sponges, soft brushes, and clean water.
- Repair Materials: Appropriate patching compound or filler for the specific tile material (e.g., drywall compound for porous tiles).
- Priming: A high-quality, stain-blocking primer formulated for the specific tile material (e.g., a masonry or drywall primer).
- Paint: Premium interior ceiling paint (typically latex-based, matte sheen).
- Application Tools: Roller frame, appropriate roller nap (usually 1/4 to 3/8 inch, depending on texture), angled brush (for cutting in), and paint trays.
- Protection: Painter’s tape, plastic sheeting, drop cloths, and caulk/filler for seams.
- Safety Gear: Safety goggles, gloves, and a respirator mask (especially when dealing with strong solvents or sanding).
Step-by-Step Guide to Painting Ceiling Tiles
Follow these steps sequentially to ensure a flawless, professional application. Remember that preparation is not just a step; it is the foundation of the entire project.
Step 1: Comprehensive Surface Preparation
This process is the most time-consuming but most critical. Start by removing all light fixtures, vents, and any decorative moldings. Use painter’s tape to mask off all trim, corners, and fixtures that must remain untouched.
- Dusting and Vacuuming: Use a vacuum with a soft brush attachment to remove all loose dust, cobwebs, and debris from every surface of the tiles.
- Deep Cleaning: Wash the tiles with a mild detergent solution. Scrub gently, paying close attention to seams and grout lines. Rinse thoroughly with clean water and allow the tiles to dry completely.
- Addressing Stains and Repairs: If grease or oil stains are present, treat them with a specialized cleaner (like a TSP substitute) and let them dwell according to the manufacturer’s instructions. Patch any cracks or chips with filler.
Step 2: Priming the Surface for Adhesion
Do not skip this step. Primer acts as a sealant and a bonding agent, ensuring that the paint sticks correctly, especially on porous or stained surfaces. Apply the primer evenly over all tiles and seams. Use a roller for the main areas and a brush for edges. Allow the primer to dry completely, following the manufacturer’s recommended time.
Step 3: Cutting In and Applying the First Coat
Once the primer is dry, begin the paint application. Start by “cutting in” the edges—the border areas where the tile meets the wall or trim—using the angled brush. This gives you precision and a clean line. Next, load the roller with paint and apply it to the larger sections. Always work in small, overlapping sections to maintain a “wet edge,” meaning you overlap the paint before it starts to dry, which prevents streaks and roller marks. Apply the paint in a consistent, uniform pattern.
Step 4: Second Coat and Achieving Uniformity
Most ceiling paints require a second coat for full color saturation and durable coverage. Wait until the first coat is completely dry (check the manufacturer’s time). Repeat the process: cut in the edges, then roll the entire surface. The second coat helps to mask any slight imperfections or variations in color that may have appeared in the initial application. If the tiles are heavily stained or the paint is highly pigmented, a third coat might be necessary.
Step 5: The Finishing Touches and Clean Up
Once the final coat is dry, carefully remove all masking tape. Pull the tape away slowly at a 45-degree angle to prevent the paint from peeling off the surface when the tape is removed. Inspect the entire ceiling for any missed spots, streaks, or drips. Clean up all tools and the workspace thoroughly.
Design and Color Considerations for Ceilings
The color you choose for your ceiling has a profound psychological and visual impact on the entire room. Unlike walls, ceilings often receive less attention, but this makes them prime real estate for adding architectural depth. Understanding sheen, undertones, and light interaction is key to success.
Understanding Paint Sheen
Sheen refers to how light reflects off the dried paint. For ceilings, the general recommendation is to use a matte or flat finish. High-gloss or semi-gloss finishes reflect light too strongly and can look harsh, making the room feel smaller and sometimes institutional. Matte finishes absorb light softly, creating a subtle, uniform appearance that makes the ceiling look higher and more expansive. Satin finishes are often too reflective for a ceiling.
When selecting a ceiling color, consider the undertones of your existing trim and walls. If your walls are cool-toned (blue or gray undertones), a cooler, softer gray or white ceiling will maintain harmony. If your walls are warm (yellow or beige undertones), a creamy white or soft ivory ceiling will complement them. Always buy samples and paint them on a section of the ceiling before committing to the entire room, as how a color appears in natural daylight versus artificial light can be drastically different.
Light and Perception
The color and sheen interact with your light sources. A very dark color can dramatically lower the perceived height of a room, while a very light, matte color can maximize the sense of space. If you are using stained or patterned tiles, the paint color should ideally be neutral to let the tile pattern remain the focal point, rather than competing with it.
Common Mistakes to Avoid
Even experienced DIYers can fall into common traps when painting overhead. Being aware of these pitfalls will save you time, paint, and frustration.
- Skipping the Primer: This is the most common and costly mistake. If you do not prime, the paint will not adhere properly, leading to flaking, blistering, or poor coverage, especially on porous or stained surfaces.
- Not Allowing Adequate Drying Time: Rushing the process by applying a second coat before the first is fully cured leads to paint streaks, poor color depth, and compromised adhesion. Always follow the manufacturer’s drying time guidelines.
- Inconsistent Rolling: Failing to maintain a consistent “wet edge” causes noticeable lines, streaks, or patches of uneven color. Overlap your strokes slightly and move systematically across the surface.
- Ignoring Ventilation: Painting any surface, especially with strong primers or solvents, requires excellent airflow. Working in a poorly ventilated space can lead to paint fumes buildup and improper curing.
Safety and Practical Notes
Safety must always be the top priority. Overhead work and chemical exposure require careful planning and adherence to safety protocols.
- Ventilation is Paramount: Open multiple windows and use fans to ensure continuous airflow throughout the entire project. This helps dissipate fumes and speeds up the drying process.
- Personal Protective Equipment (PPE): Always wear safety goggles to protect your eyes from drips and debris. Use chemical-resistant gloves, and if the paint or primer contains strong solvents, wear a proper respirator mask.
- Handling Hazardous Materials: If you suspect the tiles or underlying structure are contaminated with lead paint or asbestos, or if the staining involves unknown chemicals, do not attempt the work yourself. Call a licensed professional immediately.
- Manufacturer Instructions: Treat the paint, primer, and sealant containers as your primary rulebook. They contain specific instructions regarding mixing ratios, application tools, and curing times that must be followed for safety and best results.
| Tool/Material | Description |
|---|---|
| Paint | Choose a high-quality paint specifically designed for ceiling tiles. Consider the type of tile material and any specific requirements, such as moisture resistance or mold resistance. |
| Primer | Select a primer recommended for use on the type of ceiling tiles you have. Primer promotes paint adhesion, enhances coverage, and helps achieve a uniform finish. |
| Paintbrushes | Use high-quality brushes suitable for the type of paint you’ve chosen. A variety of brush sizes may be needed for different areas and details. |
| Roller and Extension Pole | A roller and extension pole are ideal for larger surface areas and can help speed up the painting process. |
| Painter’s Tape | Use painter’s tape to protect edges, fixtures, and walls from accidental paint splatters or drips. |
| Drop Cloths or Plastic Sheeting | Cover the floor and furniture with drop cloths or plastic sheeting to protect them from paint spills or splatters. |
| Sanding Block or Sandpaper | If needed, have a sanding block or sandpaper on hand to smooth any rough edges or imperfections on the ceiling tiles. |
| Putty Knife | Use a putty knife to fill in any cracks or holes in the tiles with an appropriate filler or patching compound. |
| Cleaning Supplies | Have cleaning supplies, such as mild detergent, sponges, and a bucket of clean water, readily available for any touch-ups or cleaning during the process. |
Frequently Asked Questions
Do I need to paint the whole ceiling or just the tiles?
This depends on the desired aesthetic. Painting only the tiles creates a segmented, intentional look that highlights the individual tile patterns. However, if the seams and grout lines are visually distracting, painting the entire ceiling surface with a uniform color will provide a more seamless, traditionally professional finish. When making this decision, consider the overall architectural style of the room.
Get the Fail-Safe Paint Color Playbook (Free PDF)
36 proven colors • 8 ready palettes • trim & sheen guide • printable testing cards.
What is the most critical step I cannot skip?
The most critical step is thorough preparation, specifically cleaning and priming. If you skip cleaning, the paint will adhere to dirt, grease, and mildew, leading to poor adhesion and potential flaking. If you skip priming, the paint may not bond properly to the porous tile material, resulting in uneven coverage and poor durability. Always allow ample time for the primer to dry completely before applying the first coat of paint.
What sheen of paint should I use for a ceiling?
For ceilings, a matte or flat finish is almost always recommended. High-gloss or semi-gloss paints reflect light too intensely, which can make the room feel smaller, harsher, and sometimes institutional. Matte finishes absorb light softly, creating a subtle, uniform appearance that helps the ceiling look higher and more expansive. Always buy samples to test how the chosen sheen looks in your specific lighting conditions.
Are there situations where I should hire a professional?
You should immediately call a licensed professional if any of the following conditions apply: 1) If you suspect the tiles or underlying structure are contaminated with lead paint, asbestos, or unknown hazardous materials. 2) If the structural damage is extensive, requiring more than minor patching. 3) If you are dealing with very specialized materials or stains that require professional chemical remediation. Safety is paramount; never proceed if you suspect hazardous materials.
How many coats of paint will I need?
Most ceiling paints require a minimum of two coats for full color saturation and durable coverage. The first coat seals the surface and provides basic coverage, while the second coat masks minor imperfections and ensures a consistent, uniform color. If the tiles are heavily stained, deeply discolored, or if you are dramatically changing the color, a third coat may be necessary. Always consult the paint manufacturer’s guidelines for specific coverage instructions.
Conclusion
Painting ceiling tiles is a manageable and highly rewarding home improvement project. By approaching the task with meticulous planning—from assessing the tile material to understanding the nuances of sheen and color—you transform a potential headache into a source of pride. Remember that the key to professional results lies not just in the paint itself, but in the dedication to preparation and the patience to let each coat cure completely. Take your time, follow the safety guidelines, and enjoy the stunning transformation of your ceiling.