
How To Paint On A Cake
Are you ready to elevate your baking skills from simple dessert preparation to true edible artistry? Cake painting is a mesmerizing technique that allows you to transform a plain cake into a vibrant, custom masterpiece. While traditional piping and frosting methods are beautiful, cake painting offers an unparalleled level of detail and depth, turning your dessert into a true centerpiece worthy of applause.
This comprehensive guide is your step-by-step mentor, designed to guide you through the entire process—from conceptualizing a grand design to mastering advanced gradient blending. We will cover everything you need to know: selecting the perfect edible mediums, stabilizing your canvas, and executing intricate, professional-grade strokes that will amaze your guests. Get ready to unlock your inner edible artist.
Get the Fail-Safe Paint Color Playbook (Free PDF)
36 proven colors • 8 ready palettes • trim & sheen guide • printable testing cards.
Quick answer: To Paint On A Cake, start with the safest first step for the material involved, test a small area when needed, and follow the process in thin, controlled stages. Use proper ventilation and protective gear when chemicals, sanding, spraying, or solvents are involved.
Conceptualizing Your Edible Masterpiece
The journey of cake painting begins long before the first brushstroke. Planning is the most crucial phase, dictating the success, complexity, and overall harmony of your final piece. Before you even touch your supplies, you must establish a clear vision for your cake. This involves understanding the theme, the intended color palette, and how the final piece will interact with its environment.
Selecting the Right Canvas and Theme
The choice of cake substrate impacts the entire process. A dense pound cake or sheet cake structure provides superior stability, which is ideal for large, heavily painted designs. Conversely, a light, airy sponge cake might be better suited for delicate, watercolor-style effects that rely less on structural rigidity. Always consider the cake’s inherent texture when choosing your design style—a rougher surface will absorb paint differently than a perfectly smooth fondant layer.
When defining your theme, think beyond just a color scheme. Are you aiming for a whimsical, soft watercolor effect? A dramatic, high-contrast marble look? Or perhaps a photorealistic depiction, like a bouquet of flowers? Establishing this core concept helps you narrow down the necessary tools and paint types, preventing the overwhelm of too many options.
Planning Before You Start
Measure the space and estimate how much paint or material you will need. Check the surface condition for cracks, peeling, or moisture issues that could affect adhesion.
| Tools and Materials | Description |
|---|---|
| Paintbrushes | Food-safe brushes available in different sizes and shapes. |
| Edible Paints | Gel-based colors, edible dusts, and food-safe airbrush colors. |
| Palette and Mixing Tools | Palette knives, mixing palettes, or plates for color blending. |
| Piping Bags and Tips | Useful for creating fine details and adding dimension. |
| Edible Markers | Pens or markers for sketching designs and adding details. |
Decide whether you need primer, specialty coatings, or extra prep steps. Review the weather forecast if working outside, and schedule the project when conditions support proper drying and curing.
Mastering Edible Color Theory
Color theory is the backbone of any successful painting, and cake painting is no exception. Understanding how colors interact in an edible medium is key to achieving depth and realism. Instead of simply choosing colors you like, consider:
- Complementary Colors: These are colors opposite each other on the color wheel (e.g., blue and orange). Using them next to each other creates maximum contrast and vibrancy, making both colors pop.
- Analogous Colors: These are colors next to each other on the wheel (e.g., blue, teal, and green). They create a soothing, harmonious, and naturally blended look, perfect for gradients and watercolor effects.
- Undertones and Tints: Every color has an undertone (the subtle color beneath it, like a blue-gray undertone in green). By knowing this, you can layer colors to achieve richer, more complex hues, moving beyond flat, obvious shades.
Always picture your cake in the light it will be displayed in. Natural daylight changes color perception drastically, so test your chosen palette under varying light sources.
The Edible Artist’s Kit: Materials and Tools
To ensure your artistic vision translates into a flawless physical piece, having the correct tools is non-negotiable. Remember, all materials must be explicitly certified and labeled as food-safe and non-toxic for consumption.
The foundation is everything. You will need a stable cake base (sheet cake or structured layers) and a smooth, non-absorbent layer. The crumb coat of buttercream is standard, but for painting, applying a thin, even layer of colored fondant or a specialized ganache base coat is often preferred, as these surfaces provide a more consistent, less porous canvas.
Edible Paints and Mediums Comparison
The type of paint dictates the look, texture, and application method. Choosing the right medium is the single most important technical decision.
- Gel Paints (Edible Acrylic): These are the most versatile for beginners. They offer high pigment concentration and opaque coverage, making them excellent for bold strokes, patterns, and sharp details. They tend to dry quickly but can sometimes require multiple coats for depth.
- Airbrush Paints: Ideal for achieving seamless, professional-grade gradients and smooth washes of color. They are excellent for simulating watercolor or marble textures. Requires an airbrush and compressor.
- Watercolor Paints: Specialized edible watercolor sets are perfect for a soft, artistic, hand-painted feel. They are best used on fondant or smooth icing and dry quickly, allowing for beautiful, translucent color blending.
- Edible Markers/Pens: Best reserved for fine details, text, and outlines, as they are highly precise but less suitable for broad areas of color.
Tool Checklist
Beyond the paints, your tools must be precise. Invest in a variety of synthetic, food-grade brushes—from large, flat wash brushes for background washes, to small, pointed detail brushes for fine work. A palette knife is essential for smoothing the base, and a small spatula helps in transferring colors.
Step-by-Step Guide to Painting the Cake
With your materials assembled, you are ready for execution. This process is best broken down into three distinct, methodical phases: Stabilization, Base Coating, and Art Application.
Phase 1: Achieving a Perfect, Stable Surface
The painted surface must be inert, smooth, and free of crumbs. Start by applying the foundational crumb coat of buttercream, ensuring all loose cake crumbs are sealed. After this initial set, apply a thin, even coat of your chosen base material (fondant or colored ganache). This layer acts as a protective skin for the paint, preventing the edible pigments from soaking into the cake structure, which would cause bleeding and poor color saturation.
Wait until this base layer is completely dry and stable—consult the manufacturer’s curing time for the specific material—before proceeding. A stable canvas is paramount for fine detail work.
Phase 2: Mapping and Initial Background Wash
Do not start painting details until the background is established. Using your preliminary sketch as a guide, begin with the broadest, lightest areas. If you are aiming for a gradient, this is where you start the first wash. Use a large wash brush and a diluted paint mixture, applying the lightest tone first. This establishes the overall mood and light source for the entire piece.
The background wash should cover large areas, setting the stage for the focal points. This initial layer is about coverage and tone, not detail.
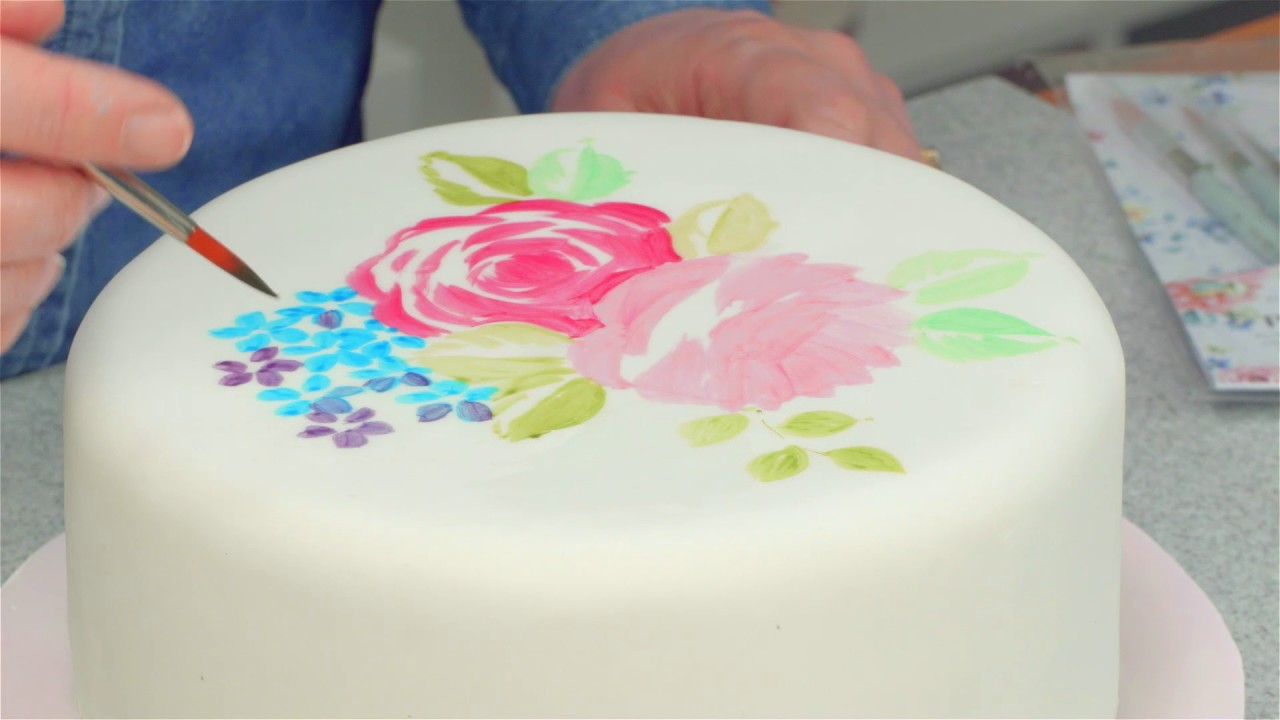
Phase 3: Layering Details and Building Depth
This is the core of the painting process. Work in layers, moving from large, soft shapes to small, sharp details. First, paint the major elements—the petals of a flower, the edges of a ribbon, or the main body of text. Use slightly darker or more saturated colors than the background to make these elements pop. Then, use the smallest brushes to add the final, fine details, such as veins on a leaf, stippling on a butterfly wing, or the edges of a pattern. Always remember to build depth by adding layers of color, never just one.
Advanced Techniques for Realistic Edible Artistry
To elevate your work from a simple painting to a professional, gallery-worthy piece, you must master advanced techniques that mimic natural light and complex art styles.
A gradient, or blend, is the smooth transition from one color to another, eliminating visible lines. To achieve a seamless blend (often called ‘feathering’), use a wet-on-wet technique. Apply the two colors next to each other, but do not blend them with a brush immediately. Instead, use a clean, damp blending brush (or a blending stump) and gently feather the edges together. The key is working quickly and lightly, allowing the pigments to merge naturally rather than scraping them together.
For simulating natural light, the lightest color should always be placed where the light source hits the object (the highlight), and the darkest color should be placed on the side opposite the light (the shadow). This simple principle gives your painting instant three-dimensionality and realism.
Creating Textures: Marble, Stone, and Watercolor
Marble Effect: Use airbrush paint and several complementary colors (like grays, creams, and soft blues). Apply large washes of color, and then use a stiff brush or palette knife to gently drag the colors across the surface, mimicking the veining of natural stone. The less control you have, the more organic and realistic the result will be.
Watercolor Effect: Utilize diluted, high-pigment edible watercolors. Apply the colors in washes, allowing them to interact and bloom into each other naturally. Use a damp brush to pull the colors outward, creating those soft, unpredictable edges characteristic of true watercolor.
Even professional artists encounter setbacks. Knowing how to troubleshoot common issues can save your masterpiece. Here are the most frequent mistakes and how to correct them:
- The Problem: Paint Bleeding. This happens when paint soaks into a porous surface (like raw cake or dry fondant). The Fix: Always ensure a perfectly sealed, non-porous base coat (like colored ganache or fondant) is applied and fully cured before painting.
- The Problem: Uneven Coverage. Some areas look thin or patchy. The Fix: This is often due to the paint drying too fast. Use a slightly wetter application, or if using gel paint, build coverage slowly by applying multiple thin coats rather than one thick coat.
- The Problem: Color Separation. Colors look muddy or clash. The Fix: Before mixing, test your colors on a scrap surface. Use color theory principles (analogous/complementary) and remember that the way colors look in a mixture is different from how they look side-by-side.
- The Problem: Poor Adhesion. The paint flakes or peels off. The Fix: The base coat was not properly cured, or the underlying surface was oily. Ensure the surface is dust-free, dry, and coated with a dedicated food-safe sealant or primer recommended for your paint type.
Mistakes to Avoid
Do not skip assessment just because the project looks simple. Most paint, cleaning, repair, and tool-care problems come from poor prep, incompatible products, rushed drying time, or using a method that does not match the material.
Avoid working without ventilation, gloves, eye protection, or a cleanup plan when coatings, solvents, sanding dust, or business/studio supplies are involved. Test first, read manufacturer directions, and pause if the surface, tool, or client setting creates safety questions you cannot answer confidently.
Safety and Practical Notes for Edible Art
Because this art form involves consumption, safety and sanitation are paramount. Never compromise these steps for the sake of a faster design.
Hygiene and Sanitation
Always wash all brushes, palettes, and tools thoroughly with soap and water between colors and between different painting sessions. Never use non-food brushes or tools. Maintain a clean, protected workspace to prevent dust or contamination from settling on your wet paint.
Handling Edible Materials
Always verify that every single product—the paint, the varnish, the brushes, and the base coat—is explicitly labeled as “food-safe” and “edible.” Never use standard craft paints or varnishes, as these are toxic and not intended for consumption. If using airbrushes, ensure proper ventilation to avoid inhaling any solvents, even if they are food-grade.
Curing and Storage
Proper curing time is critical. While some paints dry quickly, others require hours or even overnight curing time to fully set and achieve maximum color saturation. Once fully painted, apply a thin, even coat of a dedicated, food-safe lacquer or sealant (often clear edible spray). This not only protects the painted surface from moisture but also stabilizes the color and enhances the overall longevity of the piece. Store the cake in a cool, stable environment, away from direct heat or extreme cold.
Frequently Asked Questions
What is the best base coat for painting?
While buttercream is standard, a thin, even layer of colored fondant or a specialized ganache base coat is highly recommended. These materials are less porous and provide a more consistent, non-absorbent canvas, which prevents paint from soaking in and causing color bleeding. Always ensure the base coat is fully cured according to the manufacturer’s instructions before applying paint.
Get the Fail-Safe Paint Color Playbook (Free PDF)
36 proven colors • 8 ready palettes • trim & sheen guide • printable testing cards.
How do I achieve a smooth gradient blend?
The key to blending is the “wet-on-wet” technique. Apply the two colors next to each other, but do not blend them immediately with a brush. Instead, use a clean, slightly damp blending brush (or a blending stump) and gently feather the edges together. Work quickly and lightly, allowing the pigments to naturally merge rather than scraping them together. This process requires patience and minimal physical manipulation.
Are standard kitchen paints safe for cake painting?
Absolutely not. Only use paints, mediums, and varnishes that are explicitly labeled as “food-safe” and “edible” for consumption. Standard craft paints, acrylics, and lacquers are toxic and must never come into contact with edible materials. Always check the labeling for specific ingredients and intended use.
How long should I wait between painting layers?
This depends entirely on the paint and base coat material. Always adhere to the manufacturer’s curing time. For the base coat (fondant/ganache), wait until it is completely stable. For the paint, allow enough time for the first layer to dry fully before applying the next. Building depth requires multiple thin coats, which allows the paint to set and achieve maximum saturation.
Conclusion
Cake painting is a rewarding blend of culinary skill and fine art. It requires patience, precision, and a willingness to experiment, but the payoff is an absolutely breathtaking, personalized centerpiece. Remember that every great piece starts with careful planning and a stable foundation.
Do not be intimidated by the complexity of the process. Start with simple, bold color blocks, master the basic blending techniques, and gradually build up to intricate details. With practice, your ability to blend, layer, and create depth will flourish, allowing you to create edible works of art that delight both the eye and the palate.