
How to Paint Polka Dots on the Wall: A Step-by-Step Guide
The polka dot pattern is a timeless design element, capable of injecting immediate whimsy, vintage charm, or modern sophistication into any space. From nursery walls to dramatic accent walls in a living room, these cheerful circles offer a perfect way to add personality and artistic flair without overwhelming a room’s aesthetic. They are a highly versatile decoration, transforming a plain surface into a vibrant, captivating backdrop.
While the concept of painting dots might seem simple, achieving a professional, uniform, and crisp-edged pattern requires careful planning, the right materials, and precise execution. This guide provides a comprehensive, step-by-step methodology, ensuring you are equipped with all the knowledge—from color theory and surface preparation to advanced painting techniques—to create stunning, gallery-worthy polka dots that last for years.
Get the Fail-Safe Paint Color Playbook (Free PDF)
36 proven colors • 8 ready palettes • trim & sheen guide • printable testing cards.
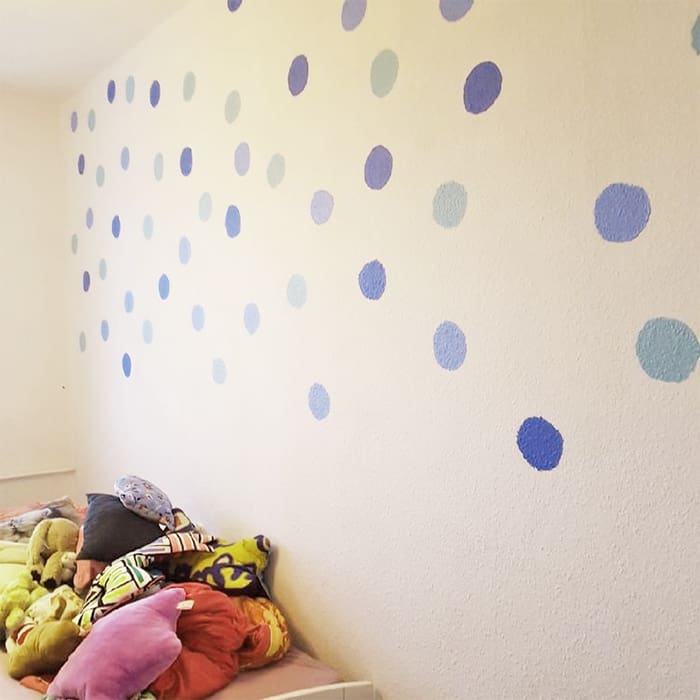
Quick answer: To Paint Polka Dots on the Wall, start with the safest first step for the material involved, test a small area when needed, and follow the process in thin, controlled stages. Use proper ventilation and protective gear when chemicals, sanding, spraying, or solvents are involved.
Planning Before You Start: Design, Scale, and Color Theory
Before you even touch a brush, the most critical phase is the planning stage. Polka dots are fundamentally a design element, and success hinges on treating it as such. You must consider the room’s existing elements, the scale of the space, and the visual impact of your chosen colors.
Assessing the Room Context and Scale
Look at the room as a whole. How big is the wall you are painting? Is it a small powder room, or a large, high-ceilinged living area? The scale of the room dictates the appropriate scale of the dots. For a very large space, smaller, more numerous dots often feel more delicate and cohesive. Conversely, in a small, intimate room, larger, bolder dots can make a dramatic, powerful statement. Always measure the height and width of the area and keep the room’s overall proportions in mind.
Choosing Complementary and Contrasting Colors
The relationship between your background wall color and your dot color is paramount. Consider these color dynamics:
- High Contrast: Pairing a vibrant dot color (like deep teal or mustard yellow) against a neutral background (like creamy white or pale gray) creates immediate, bold impact. This is excellent for a focal point.
- Low Contrast: Using closely related shades (e.g., slate blue dots on a dusty blue wall) creates a subtle, sophisticated, and ethereal look. This is perfect for adding texture without making a loud statement.
- Undertones Check: Pay close attention to the undertones of both colors. If your wall has a warm yellow undertone, choosing a cool-toned dot color (like icy blue) will create a pleasing contrast. If both colors share the same undertone, the resulting pattern will look harmonious and blended.
Always create a physical color sample board using large swatches on cardboard. This allows you to view the colors under the actual lighting conditions of the room, which can drastically change how paints appear.
Materials and Tools: Your Polka Dot Arsenal
Having the right tools makes the difference between a frustrating, messy attempt and a professional, clean finish. Do not skimp on quality, especially when it comes to prep materials and paint.
| Essential Supplies | Optional Supplies |
|---|---|
| Paint | Pencil |
| Paintbrushes | Eraser |
| Painter’s tape | Stencil |
| Measuring tape | Sponge applicator |
| Level | Paint tray |
Paint Selection and Sheen
The type of paint matters greatly. For patterned accent walls, high-quality interior latex paint is recommended. When considering the finish (sheen), remember that sheen affects how light interacts with the dots:
- Matte/Flat: Absorbs light, giving the dots a soft, velvety look. This is ideal for a subtle, gallery-like finish.
- Eggshell/Satin: Offers a slight sheen and is more durable and washable than matte paint. This is excellent for high-traffic areas or rooms with children.
- Semi-Gloss: Highly durable and washable, but the sheen can be too pronounced and reflective for a truly whimsical, soft polka dot look. Use sparingly.
For the dot color, consider a paint with high opacity, which will allow your dot color to stand out vividly against the background, even if the background paint is slightly darker.
- Painter’s Tape: Use high-quality, low-tack painter’s tape (like FrogTape or ScotchBlue). The low-tack formulation minimizes the risk of paint bleeding or pulling off the underlying wall surface when removed.
- Brushes: You will need at least two types: a small, round artist’s brush (for detailed, fine dots) and a slightly larger, medium-bristle synthetic brush (for filling in larger dots).
- Prep Tools: Spackle, putty knife, sanding sponge, mild soap, and clean cloths.
- Safety Gear: Respirator mask, gloves, and safety glasses.
The Step-by-Step Guide: From Prep to Perfection
This comprehensive process ensures your canvas is flawless and your application is methodical, minimizing mistakes and maximizing visual impact.
Step 1: Wall Preparation (The Canvas Foundation)
Preparation is non-negotiable. A poorly prepared surface leads to patchy paint and uneven adhesion.
- Cleaning: Wash the entire area with a solution of mild detergent and water. Use a damp cloth (not soaking wet) to gently wipe away dust, grease, and loose grime. Allow the wall to dry completely, which may take several hours depending on humidity.
- Repairing: Inspect the surface for cracks, nail holes, or gouges. Use appropriate spackle or filler to patch all imperfections. After the filler has dried completely (check the manufacturer’s time), sand the patched areas until they are perfectly flush and smooth with the existing wall texture.
- Priming: Apply one coat of a high-quality, stain-blocking primer. This step seals the surface, ensuring that the final dot color will adhere evenly and won’t be affected by underlying material inconsistencies.
Step 2: Planning and Marking the Pattern
Do not start painting until the pattern is marked. Use a pencil or chalk line to lightly mark the intended dot centers. If you are using a grid pattern, measure and mark the spacing precisely. If you are going for a random, organic feel, mark a few anchor points to guide your initial placement, but leave the rest to improvisation.
Determine the size of the dots you intend to paint. Use a template or a small object (like a bottle cap) to consistently measure the diameter of your dots.
Step 3: Masking the Dots with Painter’s Tape
This is the most time-consuming but most crucial step for crisp edges. The goal is to create a perfect physical barrier around every single dot.
- Application: Cut strips of painter’s tape slightly larger than the diameter of your dot, ensuring enough excess material to create a clean edge.
- Placement: Carefully apply the tape around each marked dot. Use a ruler or a straight edge to guide the tape’s curve, ensuring the edges are perfectly aligned with the intended dot size.
- Sealing: To prevent paint bleed, gently run a putty knife or the edge of a credit card along the entire perimeter of the tape, pressing the paint-blocking material (like a thin line of the base color) into the gap between the tape and the wall. This seals the edge completely.
Step 4: Painting the Dots
With the dots masked, you can apply the paint. Remember, consistency is key. Treat the paint application like filling in a delicate window.
- Paint Consistency: Stir the dot paint thoroughly. The paint should be thin enough to flow smoothly but thick enough to maintain its shape.
- Application Technique: Dip your brush and begin painting the dot. Start by filling the dot from the center, working outward in gentle, circular strokes. Use light, controlled pressure to ensure the paint adheres fully to the background material and seals the edge of the tape.
- Filling Out: Work systematically, dot by dot, moving across the wall in clean rows. Fill the dot completely, ensuring the color is uniform and opaque.
Step 5: The Reveal (Removing the Tape)
This final step requires patience. If you remove the tape too early, the wet paint can lift with it. If you wait too long, the paint may dry and crack.
- Drying Time: Allow the dot paint to dry until it is tacky but not fully cured. This usually takes 30 minutes to a few hours, depending on humidity and paint type.
- The Pull: Working slowly and steadily, gently pull the painter’s tape off the wall at a precise 45-degree angle, pulling it away from the painted dot. This angle minimizes the chance of pulling the paint off the wall surface.
- Touch-Up: Inspect the entire pattern. If any paint has bled or the edge looks imperfect, use a fine-tip brush and the background color to carefully touch up the border, restoring the crisp, clean look of the dots.
Advanced Techniques and Variations for Depth
Once you have mastered the basic process, you can elevate your polka dots from simple pattern to complex, artistic mural. These variations add depth and visual interest.
Mixing Dot Sizes and Density
Instead of uniform dots, vary the size (small, medium, large) and the spacing (dense, sparse) across the wall. This variation draws the eye and makes the pattern feel organic, rather than machine-made. For example, you could create a cluster of large dots in one corner, surrounded by a field of small, uniform dots.
Incorporating Pattern Breakers
A pattern breaker is any element that interrupts the repetitive rhythm of the dots. These can take the form of:
- Different Shapes: Interspersing a few circles with small squares, triangles, or ovals.
- Color Shifts: Creating a section where the dots suddenly change color or density.
- Outline Swirls: Using a fine brush to paint a thin, curved line that connects several dots, suggesting a narrative or movement across the wall.
Using Different Mediums
If you want a non-paint element, consider incorporating natural materials or other textures. For example, painting dots and then strategically placing decorative items (like small, painted ceramic tiles or wooden coasters) among the dots can create a three-dimensional effect, adding depth that paint alone cannot achieve.
The final aesthetic success of your polka dots depends heavily on how they interact with light and the room’s overall design elements.
Understanding Light Effects
Natural light is constantly changing, and artificial light sources (lamps, overhead fixtures) cast different hues. When planning, observe how the wall looks at different times of day. For example, if your room gets strong afternoon sunlight with a yellow cast, selecting dot colors that are cool-toned (like pale blue or sage) will provide a beautiful, counteracting contrast. If the room is always dimly lit, choose highly opaque, semi-gloss dots to ensure they catch the minimal available light.
Pairing with Furniture and Decor
The dots should complement, not compete with, your furniture. If you have heavily patterned wallpaper or richly textured furniture (like velvet), choose a more subtle, low-contrast dot pattern. If the room is otherwise minimalist and neutral, you have the freedom to go bold with highly contrasting colors and large dots.
The Impact of Sheen on Pattern
If you are using a semi-gloss dot paint on a matte background, the slight sheen on the dots will cause them to reflect light dramatically, making them appear almost metallic or iridescent. If you want the pattern to look soft and integrated, stick to matte or eggshell finishes for both the background and the dots.
Even experienced painters encounter issues. Knowing how to troubleshoot common mistakes will save you time, frustration, and paint.
The Problem of Bleed and Seepage
Mistake: Paint bleeding under the tape edge. Solution: This happens if the tape is not fully sealed. Always use a putty knife or credit card to run a bead of background color along the entire edge of the tape before painting. If bleeding occurs after the paint dries, use a fine-tipped brush and the background color to carefully clean the border.
The Problem of Uneven Dot Size
Mistake: Dots vary significantly in size. Solution: This is usually due to inconsistent pressure or inconsistent paint loading. Before painting, practice making a series of dots on a scrap piece of cardboard to calibrate your pressure and brush technique. Keep your hand steady and apply uniform, circular pressure.
The Problem of Patchy Coverage
Mistake: Some dots look faded or thin compared to others. Solution: This means the dot color is not opaque enough or the paint was applied too thinly. If the paint is latex-based, you may need a second, thin coat, allowing it to dry completely between coats. If the dot color is highly pigmented, it may require a specific primer for maximum adhesion.
Mistakes to Avoid
Do not skip assessment just because the project looks simple. Most paint, cleaning, repair, and tool-care problems come from poor prep, incompatible products, rushed drying time, or using a method that does not match the material.
Avoid working without ventilation, gloves, eye protection, or a cleanup plan when coatings, solvents, sanding dust, or business/studio supplies are involved. Test first, read manufacturer directions, and pause if the surface, tool, or client setting creates safety questions you cannot answer confidently.
Safety and Practical Notes
Safety must always be the top priority when working with paint and chemicals. Do not compromise these steps for the sake of speed.
- Ventilation: Always ensure excellent ventilation. Open windows and use fans to circulate air while mixing, applying, and drying paint. This prevents the buildup of volatile organic compounds (VOCs).
- Protective Gear: Wear appropriate protective gear, including gloves and a respirator mask, especially when working with primers or filler compounds.
- Manufacturer Directions: Always read and follow the manufacturer’s instructions for drying times, curing times, and mixing ratios. Never assume a paint will dry faster than the manufacturer claims.
- Professional Limitations: If the wall surface has suspected structural damage, lead paint, or asbestos, do not attempt remediation. Call a licensed professional immediately.
Frequently Asked Questions
What should I do if my wall is porous, textured, or painted with old, peeling paint?
If the wall is porous, heavily textured, or has signs of flaking/peeling paint, do not proceed without adequate surface preparation. You must thoroughly clean the area and patch all imperfections. For old paint, sanding and priming are critical. If you suspect the paint underneath is lead-based or if the structural damage is extensive, do not attempt remediation yourself; contact a licensed professional immediately.
Get the Fail-Safe Paint Color Playbook (Free PDF)
36 proven colors • 8 ready palettes • trim & sheen guide • printable testing cards.
How do I ensure the edges of my dots are perfectly crisp and prevent paint bleed?
The key to crisp edges is proper masking and sealing. After applying the painter’s tape, you must seal the entire perimeter of the tape. Use a putty knife or the edge of a credit card to gently run a bead of the background color along the entire edge of the tape. This seals the gap between the tape and the wall, preventing the dot paint from bleeding underneath.
Should I use a matte, eggshell, or semi-gloss paint finish for my polka dots?
The best choice depends on the desired look and room function. For a soft, subtle, or whimsical aesthetic, matte or eggshell finishes are recommended. Matte absorbs light, giving a velvety look, while eggshell offers durability and washability without being overly reflective. Semi-gloss is highly durable but can be too reflective, making the pattern appear overly shiny or metallic.
Inconsistent size usually results from inconsistent pressure or technique. Before starting the actual pattern, take a break and practice painting a series of dots on a piece of scrap cardboard. This helps you calibrate your pressure and ensure you are applying uniform, controlled circular strokes. Keep your hand steady and maintain consistent paint loading on your brush.
How long should I wait before removing the painter’s tape?
Timing is critical. Wait until the dot paint is dry enough to be tacky but not fully cured. If you remove the tape too early, the wet paint can lift off the wall. If you wait too long, the paint may dry and crack, causing the edge to peel. Check the paint manufacturer’s guidelines, but generally, waiting until the paint has visibly set but still retains some slight tackiness is ideal.
Conclusion: Enjoying Your Polka Dot Wonderland
Painting polka dots is a rewarding, creative project that allows you to truly personalize your living space. By approaching the process with meticulous planning—from selecting colors that harmonize with your room’s light to mastering the tricky art of the tape removal—you can achieve a result that looks professionally designed. Remember that the process itself is part of the fun; take your time, enjoy the act of creation, and step back to admire the whimsical, vibrant masterpiece you have created. Happy dot painting!