
Mastering the Art of Painting Resin Figures: A Step‑by‑Step Guide for Stunning Results
When I first picked up a resin figure, I thought painting it would be just like working with plastic. I was wrong. Resin has its own personality—slick surfaces, delicate details, and the occasional flaw that loves to show up in paint. The difference between a muddy, uneven finish and a jaw-dropping display piece comes down to preparation, technique, and patience.
Over the years, I’ve learned that painting resin isn’t about rushing to the colors—it’s about setting the stage. The right cleaning method, the right primer, and the right layering approach can make even a budget kit look like a collector’s treasure. Skip those steps, and you’ll fight the surface every time your brush touches it.
Get the Fail-Safe Paint Color Playbook (Free PDF)
36 proven colors • 8 ready palettes • trim & sheen guide • printable testing cards.
In this guide, I’ll share the exact process I use to take a bare resin cast and turn it into a piece worth showing off. No fluff—just practical, repeatable steps you can use to get clean lines, rich colors, and lasting durability on every figure you paint.
Preparing the Resin Figure
Painting a resin figure starts long before the first drop of color hits the surface. Resin is a beautiful material to work with, but it comes with quirks—slick surfaces that resist paint, tiny imperfections that catch the eye, and delicate details that demand care. The truth is, the preparation stage is where half the painting magic happens. If you get this right, the rest of the process becomes smoother, faster, and far more satisfying.
Below are the essential steps I follow before I even think about opening a paint bottle.
Cleaning and Degreasing
Resin figures often arrive coated in invisible mold release agents—chemical oils that help them pop out of the casting mold. Unfortunately, those same oils will fight your primer and paint.
The fix is simple but critical:
- Fill a bowl with warm water and add a few drops of mild dish soap.
- Use a soft toothbrush to gently scrub every inch of the model, getting into all the small crevices.
- Rinse thoroughly with clean water.
- Let the figure air-dry completely before moving on.
💡 Pro Tip: Skipping this step is one of the most common reasons paint chips or peels off resin models.
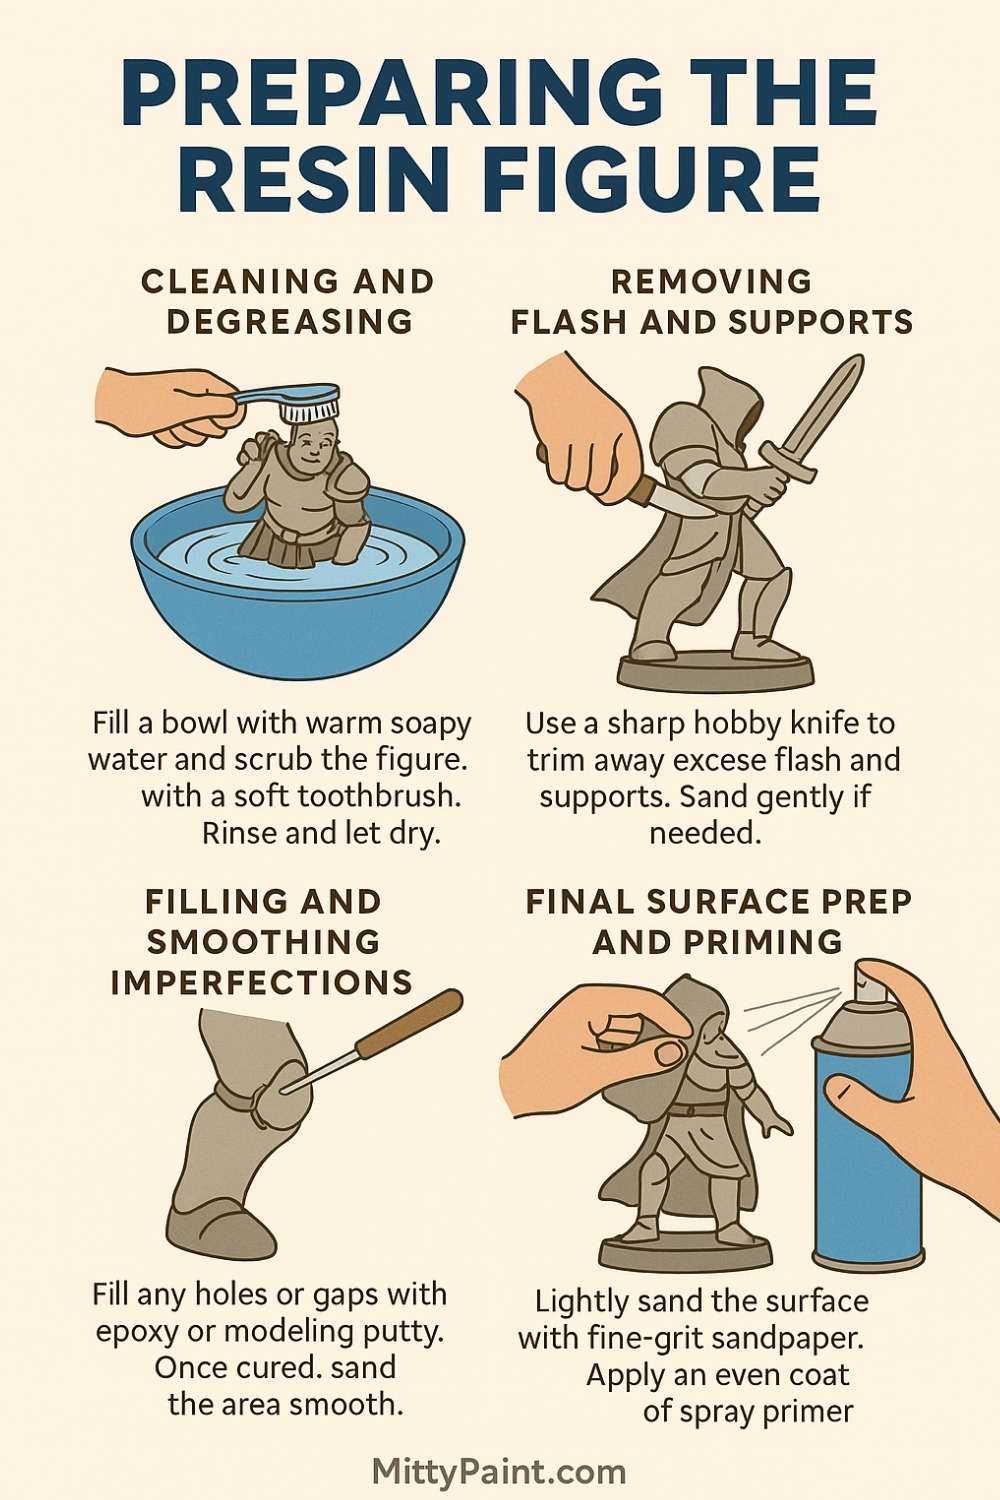
Removing Flash and Supports
Even high-quality resin casts may have thin “flash” lines or leftover supports from the printing or molding process. These aren’t just cosmetic—they can disrupt brush strokes and make details look messy.
For clean removal:
- Use a sharp hobby knife or sprue cutters to trim larger bits.
- Smooth the area with fine-grit sandpaper (600–800 grit works well).
- Sand gently—resin is softer than most plastics, so too much pressure can gouge the surface.
Filling and Smoothing Imperfections
Tiny bubbles or small gaps sometimes appear in resin casting. Left untreated, they’ll stand out even more once painted.
Here’s how I fix them:
- Mix a small amount of epoxy or modeling putty.
- Press it into the gaps with a sculpting tool or toothpick.
- Once cured, sand the spot smooth—start with a medium grit, then finish with a very fine grit for a seamless surface.
Final Surface Prep and Priming
This last stage locks in all your prep work and creates the perfect surface for paint.
- Lightly sand the entire figure with fine-grit paper to give the primer something to grip.
- Remove sanding dust with a soft cloth or a quick puff of compressed air.
- Apply an even coat of spray primer, holding the can about 8–12 inches away.
When choosing primer color:
| Primer Color | Best For |
|---|---|
| White | Bright and vibrant color schemes |
| Black | Dark, moody, or metallic finishes |
| Gray | Balanced base for mixed palettes |
💡 Pro Tip: A smooth, even primer coat makes colors richer, details sharper, and the entire paint job more durable.
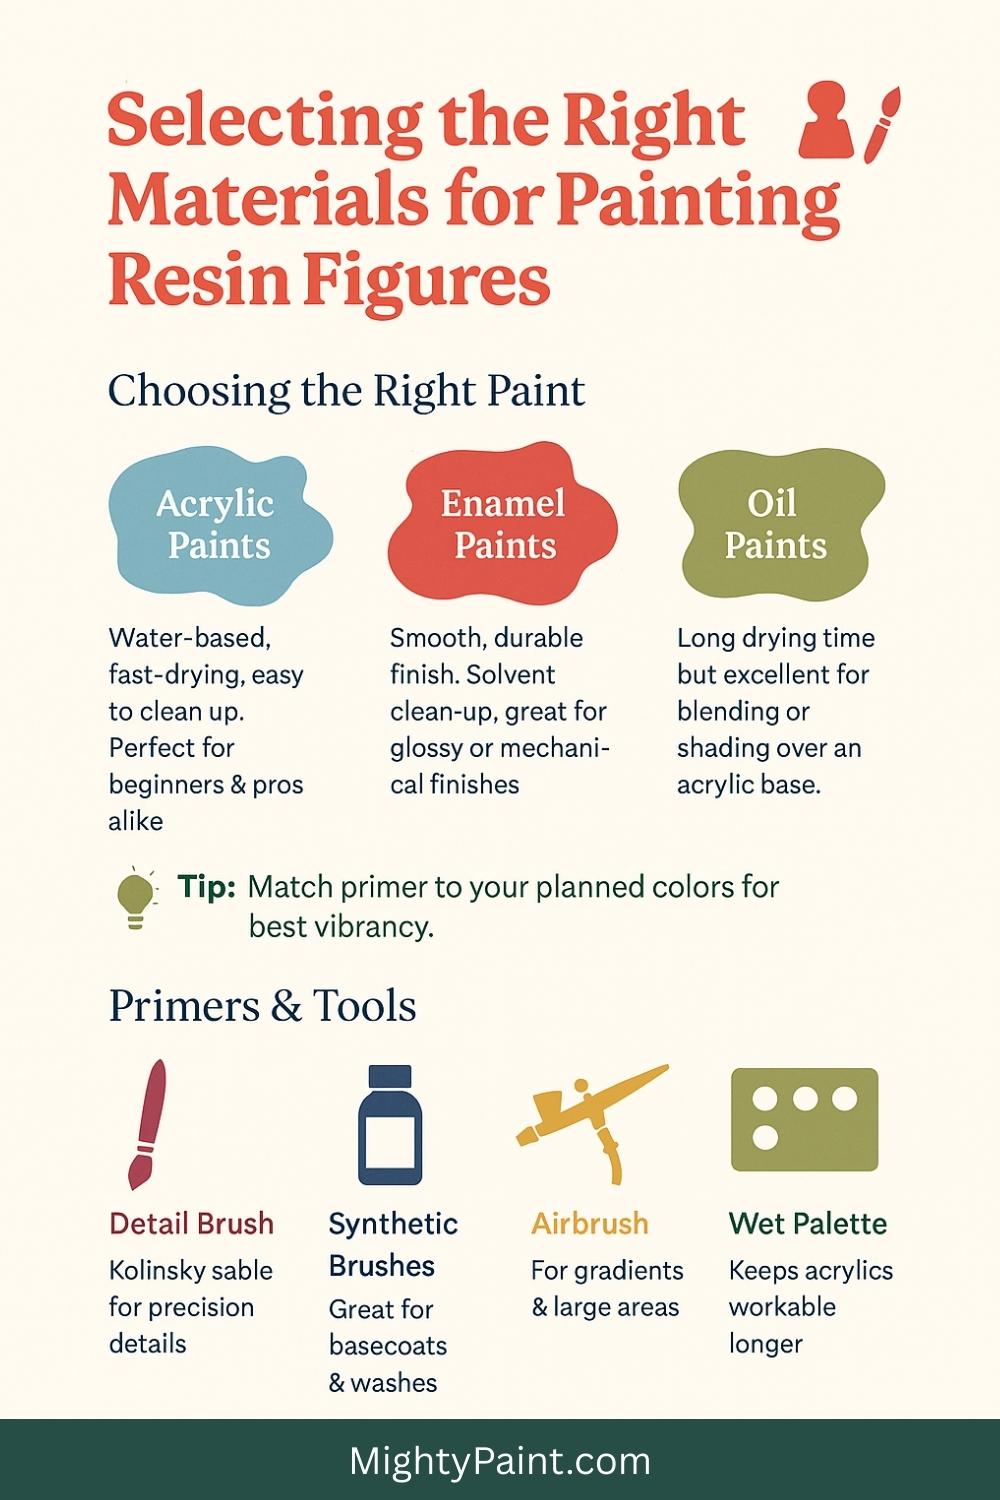
Selecting the Right Materials
Once your resin figure is cleaned, smoothed, and primed, it’s time to think about the tools and paints you’ll use. The right materials make a huge difference—not only in how your final piece looks but also in how enjoyable the painting process feels. Using poor-quality brushes or the wrong type of paint can turn an exciting project into a frustrating chore.
Below are my go-to choices for paints, primers, and tools when working with resin.
Get the Fail-Safe Paint Color Playbook (Free PDF)
36 proven colors • 8 ready palettes • trim & sheen guide • printable testing cards.
Choosing the Right Paint
There’s no single “best” paint for resin, but some types work better than others depending on your style and preferences.
Acrylic Paints
These are my top recommendation for most resin figure projects. They’re water-based, fast-drying, and easy to clean up. Acrylics layer beautifully and are safe to use indoors. Perfect for beginners and pros alike.
Enamel Paints
These give a smooth, durable finish, especially on mechanical or glossy surfaces. They take longer to dry and require solvents for cleanup, so they’re better for detail work rather than full coverage.
Oil Paints
Ideal for blending smooth gradients, especially on larger surfaces or for creating realistic shadows. They take much longer to dry and need special handling, so I use them sparingly, often over an acrylic base.
Primers That Work Well on Resin
Priming is non-negotiable for resin. Even after sanding, paint won’t stick properly without it.
Here are three solid options:
- Krylon ColorMaster Ultra Flat Primer – Great all-rounder, dries quickly.
- Vallejo Surface Primer – Works well with both brush and airbrush.
- Tamiya Fine Surface Primer – Ideal for ultra-detailed minis where you don’t want to obscure texture.
💡 Tip: Always match your primer color to the general tone of your planned color scheme. A black primer under bright pastels will dull them, while a white primer under metallics will make them pop.
Brushes, Airbrushes, and Tools
The tools you choose can make or break your paintwork.
- Detail Brushes – I prefer Kolinsky sable for fine detail work because they hold a sharp point and carry paint smoothly.
- Synthetic Brushes – Perfect for basecoats, washes, and use with solvent-based paints that can damage natural hair.
- Airbrush – Optional, but a game-changer for smooth gradients, basecoating large areas, and zenithal priming.
- Wet Palette – Keeps acrylic paints workable for longer and helps with smooth blending.
| Tool | Best Use |
|---|---|
| Kolinsky Sable Brush | Precision details, fine lines |
| Synthetic Brush | General basecoats, washes |
| Airbrush | Large surfaces, gradients, priming |
| Wet Palette | Blending, extending acrylic work time |
Painting Techniques for Resin Figures
With your figure fully prepped and your tools ready, it’s finally time for the fun part—adding color. Painting resin isn’t just about filling in areas; it’s about creating depth, texture, and personality. How you apply paint can completely change the mood and realism of your piece.
Get the Fail-Safe Paint Color Playbook (Free PDF)
36 proven colors • 8 ready palettes • trim & sheen guide • printable testing cards.
These are the core techniques I rely on to get professional-looking results.
Start with Thin Coats
One of the biggest beginner mistakes is slapping on thick paint in an attempt to cover in one go. Thick coats obscure details and can leave uneven surfaces.
Instead:
Get the Fail-Safe Paint Color Playbook (Free PDF)
36 proven colors • 8 ready palettes • trim & sheen guide • printable testing cards.
- Always thin your paints slightly with water (for acrylics) or the appropriate thinner (for enamels/oils).
- Apply multiple thin layers, letting each one dry before the next.
- Don’t worry if the first coat looks patchy—coverage will build gradually.
💡 Tip: Thin coats dry faster, adhere better, and keep those fine resin details crisp.
Layering for Depth
To make a resin figure pop, you need more than flat color. Layering lets you add visual depth and richness.
- Basecoat: Lay down your mid-tone color.
- Shadows: Apply darker tones in recesses to create depth.
- Highlights: Use lighter shades or drybrushing on raised areas to bring details forward.
A good rule is to work from dark to light, building up highlights gradually.
Drybrushing and Edge Highlighting
Drybrushing is perfect for adding quick highlights to textured areas like hair, armor, or cloth folds.
- Load a brush with paint, then wipe most of it off on a paper towel.
- Lightly sweep it over raised areas so only the tips catch color.
Edge highlighting is similar but more precise—use a fine brush to paint just the edges of armor plates or other sharp surfaces. This gives a clean, defined look.
The “Slap-Chop” Shortcut
If you want speed without sacrificing depth, try the slap-chop method:
- Prime the figure black.
- Drybrush heavily with white to catch raised details.
- Apply contrast paints or thin washes—these naturally settle in recesses, giving instant shading and highlights.
This is a fantastic method for gaming miniatures or quick tabletop armies.
Sealing the Paint
Once you’re happy with your paint job, protect it with a clear varnish.
- Matte varnish for a realistic, non-reflective finish.
- Gloss varnish for shiny effects like gemstones or wet-looking surfaces.
- Satin varnish for something in-between.
Apply varnish in light coats to avoid cloudiness.
Get the Fail-Safe Paint Color Playbook (Free PDF)
36 proven colors • 8 ready palettes • trim & sheen guide • printable testing cards.
Finishing Touches and Advanced Effects
Once the base painting is complete, you have a solid figure—but the real magic happens when you add the small details and special effects that bring it to life. These finishing steps can turn a “good” paint job into one that people stop and admire.
Weathering and Aging
If your figure is meant to look battle-worn, ancient, or rugged, weathering techniques can add authenticity.
- Washes: Thin, dark paint that flows into recesses to enhance shadows and texture. Great for making details pop and adding grime to crevices.
- Stippling: Dabbing with a stiff brush or sponge to create a mottled, worn texture.
- Rust and Dirt Effects: Use specialized weathering powders or mix pigment powders with a matte medium.
💡 Tip: Less is more. A subtle dusting or streak can be more convincing than heavy-handed effects.
Special Effects with Paint
Adding visual interest isn’t limited to weathering—creative paint techniques can transform a figure.
- Glow Effects (OSL – Object Source Lighting): Create the illusion of light radiating from a source, like a lantern or magical weapon. Blend lighter colors outward from the source into darker tones.
- Metallic Finishes: Use metallic paints for a natural shine, or try “Non-Metallic Metal” (NMM) techniques using only flat colors and shading for a painted-metal illusion.
- Translucent Effects: For elements like glass or energy fields, thin down paints to build color gradually, letting some primer show through for a glowing effect.
Base Decoration
A figure’s base is more than a stand—it’s part of the story.
Options include:
- Scenic Bases: Rocks, grass tufts, sand, or custom terrain to match a diorama.
- Thematic Elements: Adding rubble for a war scene, crystal shards for a fantasy theme, or industrial plating for sci-fi.
- Resin Pours: For water, slime, or lava effects.
💡 Tip: Seal the base just like the figure to protect your work from handling and dust.
Get the Fail-Safe Paint Color Playbook (Free PDF)
36 proven colors • 8 ready palettes • trim & sheen guide • printable testing cards.
Final Sealing
Even after all your careful work, unsealed paint is vulnerable to chips, scratches, and fading.
- Use a matte spray varnish for a natural finish on most figures.
- For glossy elements, apply a selective gloss varnish with a brush after the matte coat dries.
- Store finished figures away from direct sunlight to prevent color fading over time.
With these final touches, your resin figure goes from painted model to miniature storytelling masterpiece—ready to display, photograph, or field in a game.
Conclusion
Painting resin figures is part craftsmanship, part creativity, and part patience. From the moment you start cleaning and prepping the surface, you’re setting the stage for every color, highlight, and shadow that follows. Skipping those early steps might save a little time now, but it will cost you quality in the end.
Once you’ve mastered preparation, the rest is a mix of technique and experimentation. Whether you’re applying careful layers, trying quick methods like slap-chop, or adding advanced effects like OSL and weathering, each brushstroke adds character and personality to your piece.
The best part? Every figure you paint teaches you something new. You’ll refine your methods, discover your own style, and build the confidence to tackle more ambitious projects. By combining solid fundamentals with creative freedom, you can turn any plain resin cast into a miniature that’s not just painted—but alive.