
How to Reshape Paint Brushes: A Step-by-Step Guide for Painters
Paint brushes are indispensable tools in the hands of any dedicated painter, and their quality is paramount because it directly dictates the final finish and efficiency of your entire project. Over time, whether due to improper cleaning, aggressive use, or simply age, brushes inevitably become misshapen—the bristles might splay, the shape might kink, or the overall structure might weaken. This deterioration can frustrate even the most experienced artisan, making it difficult to achieve the desired, professional-grade effect on any surface.
Fortunately, the decline of a good brush doesn’t always mean its end. With proper knowledge and careful technique, it is possible to restore a brush’s structural integrity and revitalize its performance. This guide provides a comprehensive, actionable roadmap, covering everything from the foundational cleaning process and necessary tools to advanced reshaping methods, ensuring you can maximize the functional lifespan of your most valuable painting assets.
Get the Fail-Safe Paint Color Playbook (Free PDF)
36 proven colors • 8 ready palettes • trim & sheen guide • printable testing cards.
Quick answer: To reshape paint brushes, remove wet paint first, then wash the bristles with warm water and mild soap for water-based coatings or the correct solvent for oil-based or enamel paint. Comb out residue, rinse until the bristles release cleanly, reshape the brush, and dry it flat. Use gloves and ventilation when mineral spirits or strong cleaners are involved.
Planning Before You Start: Assessing the Damage
Before you even gather a cleaning brush, it is crucial to assess the damage to determine if reshaping is even feasible. Not all misshaping is equal. Some brushes simply need conditioning and gentle straightening, while others have structural issues that require replacement.
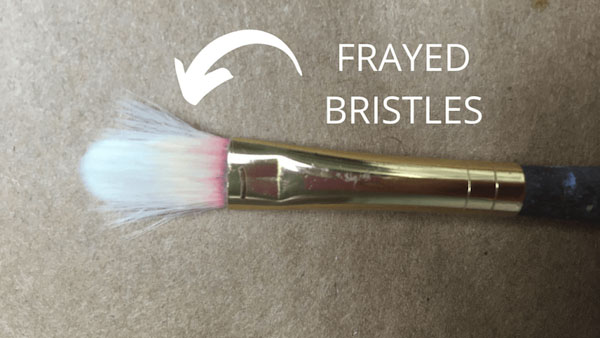
Examine the ferrule (the metal part that holds the bristles) and the handle. If the ferrule is bent, loose, or if the handle is cracked, the brush is compromised and must be retired, as reshaping will not fix these structural weaknesses. For the bristles, observe the pattern of damage. If the misshaping is minor—such as slight splaying or minor kinks—reshaping is highly effective. However, if the bristles are severely separated, frayed, or if the glue holding the bristles to the ferrule has dissolved or degraded, the brush should be replaced. Always remember that the primary goal of reshaping is restoration, not structural repair.
Materials and Tools: Gathering Your Supplies
A successful reshaping process requires more than just a brush and water; specific tools ensure the safety and effectiveness of the restoration. Gathering these items beforehand will streamline your process and minimize the risk of damage.
- Mild Detergent or Specialized Brush Soap: Do not use harsh chemicals. A mild soap designed for art supplies or gentle dish soap works best for deep cleaning.
- Warm Water: Use water that is warm, not hot, to prevent damaging the handle material or the bristle glue.
- Fine-Tooth Comb or Wire Brush: A specialized brush comb is ideal for gently separating and aligning the bristles without pulling them out.
- Heat Source: A low-setting hairdryer or a dedicated low-heat plate (never a direct flame) is used to gently set the new shape.
- Conditioning Agents: A small amount of fabric softener or specialized bristle conditioner helps keep the natural oils and elasticity of the bristles intact during the drying phase.
- Clothespins or Binder Clips: These are used to physically hold the bristles in the desired straight position while the brush dries.
- Paper Towels: Essential for blotting and drying the brush thoroughly at various stages.
The Main Guide: Reshaping Techniques for Optimal Restoration
Once your brush is thoroughly cleaned and assessed, you can proceed with the reshaping. The technique varies slightly depending on whether you are working with natural bristles (often used for oil paints) or synthetic bristles (common for latex and acrylic paints).
1. The Deep Cleaning Foundation
Before any reshaping attempt, the brush must undergo a rigorous cleaning process. Immerse the brush in warm water mixed with the mild detergent. Gently work the soap through the bristles, ensuring all remnants of old paint are removed. Do not scrub the ferrule. Rinse the brush repeatedly under running water until the water runs clear and there is no soapy residue. After rinsing, gently blot the brush with paper towels to remove excess water. Do not dry the brush aggressively; allow it to air dry partially.
2. The Comb Method (Gentle Straightening)
This method is best for minor kinks and overall straightening. Start by dipping the comb or wire brush into a small amount of water and gently running it through the bristles, beginning at the base and working outward. Use gentle, even strokes, never pulling hard enough to snag or pull out bristles. The goal is to realign the natural curve and shape of the bristles, not to force them into an unnatural straightness. Repeat this process several times until the comb glides smoothly through the entire length of the bristles.
3. The Heat Method (Setting the Shape)
Heat is used to help the keratin and synthetic materials relax and retain a new, straight shape. Use a hairdryer on a low, indirect setting. Hold the hairdryer several inches away from the bristles. Starting at the middle section, gently apply heat in sections, moving from the base toward the tip. The warmth should soften the bristles and glue, allowing you to gently manipulate them back into alignment. Once a section is shaped, hold it in place for a moment until it cools down, allowing the heat to “set” the new shape. Be extremely cautious to avoid overheating the ferrules or handle, as excessive heat can melt the glue or warp the materials.
4. The Clamping Method (Maintaining Alignment)
This is the final, critical step for setting the shape. Once the comb and heat methods have been used, the brush must be held in its ideal, straight form while it dries. Use clothespins or binder clips to clamp the bristles into the desired, uniform shape. Ensure the clamps are positioned evenly along the length of the bristles. Leave the clips in place until the brush is completely dry—this may take 24 to 48 hours, depending on humidity and the type of paint residue. Do not remove the clips until the brush is fully dry.
Advanced Care: Optimal Maintenance and Storage
Proper maintenance is the secret to keeping your brushes reshaped and performing optimally for years. Routine care prevents the need for emergency reshaping.
- Immediate Cleaning: Never leave a brush covered in paint. As soon as a painting session is over, gently wash the brush to prevent dried paint from hardening and setting kinks in the bristles.
- Drying Protocol: Always wash brushes so they dry standing upright, in a ventilated area, or laid flat on a clean towel. Gravity helps the water drain from the ferrule, preventing mildew and water damage to the glue.
- Conditioning: After the brush is completely dry, a light application of bristle conditioner or even a tiny bit of fabric softener (diluted heavily) can help maintain the natural elasticity of the fibers, preventing them from becoming brittle.
- Storage: Store brushes in a cool, dry place, preferably in a dedicated container with drainage holes. Never store them submerged in water, as this leads to mildew and weakens the glue over time.
Mistakes to Avoid: Common Reshaping Errors
Even with the best intentions, several common mistakes can undo your hard work or, worse, ruin the brush completely. Knowing these pitfalls is just as important as knowing the techniques.
- Using Excessive Heat: The biggest danger is overheating. Too much heat can damage the glue holding the bristles to the ferrule, causing the bristles to fall out, or it can warp the handle material. Always use low, indirect heat.
- Ignoring the Deep Clean: If the brush is not meticulously cleaned of all old paint, the residue can harden and re-kink the bristles during the reshaping process, making the brush unusable.
- Forcing the Straightness: Do not try to force the bristles to be perfectly straight if they are naturally curved (especially natural hair brushes). A slight, natural curve is often necessary for optimal paint flow.
- Improper Drying: Allowing the brush to dry while submerged in water or in a sealed container promotes mold and mildew growth, which weakens the materials and cannot be easily removed.
Safety and Practical Notes
Safety must be the primary consideration when working with heat and cleaning chemicals. Please take the following precautions:
- Ventilation: If using any strong solvents or cleaning chemicals (though mild soap is preferred), ensure the area is extremely well-ventilated.
- Heat Safety: When using a hairdryer or hot plate, always keep your hands clear of the heat source to prevent burns. Do not hold the heat source directly against the metal ferrule.
- Chemical Disposal: Always check your local municipal guidelines for disposing of paint and cleaning materials. Never pour large quantities of paint or strong solvents down the drain.
- Professional Limits: While reshaping is effective for minor wear, if the brush has structural damage to the ferrule or handle, or if the bristles are severely frayed, it is best practice to call a professional or simply purchase a replacement tool to ensure a perfect finish.
Frequently Asked Questions
Can I reshape a brush if the ferrule is bent or loose?
No. If the metal ferrule (the part holding the bristles) is bent, loose, or if the handle is cracked, the brush has structural damage and should be retired. Reshaping techniques only restore the bristles; they cannot fix weaknesses in the metal or wood components. Attempting to use a compromised brush risks paint loss and poor performance.
How long does it take for a reshaped brush to dry and set its new shape?
The drying time is critical and varies based on humidity and the size of the brush, but you must leave the brush clamped until it is completely dry. This process typically takes between 24 to 48 hours. Do not remove the clamps or clips until the entire brush is bone dry. Rushing this step can lead to glue residue or uneven drying.
Get the Fail-Safe Paint Color Playbook (Free PDF)
36 proven colors • 8 ready palettes • trim & sheen guide • printable testing cards.
What is the safest heat source to use for reshaping?
Always use a hairdryer set to a low, indirect heat. Never use a direct flame or an overly hot plate, as excessive heat can melt the glue holding the bristles to the ferrule or warp the handle material. Hold the heat source several inches away from the bristles to ensure gentle, even warmth.
Should I use conditioner on every brush?
While conditioning is highly recommended for optimal maintenance, it is not mandatory for every reshaping process. However, after the brush has been thoroughly washed, reshaped, and fully dried, applying a light conditioner (like specialized bristle soap or diluted fabric softener) helps restore the natural elasticity of the fibers, preventing them from becoming brittle and extending the brush’s lifespan.
What if the reshaping process doesn’t seem to work?
If the brush is extremely old, has been soaked in paint for months, or if the glue has degraded significantly, the reshaping process may be futile. If you encounter major resistance, severe fraying, or if the bristles refuse to hold a straight shape even after clamping, it is best practice to assume the brush has reached the end of its usable life and replace it to guarantee the quality of your final artwork.
Conclusion
Reshaping your paint brushes is a valuable skill that empowers you to extend the life and maintain the quality of your painting tools. By adopting a systematic approach—starting with a deep clean, following the appropriate reshaping technique for your brush type, and adhering to rigorous drying and storage protocols—you can restore brushes to near-new working condition.
Remember that the longevity of your tools is directly tied to the care you provide them. By treating your brushes with respect and following these detailed guidelines, you ensure that every paint stroke you make is executed with the precision and quality that your project deserves.