
Why Is My Wagner Paint Sprayer Spitting
Painting is one of the most satisfying and transformative home improvement projects, giving a fresh life and renewed character to any space. Whether you are tackling a small accent wall or refinishing an entire exterior façade, the goal is usually a smooth, professional-looking finish. However, the process is not always straightforward. When using a powerful tool like a paint sprayer, issues can arise that are not only frustrating but can halt your project entirely.
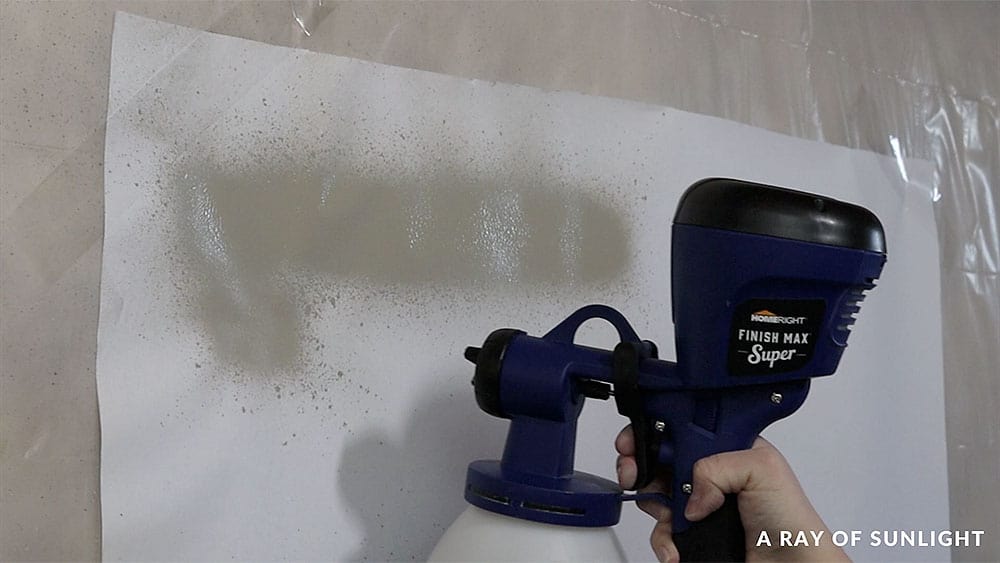
One of the most common, and often most alarming, issues encountered by DIY painters is “spitting.” Spitting occurs when the paint exits the nozzle or spray pattern unevenly, appearing as distinct, erratic droplets instead of a continuous, smooth mist. If you are using a Wagner or any other brand of paint sprayer and are experiencing this, please know that you are encountering a common technical issue. The good news is that spitting is rarely an irreversible problem; it is almost always a sign that a specific part, setting, or paint characteristic needs adjustment.
Get the Fail-Safe Paint Color Playbook (Free PDF)
36 proven colors • 8 ready palettes • trim & sheen guide • printable testing cards.
Best choice: The best choice depends on the surface, durability needs, finish, application method, safety requirements, maintenance, and budget. Avoid choosing by price alone; match the product to the job and check the manufacturer directions before buying.
Preparing for a Smooth Spraying Experience
Before troubleshooting the spitting itself, it is vital to ensure the foundation of the project is sound. A perfect sprayer setup cannot compensate for poor surface preparation or incorrect paint handling. Proper planning saves time, minimizes waste, and significantly improves the final finish quality.
Assessing the Surface and Paint Compatibility
The first step in any spraying project is understanding what you are painting and what you are spraying with. Different surfaces require different levels of preparation, and different paints require different application methods. For instance, spraying over raw, porous drywall requires a specific primer to seal the surface and prevent the paint from being absorbed unevenly. If you are painting metal, you must use a specialized metal primer before applying any topcoat, as standard latex paint will not adhere properly to oxidized surfaces.
Furthermore, understand the relationship between the paint type and the sprayer mechanism. Airless sprayers are excellent for high-volume, fast coverage and are best suited for thick, durable coatings. Conversely, HVLP (High Volume Low Pressure) sprayers are designed for maximum atomization and are often preferred for delicate finishes, such as fine trim or wood, as they reduce overspray and allow for more even paint deposition. Always match the sprayer type to the paint formulation for optimal results.
Setting Up Your Workspace and Budget
Consider the environment. Is the area well-ventilated? Is the temperature within the manufacturer’s recommended range? Humidity plays a huge role; spraying in extremely high humidity can cause the paint to dry too quickly, leading to poor adhesion and uneven application. For budget planning, remember that while a professional-grade sprayer costs money, the cost of wasted paint and time due to poor prep or troubleshooting can far exceed the initial equipment investment. Allocate time not just for spraying, but also for meticulous masking and sanding.
Planning Before You Start
Measure the space and estimate how much paint or material you will need. Check the surface condition for cracks, peeling, or moisture issues that could affect adhesion.
Decide whether you need primer, specialty coatings, or extra prep steps. Review the weather forecast if working outside, and schedule the project when conditions support proper drying and curing.
Diagnosing and Fixing Spitting Issues
If your sprayer is spitting, you need to approach the diagnosis systematically, following a flow that checks the paint first, then the equipment, and finally the technique. This comprehensive process will help you isolate the root cause, whether it is paint chemistry, clogged hardware, or operational pressure.
Step 1: Checking Paint Viscosity and Consistency (The Paint)
Viscosity—the paint’s thickness or resistance to flow—is the single most critical variable. If the paint is too thin, it will atomize too rapidly, causing the spray to become unstable and erratic, which manifests as spitting. If it is too thick, the sprayer won’t be able to force it through the nozzle efficiently.
Action Steps for Viscosity:
- Test the Paint: Before committing to a large area, always test the paint’s flow rate in a bucket. Does it pour smoothly, or does it feel sluggish?
- Thinning vs. Thickening: It is crucial to understand the difference. Thinning involves adding water or a diluent to reduce viscosity, which is appropriate for latex or water-based paints. Thickening involves adding a specialized additive (like a paint thickener) to stabilize the paint and prevent dripping or separation, often used for oil-based coatings or stain.
- Proper Mixing: Never dump the thickener or diluent into one corner of the paint. Always mix additives thoroughly and slowly, following the manufacturer’s instructions for the additive itself.
- Dilution Ratios: Consult the paint manufacturer’s data sheet for the optimal dilution ratio specific to your brand and sprayer type. Guessing the ratio is the most common mistake.
Step 2: Inspecting the Hardware and Flow Path (The Equipment)
The next area to inspect is the physical path the paint takes: from the reservoir, through the hoses, fittings, and finally out the nozzle. Even minor blockages can drastically affect pressure and cause spitting.
Troubleshooting Hardware:
- Inspect Nozzles and Tips: These are the most frequent culprits. Dried paint, dust, or debris can partially block the tiny openings. Always follow the deep cleaning process: disconnect, soak in warm, soapy water, and use a fine brush (like a toothbrush) to gently scrub the internal passages.
- Examine Hoses and Fittings: Visually inspect all hoses for abrasions, kinks, or swelling. Damage can restrict flow. Check all connections and fittings for mineral deposits or signs of leaks. Tighten fittings securely, but do not overtighten, as this can strip threads.
- Check Pressure Regulator: Ensure the pressure regulator is set correctly according to the paint and sprayer type. If the pressure is too low, the paint cannot be atomized correctly.
- Power Source: If using a corded electric sprayer, ensure the power source is adequate and the cord is undamaged. If using a compressed air system, confirm the air compressor is delivering consistent, high-volume pressure.
Step 3: Addressing Operational Technique (The User)
Sometimes, the problem isn’t the paint or the machine, but how the machine is being operated. Poor technique can lead to uneven application that resembles spitting.
Technique Adjustments:
- Distance and Angle: Maintain a consistent distance (usually 8 to 12 inches) from the surface and move the sprayer in smooth, overlapping passes. Holding the trigger too long or moving too quickly will ruin the coverage and make it appear patchy or spitting.
- Pacing: Practice a steady, rhythmic pace. Jerky, inconsistent movements can disrupt the atomization process.
- Pre-Spray Test: Always test the spray in an inconspicuous area first. This allows you to adjust the pressure, flow rate, and technique before committing to the main surface.
Essential Materials and Tools Checklist
To address spitting effectively, having the right tools on hand is essential. This list covers both the operational necessities and the remedial supplies.
- The Sprayer Unit: The Wagner sprayer itself, ensuring all parts are accounted for.
- Cleaning Supplies: Warm water, mild soap (dish soap is effective), paint brushes or small stiff-bristle brushes, and rags.
- Paint Additives: Specialized paint thickener or thinner designed for the paint type you are using (e.g., latex additive, alkyd thinner).
- Maintenance Parts: Replacement nozzles, replacement filters, and replacement hose fittings.
- Preparation Tools: Masking tape, sandpaper, sanding blocks, and scrapers for surface prep.
Common Mistakes to Avoid When Spraying
Avoiding these common pitfalls will save you frustration, wasted paint, and potential damage to your project.
- Ignoring Surface Prep: Applying paint directly to dirty, dusty, or greasy surfaces is a recipe for failure. Always wash and lightly sand the area first.
- Mixing Incompatible Paints: Never mix different brands or types of paint (e.g., oil-based and latex) in the same batch, even if they appear to be the same color. They will cure and dry at different rates, leading to peeling or uneven adhesion.
- Over-Thinning: While thin paint causes spitting, adding excessive amounts of water or diluent can severely compromise the paint’s integrity and its ability to adhere properly, leading to flaking later.
- Ignoring Safety Protocols: Never operate the sprayer without proper ventilation or without wearing the required personal protective equipment (PPE).
Safety and Practical Notes
Safety is paramount when using high-powered equipment and chemical materials. Never take shortcuts when it comes to protecting yourself or the environment.
- Ventilation: Always work in a well-ventilated area. Use fans to draw fumes away from the breathing zone. If working in an enclosed space, consider opening multiple windows.
- Personal Protective Equipment (PPE): This is non-negotiable. Wear a proper respirator (rated for paint/solvent particles, not just dust), chemical-resistant gloves, and safety goggles.
- Disposal: Follow local regulations for paint disposal. Do not pour leftover paint or thinners down the drain; allow the waste paint to dry completely in an open container before disposing of it as solid waste.
- Manufacturer Guidelines: Always prioritize the specific instructions provided by the paint and sprayer manufacturers. These guidelines account for the chemistry of the materials involved.
Frequently Asked Questions
Why does my paint sprayer spit, and is it always a blockage?
Spitting is usually a symptom, not the root cause. While clogged nozzles are a common culprit, the issue is often related to paint viscosity. If the paint is too thin, it atomizes too rapidly and unevenly. If it is too thick, the pressure cannot force it through. Always check the paint’s consistency first, then inspect the hardware, as the problem is usually an imbalance between the paint chemistry and the equipment settings.
Get the Fail-Safe Paint Color Playbook (Free PDF)
36 proven colors • 8 ready palettes • trim & sheen guide • printable testing cards.
How do I correctly thin or thicken paint for spraying?
Never guess the ratio. Always consult the paint manufacturer’s technical data sheet or the sprayer manufacturer’s guidelines for the optimal dilution ratio. Understand the difference: Thinning (adding water/diluent) is for water-based latex paints; Thickening (using specialized additives) is for oil-based or stain coatings. Mix any additives slowly and thoroughly, following the additive manufacturer’s instructions.
What is the most critical part to inspect when diagnosing spitting?
The nozzles and tips are the most frequent failure points. Because they are tiny, even dried paint residue, dust, or mineral deposits can partially block the opening, severely restricting flow and causing the erratic spitting. Always disconnect the nozzle, soak it in warm, soapy water, and use a fine brush to gently clean all internal passages before resuming work.
What safety protocols must I follow when painting?
Safety is paramount. Always work in a well-ventilated area, using fans to draw fumes away from your breathing zone. You must wear appropriate Personal Protective Equipment (PPE), which includes a respirator rated for paint/solvent particles (not just dust), chemical-resistant gloves, and safety goggles. Remember to follow local guidelines for paint disposal; never pour leftover paint or thinners down a drain.
Conclusion
Addressing paint sprayer spitting requires a methodical approach that treats the problem not as a single failure, but as a complex interaction between the paint chemistry, the equipment mechanics, and the application technique. By systematically checking the viscosity, inspecting every component for clogs, and adjusting your operational method, you can diagnose the precise cause of the spitting.
Remember that professional results come from preparation and attention to detail. Treat the troubleshooting process as part of your painting ritual, and you will find that your Wagner sprayer returns to its optimal, smooth performance, allowing you to complete your home improvement project with confidence and efficiency.