
How Does Airless Paint Sprayer Work
Painting a room can transform an entire home, giving it a fresh, cohesive look that lasts for years. While the thought of painting might seem daunting, the right tools and knowledge can turn a challenging DIY project into a satisfying weekend accomplishment. For large-scale projects, such as painting entire walls or exterior siding, a conventional brush and roller method can be incredibly time-consuming and physically demanding.
Fortunately, modern technology offers powerful solutions, chief among them the airless paint sprayer. This specialized tool dramatically increases efficiency by using high pressure to atomize paint into a fine mist. Understanding how this equipment works, how to prepare your surfaces, and the proper application techniques is the key to achieving a professional, streak-free finish that rivals a professional painter’s best work.
Get the Fail-Safe Paint Color Playbook (Free PDF)
36 proven colors • 8 ready palettes • trim & sheen guide • printable testing cards.
Best choice: The best choice depends on the surface, durability needs, finish, application method, safety requirements, maintenance, and budget. Avoid choosing by price alone; match the product to the job and check the manufacturer directions before buying.
Planning Before You Start: Assessing Your Project Scope
Before you even think about mixing paint or setting up the equipment, proper planning is the most critical step. A successful painting project hinges on accurately assessing the scope of work, the condition of the surfaces, and the materials at hand. Skipping this planning phase is the quickest way to frustration, wasted paint, and uneven results.
Surface Assessment: Different materials require different approaches. Is the surface bare drywall, existing painted wood, or metal siding? Drywall needs patching and sanding to ensure all seams are filled. Bare wood may need a stain-blocking primer to prevent tannins from bleeding through the topcoat. Metal surfaces, especially exterior ones, must be cleaned of rust and treated with a specific bonding primer. Never assume a surface is ready; always inspect for loose paint, peeling sections, or deep gouges.
Paint Selection and Testing: The type of paint you use must match the surface and the environment. Latex paints are ideal for most interior walls and are breathable. Oil-based paints offer superior durability and resistance to moisture, making them excellent for trim or utility rooms. Crucially, always test your chosen paint on a small, inconspicuous area—like behind a piece of furniture—to check how the color reads in natural light and to ensure it adheres properly to the substrate.
The Mechanics of Spraying: How Airless Paint Sprayers Work
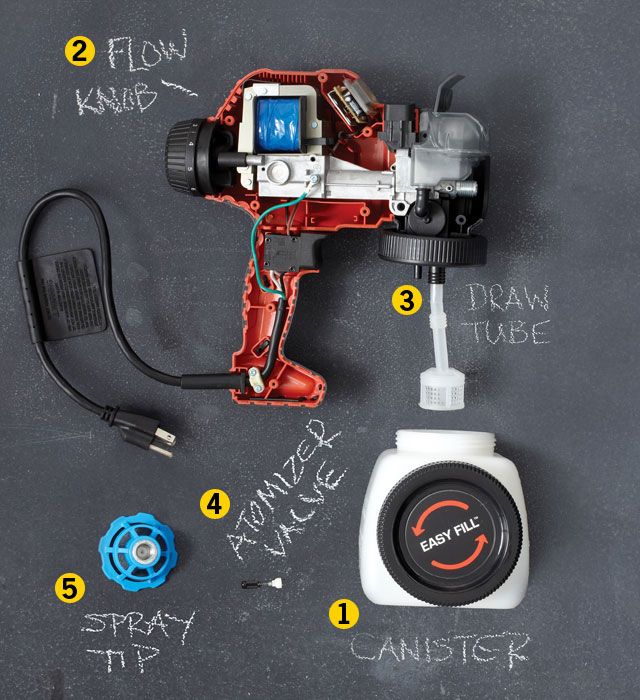
Understanding the underlying science demystifies the process and helps you troubleshoot potential issues. An airless paint sprayer does not use external air pressure to atomize the paint; rather, it uses mechanical pressure generated by a pump.
The Pump Action: The electric motor powers a high-pressure pump, which draws the paint from the container. This pump significantly increases the paint’s internal pressure. The paint is then forced through a hose and into the spray gun assembly. The sheer force and pressure of the paint exiting the nozzle are what cause the atomization.
Atomization Explained: Atomization is the process of breaking the liquid paint into microscopic droplets. The pressure forces the paint through a small orifice (the nozzle), shearing it and breaking it down into a fine mist. This fine mist ensures that the paint covers the surface evenly and consistently, eliminating the brushstrokes and roller marks associated with manual application. The consistency of this process is what makes airless spraying so efficient and effective for large areas.
Materials and Tools Checklist
To ensure a smooth process, gather all necessary equipment and consumables before starting. This list covers more than just the sprayer itself.
- The Airless Sprayer System: Ensure the unit is rated for the type of paint you plan to use (e.g., latex, oil, or specialized coatings).
- Paint and Primer: Select the correct paint viscosity for spraying. Often, paint needs to be watered down or mixed with a dedicated thinning agent to flow optimally through the system.
- Consumables: These include replacement filters (crucial for preventing clogs), specialized spray tips (which determine the pattern width), and high-quality extension hoses.
- Surface Preparation Tools: Include sanding sponges, wire brushes, putty knives, scraping tools, and dust collection vacuum.
- Safety Gear (PPE): This is non-negotiable. You must have safety goggles, disposable gloves, and, most importantly, a respirator rated for paint fumes.
Step-by-Step Guide to Perfect Application
The application process is divided into three distinct phases: preparation, setup, and the actual spray technique.
- Preparation: Thoroughly clean the area. Use scrapers to remove all flaking or loose paint. Sand down rough edges and patched areas to ensure a smooth transition. Use painter’s tape to mask off trim, baseboards, and fixtures that should not be painted.
- Equipment Setup: Assemble the sprayer according to the manufacturer’s directions. Connect the hose and set the pressure gauge to the recommended PSI for your paint type. Load the paint into the cup or container, ensuring the paint level is above the pump intake.
- The Spraying Technique: Maintain a consistent distance—usually 8 to 12 inches—from the surface. Start and end your passes with overlapping strokes to prevent noticeable lines. Use a steady, overlapping pattern, moving in a systematic direction (e.g., top to bottom, or cross-hatching). Do not stop moving the spray gun for more than a few seconds, as this can cause the paint pattern to break.
The Final Touch: Remember that spraying provides a fantastic base coat, but corners, edges, and detailed trim work should always be finished with a high-quality brush or roller for maximum control and a polished, professional look.
Design and Finish Considerations: Sheen, Undertones, and Priming
The finish you choose significantly impacts both the look and the lifespan of your paint. It is vital to consider how the final sheen will interact with your room’s natural lighting.
Understanding Sheen:
- Matte/Flat: Absorbs light, minimizing glare. This is excellent for large wall areas where you want a subtle, non-distracting look. However, it is the hardest finish to clean.
- Eggshell/Satin: Offers a slight sheen, providing a balance between appearance and durability. This is the most common choice for living rooms and bedrooms, as it can be easily wiped clean while still looking sophisticated.
- Semi-Gloss/Gloss: Highly reflective and extremely durable. Ideal for high-traffic areas, such as kitchens, bathrooms, and trim, as it resists moisture and cleaning chemicals better than flatter finishes.
The Priming Imperative: Whether you are painting bare drywall or switching from a dark color to a light one, priming is non-negotiable. Primer seals the surface, improves adhesion, and, most importantly, provides a uniform base that ensures your topcoat color is true and consistent.
Mistakes to Avoid During Spraying
Even with a powerful tool, human error and poor preparation can ruin a coat of paint. Here are common mistakes to avoid:
1. Skipping Surface Prep: The most common error. If you spray over loose paint, dirt, or greasy residues, the paint will adhere poorly and peel off quickly. Always wash, sand, and patch first.
2. Incorrect Paint Viscosity: Spraying paint that is too thick will clog the nozzle and result in an uneven, patchy spray. Painting with paint that is too thin can lead to drips and poor adhesion. Always follow the manufacturer’s dilution guidelines.
3. Poor Ventilation: Painting in an enclosed space without proper ventilation can lead to excessive fumes, which are dangerous to breathe and can also cause the paint to cure improperly. Always ensure adequate airflow.
4. Improper Cleanup: Failing to immediately clean the equipment after use allows dried paint residue to harden in the lines and components, leading to clogs and damaged parts.
Safety and Practical Notes
Safety must be the absolute top priority when operating pressurized equipment. Airless sprayers are powerful tools, and proper precautions are mandatory.
- Personal Protective Equipment (PPE): Always wear safety goggles to protect your eyes from paint splatter, gloves, and a proper respirator mask to filter out VOCs (Volatile Organic Compounds) and paint fumes.
- Ventilation: Open all windows and use exhaust fans to ensure fresh air circulation. If possible, use the sprayer in a garage or area that can be properly vented and cleared of any flammable materials.
- Equipment Handling: Never point the spray gun at people or pets. Always keep your fingers clear of the paint path and handle the pressurized hose with care.
- Disposal: Never pour wet paint down the drain. Follow local waste management guidelines for paint and cleaning materials.
Frequently Asked Questions
How do I know if my paint is the right consistency for the sprayer?
Paint viscosity is crucial. If it’s too thick, the sprayer will clog; if it’s too thin, it won’t adhere well. Most paint manufacturers provide specific dilution guidelines for spraying. Generally, you may need to thin the paint using a dedicated thinning agent or clean water, but always start by following the manufacturer’s recommendation for your specific paint type (latex vs. oil). Test the mixture on a scrap piece of board first to ensure proper flow.
Get the Fail-Safe Paint Color Playbook (Free PDF)
36 proven colors • 8 ready palettes • trim & sheen guide • printable testing cards.
Is priming mandatory, or can I skip it if I’m painting drywall?
Priming is highly recommended, even if you are only painting bare drywall, because it seals the porous surface and ensures the topcoat color will be uniform. If you are making a drastic color change (e.g., dark to light), a specialized primer is mandatory to prevent the old color from bleeding through the new topcoat. Never skip priming, as it is the key to a professional, consistent finish.
What is the safest way to clean the sprayer after use?
Immediate cleanup is essential to prevent clogs and damage. Never allow paint to dry in the lines or components. The safest method is to rinse the sprayer immediately after use with clean, fresh water (or a specialized cleaning solution, depending on the paint type). Disassemble the spray gun and components and rinse every part thoroughly. Always follow the manufacturer’s guidelines for proper disassembly and cleaning.
What is the biggest mistake amateur sprayers make?
The most common and costly mistake is neglecting surface preparation. Spraying over loose paint, dust, or dirt will result in poor adhesion, and the new paint will peel off quickly. Before setting up the equipment, you must scrape all flaking paint, sand down rough edges, and wash the surface thoroughly to ensure the substrate is clean and solid.
What safety equipment (PPE) is absolutely required?
Safety is paramount. You must always wear safety goggles to protect your eyes from paint splatter. Additionally, because paint fumes contain VOCs (Volatile Organic Compounds), a proper respirator mask rated for paint fumes is non-negotiable. Always ensure the area is well-ventilated by opening windows and using exhaust fans.
Conclusion
The airless paint sprayer is an invaluable asset for anyone tackling large-scale painting projects. By approaching the task with meticulous planning—respecting the prep work, understanding the mechanics, and adhering to strict safety guidelines—you can achieve a high-quality, uniform finish that is both beautiful and durable. Remember that the tool is only as good as the preparation and the technique behind it, ensuring your next painting project is successful from the first coat to the final cleanup.