
How Much Does It Cost to Paint a Garage Floor? A Step-by-Step Guide
A garage floor is far more than just a functional storage area; it is a major surface within your home that impacts both the aesthetic appeal and the overall perceived value of your property. Over years of daily use, garage concrete can accumulate deep stains from oil, tires, and chemicals, along with general wear and tear, leaving the space looking tired and neglected. Painting or coating the floor is one of the most effective and dramatic ways to revitalize this overlooked area.
However, the process of painting a garage floor is not merely a matter of applying paint. It is a multi-stage home improvement project that demands meticulous preparation, careful material selection, and a solid understanding of potential costs. Before you even buy a single can of paint, you must determine the scope of the work—from simple cosmetic staining to full-scale chemical-resistant epoxy coating. Understanding the necessary preparation, the type of paint required for your specific concrete, and the labor implications are the keys to a successful, lasting project.
Get the Fail-Safe Paint Color Playbook (Free PDF)
36 proven colors • 8 ready palettes • trim & sheen guide • printable testing cards.
Quick answer: Painting a garage floor costs $0.50 to $2 per square foot for a DIY epoxy or concrete paint kit, or $3 to $12+ per square foot for a professional coating. A typical two-car garage (400 sq ft) ranges from $200 to $800 DIY or $1,200 to $4,800 professionally. The cost depends on concrete condition including cracks, oil staining, and porosity, as well as whether a simple cosmetic paint or a full chemical-resistant epoxy coating system is used.
Planning and Assessing Your Concrete Surface
Before any brush touches the concrete, you must treat this phase as a thorough structural and chemical assessment. This initial planning stage saves money, time, and frustration down the line. You are not just painting a surface; you are treating concrete that has endured decades of chemical, mechanical, and environmental stress.
Start by documenting the floor’s current state. Use a checklist to assess the following:
- Cracks and Spalling: Note the depth and frequency of structural cracks. Are they hairline or deep enough to require filler?
- Staining: Identify the type of stain. Is it surface oil (easy to lift), chemical bleed-through (requires degreasing/acid), or general water damage?
- Porosity: How absorbent is the concrete? Highly porous concrete will require specialized sealing or etching to ensure paint adhesion.
- Traffic Patterns: Is the garage used for light storage, or is it a multi-car driveway with heavy, constant vehicle traffic? This dictates the required durability of the final coating.
Making the DIY vs. Professional Decision
This is the most critical decision point, and it should be based on the floor’s condition, not your personal comfort level.
Choose DIY if: The floor is generally sound, stains are superficial (surface oil), the size is manageable (under 200 sq ft), and you are willing to dedicate several days to preparation. Simple stains and a low-traffic area make DIY feasible with proper materials.
Call a Professional if: The floor has structural cracks, significant settling, deep chemical stains (like gasoline or oil spills), or if the size exceeds 300 sq ft. Professional teams have industrial equipment for crack injection, specialized acid-etching tools, and access to high-grade, commercial-strength epoxy systems that are difficult for homeowners to handle safely.
The Step-by-Step Guide to Painting a Garage Floor
The process can be broken down into four distinct phases: Cleaning, Repairing, Etching, and Applying. Skipping any of these steps will result in premature failure of the coating.
Step 1: Deep Cleaning and Degreasing (The Foundation)
This step removes all foreign contaminants. Simple sweeping or washing with soapy water is insufficient. You must use an industrial-strength concrete degreaser. This chemical process breaks down oil, grease, and road grime that sit deep in the pores of the concrete. This typically requires scrubbing, rinsing, and allowing the degreaser to dwell for the time specified by the manufacturer.
Step 2: Structural Repair and Leveling (The Integrity Check)
Once the surface is clean and dry, address all physical damage. This involves:
- Crack Filling: Use specialized concrete crack filler or epoxy injection kits for deep, structural cracks. For minor, surface cracks, a high-quality concrete filler can be used.
- Patching: Cut out any areas of spalling (flaking concrete) and fill them with a matching, high-strength concrete patching compound.
- Leveling: If there are significant dips or uneven areas, a leveling compound may be necessary.
Allow all fillers and patches to cure completely—this often takes several days—before proceeding. The surface must be structurally sound before paint is applied.
Step 3: Etching or Sealing (The Adhesion Boost)
Etching is a chemical process that slightly roughens the surface at a microscopic level, allowing the paint/epoxy to grip the concrete instead of just sitting on top of it. This is often done using a mild acid (like muriatic acid, used with extreme caution and proper ventilation) or a commercial etching solution. The acid reacts with the calcium carbonate in the concrete, creating a porous, rough texture.
Alternatively, some professional coatings use a mechanical etching process or require a specialized concrete primer that acts as a sealant and adhesion promoter. Follow the manufacturer’s instructions precisely here, as over-etching can weaken the concrete.
Step 4: Applying the Coating (The Finish)
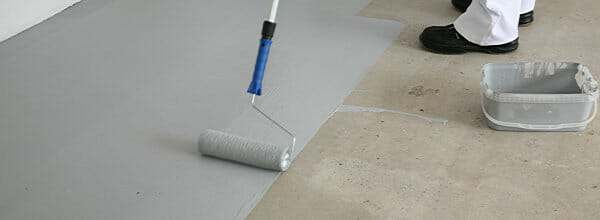
The final step involves applying the chosen coating, usually in multiple coats. Whether it is a stain, a latex paint, or a multi-component epoxy, the application must be even and controlled. The first coat is crucial as it seals the surface and provides the base for the second, durable topcoat. Proper application techniques—such as using a notched trowel for stains or a specialized airless sprayer for epoxy—are vital for a professional finish.
Materials and Tools You Will Need
The required tools depend heavily on the paint type, but a comprehensive list includes:
- Cleaning Supplies: Industrial degreaser, stiff-bristle brushes, pressure washer, squeegees, safety masks, gloves, and chemical neutralizing agents.
- Repair Materials: Concrete patching compound, crack filler (epoxy or cementitious), and sanding equipment.
- Surface Prep: Etching solution (if required), protective sheeting, and ventilation fans.
- Painting Supplies: High-quality paint/epoxy kit (including hardeners), rollers, paint sprayer (airless is often best for epoxy), masking tape, and drop cloths.
The type of coating you choose dictates the cost, the prep difficulty, the required cure time, and the ultimate durability. Here is a breakdown of the most common options:
Epoxy Coatings (Maximum Durability)
Best for: High-traffic areas, commercial garages, or any area exposed to chemicals, tire marks, and heavy loads. Epoxy coatings create a seamless, chemically resistant, and extremely durable shell.
Pros: Unmatched durability, easy to clean, highly resistant to chemicals and abrasion. Cons: Most expensive, requires the most rigorous preparation (etching/priming), and often involves a lengthy curing time (days, not hours) before full use.
Latex/Acrylic Paints (Budget-Friendly)
Best for: Low-traffic, decorative garages, or areas where aesthetics are prioritized over extreme chemical resistance. These paints are more forgiving and easier for DIY application.
Pros: Affordable, easy to apply, good aesthetic finish, and quicker drying time than epoxy. Cons: Lower chemical resistance than epoxy; may be susceptible to deep staining from prolonged oil exposure.
Concrete Stains (Decorative Finish)
Best for: Achieving a rustic, natural, or washed-out look without the thickness of a coating. Stains penetrate the concrete’s pores and react with the surface minerals to create color.
Pros: Provides a unique, natural aesthetic; requires minimal thickness. Cons: Lowest durability; stains do not provide a waterproof or chemical barrier. They are easily scratched or worn off with heavy traffic, making them best suited for decorative, low-impact areas.
Design and Color Considerations
While the function is key, the color choice can drastically change the mood of the garage. Consider how the finished floor will interact with the rest of your home and the natural light available.
Sheen and Finish: For garage floors, a satin or semi-gloss finish is often recommended. While a high-gloss finish looks striking, it can be more prone to showing minor scratches and scuff marks. A semi-gloss finish offers good protection while maintaining a clean, reflective look.
Undertones and Pairing: If your garage door or surrounding trim is white, a light grey or charcoal epoxy can provide a modern contrast. If you are using stained concrete, selecting a color that complements the natural stone or wood tones in your home (such as warm browns or deep slate tones) will create a cohesive look. Always test samples on an inconspicuous area of the floor before committing to the entire surface.
Common Mistakes to Avoid
The failure of a garage floor coating is rarely due to the paint itself; it is almost always due to inadequate preparation. Be mindful of these common pitfalls:
- Ignoring Deep Cleaning: The single biggest mistake is failing to remove deep, polymerized oil and chemical stains. If the oil remains, the coating will fail quickly, often lifting or blistering.
- Rushing the Cure Time: Coatings (especially epoxy) require specific curing times that are often longer than the “drying time.” Applying traffic or water too soon can compromise the chemical bond. Always adhere strictly to the manufacturer’s recommended cure schedule.
- Insufficient Ventilation: Working with strong solvents, acids, and epoxy fumes requires professional-grade ventilation. Working in a poorly ventilated space risks respiratory damage and improper chemical curing.
- Mixing Incompatible Products: Never mix different types of concrete chemicals (e.g., mixing acids with salts or different types of degreasers). Always follow the specific manufacturer’s instructions for the entire process.
Safety and Practical Notes
Safety cannot be overstated when working with strong chemicals, solvents, and abrasive materials. Treat this process with the caution reserved for construction site work.
Personal Protective Equipment (PPE): Always wear appropriate PPE. This includes chemical-resistant gloves, safety goggles, and, most importantly, a proper respirator (not just a dust mask) when handling acids or strong solvents. The type of respirator must be suitable for the specific chemicals being used.
Ventilation Protocol: Ensure continuous, powerful cross-ventilation throughout the entire project. Open garage doors and windows, and use exhaust fans to pull fumes out of the workspace. This is critical during the degreasing, etching, and epoxy application phases.
Waste Disposal: Never pour chemical waste (degreasers, acids, paint residue) down a household drain. Check local waste disposal regulations for proper handling and disposal of chemical byproducts.
Transforming your garage floor is a highly rewarding project that dramatically boosts both the curb appeal and the functionality of your home. By prioritizing thorough preparation, selecting the correct coating based on your traffic and chemical exposure, and respecting the necessary safety protocols, you can achieve a durable, beautiful, and long-lasting finish.
Remember that the budget for this project is largely determined by the quality of the preparation and the durability of the materials chosen. By taking the time to assess your concrete, understand the chemical process, and prioritize safety, you are investing in a beautiful, functional, and resilient part of your home for years to come.
Frequently Asked Questions
How much does painting a garage floor cost?
The cost is highly variable and depends far more on the preparation labor and the coating chosen than on the paint itself. Expect the cost to be driven by three factors: the size of the floor (square footage), the level of prep work required (e.g., acid etching, deep crack injection), and the material grade (epoxy is significantly more expensive than latex paint). For a professional job, budgeting for professional labor and specialized materials is recommended, as skipping proper preparation will lead to coating failure.
Get the Fail-Safe Paint Color Playbook (Free PDF)
36 proven colors • 8 ready palettes • trim & sheen guide • printable testing cards.
The application of the coating itself might take a full day, but the project duration is dominated by the curing and drying times. The guide emphasizes that proper preparation (degreasing, patching, and etching) requires time to cure, which can span several days. Epoxy coatings, for example, often require multiple days—not just hours—before the surface can safely handle vehicle traffic. Always adhere strictly to the manufacturer’s recommended cure schedule.
What is the difference between stains, latex paints, and epoxy coatings?
The choice depends entirely on your desired durability and aesthetic. Epoxy coatings offer the highest durability, chemical resistance, and seamless finish, making them ideal for high-traffic or oily garages. Latex/Acrylic paints are budget-friendly, easier for DIY application, and suitable for low-traffic, decorative areas. Concrete stains are purely decorative, penetrating the pores to provide color but offering no significant waterproof or chemical barrier, making them best for aesthetic, low-impact zones.
Is it safe to do this project myself (DIY)?
DIY is feasible only if the floor is structurally sound, the stains are superficial (surface oil), and the size is manageable (under 200 sq ft). However, professional help is strongly recommended if the concrete has deep structural cracks, significant settling, or if the stains involve heavy chemical bleed-through (like gasoline). Working with industrial-strength degreasers, acids, and epoxy requires specialized equipment and safety measures that are best handled by experienced contractors to ensure both safety and structural integrity.
Conclusion
How Much To Paint A Garage Floor works best when the plan, materials, safety steps, and finish goals all line up before work begins. Review the surface or tool condition, choose compatible products, and leave enough time for drying, cleanup, and final checks.
Use the guidance above as a practical checklist, then adjust it to the specific surface, workspace, product directions, and risk level. When the project involves fumes, damaged materials, business liability, or uncertain conditions, slow down and get qualified help before moving forward.