
How to Distress Furniture with Milk Paint: A Step-by-Step Guide
Adding a layer of history and character to your furniture doesn’t require expensive antique pieces or complex restoration techniques. Distressing with milk paint is a beautiful, accessible, and deeply rewarding method that allows you to transform ordinary furniture into unique, heirloom-quality art. This natural painting technique mimics the beautiful wear and tear of time, giving your piece a story to tell.
Milk paint, with its roots in traditional crafts, is celebrated for its ability to adhere beautifully to various wood types and its naturally matte finish. Unlike modern paints, milk paint often carries a subtle, breathable quality that enhances the wood grain beneath the surface. By following a careful process—from initial stripping to the final protective seal—you can achieve a professional, aged look that will become a stunning focal point in any room.
Get the Fail-Safe Paint Color Playbook (Free PDF)
36 proven colors • 8 ready palettes • trim & sheen guide • printable testing cards.
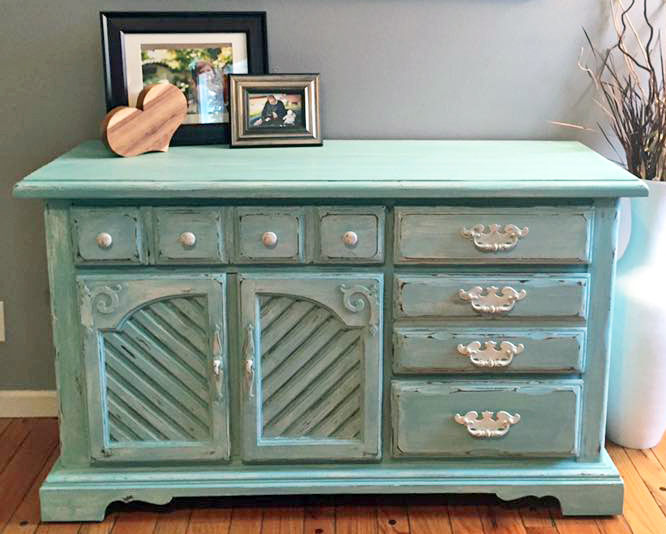
Quick answer: To Distress Furniture With Milk Paint, start with the safest first step for the material involved, test a small area when needed, and follow the process in thin, controlled stages. Use proper ventilation and protective gear when chemicals, sanding, spraying, or solvents are involved.
Planning Your Distressing Project
Before you even open the paint, proper planning is crucial. Treating a furniture piece is not just about painting; it’s about understanding the object, the space it will live in, and the look you are trying to achieve. Take the time to assess the piece and your desired aesthetic to ensure the project is successful from the start.
Assessing the Furniture and the Space
The suitability of a piece depends on its material, size, and the intended style of the room. A heavy, dark mahogany dresser might look stunning distressed in a rustic farmhouse setting, while a delicate, carved French armoire might be better suited for a more refined, coastal vintage look. Consider the following:
- Weight and Scale: Does the piece fit the room’s proportions?
- Wood Type: Hardwoods (oak, cherry) take distress well but require more careful preparation than softer woods (pine).
- Desired Style: Do you want a subtle, aged patina (soft grays, whites) or a dramatic, worn look (deep blues, earthy reds)?
Think about how the furniture will interact with the existing decor. Will it be the centerpiece, or a subtle accent? Knowing its role helps guide your color and distressing decisions.
Step-by-Step Guide to Distressing with Milk Paint
This process is broken down into four major phases: Preparation, Application, Distressing, and Finishing. Following these steps systematically is the key to a professional result.
Phase 1: Preparing the Surface (The Foundation)
Preparation is arguably the most critical phase. If the surface isn’t clean and stable, the milk paint will not adhere properly, leading to peeling and patchy spots later on.
- Stripping and Cleaning: If the piece has an existing finish, use a chemical stripper or sanding to remove all layers. If using a stripper, wear appropriate protective gear and ensure maximum ventilation.
- Repairing Damage: Fill any deep scratches, gouges, or loose joints using a wood filler appropriate for the wood type. Allow the filler to dry completely.
- Sanding Progression: Start with a medium grit (around 100-120 grit) to smooth out filler and major imperfections. Finish with a fine grit (180-220 grit) to ensure a perfectly smooth, uniform base that will accept the paint evenly.
- Final Cleaning: Wipe the entire piece down with a tack cloth or a solution of mineral spirits and water to remove all dust, sanding residue, and oils. The surface must be bone dry before moving forward.
Phase 2: Mixing and Applying the Base Coat
Milk paint often comes in powdered form, which must be mixed correctly to achieve the right working consistency. The consistency affects how the paint flows and how easily it can be distressed.
- Mixing the Paint: Follow the manufacturer’s instructions, typically involving mixing the powder with water. For distressing, a slightly thicker consistency is often better, as it allows the paint to sit more visibly on the surface, making the distressed layers more pronounced.
- Enhancing Adhesion (Optional): If the wood is very smooth or glossy, consider mixing in a bonding agent or a thin layer of shellac to help the paint grip the surface better.
- Applying the First Coat: Using a high-quality synthetic brush or roller, apply the first coat evenly. Work in the direction of the wood grain. Do not worry about perfection here; the goal is full, even coverage.
- Drying Time: Allow the paint to dry completely. This can take several hours depending on humidity and temperature. Patience is key; rushing this step leads to poor adhesion.
Phase 3: Executing the Distress Techniques
This is where the piece gains its character. The goal is to create the illusion that the paint has worn away over decades of use, revealing the aged wood beneath the base color.
- Sanding for Wear: Use medium grit sandpaper (120-150 grit). Focus your sanding efforts on areas that naturally see the most use: the edges of tabletops, the corners of drawer fronts, and the armrests of chairs. Sanding lightly and randomly, rather than in straight lines, creates the most authentic, natural wear pattern.
- Scraping/Chipping: Use a putty knife or a specialized scraping tool. Angle the scraper and gently push it across the edges and high points of the furniture. Vary your pressure and angle; deep, aggressive scraping looks modern, while light, random scraping looks truly aged.
- Dry Brushing: Dry brushing is used to highlight the texture and details. Dip a stiff brush into a contrasting (usually lighter) color of milk paint, then wipe almost all the paint off onto a paper towel until the brush bristles are barely coated. Lightly drag this brush over raised details, carvings, and edges. This technique picks up the texture and makes the distressed areas pop.
Phase 4: Sealing and Finalizing the Finish
The distressed finish must be protected to last. Choosing the right sealant is paramount, as it determines the piece’s durability and final aesthetic.
- Selecting the Sealant:
- Wax Finish: Ideal for a very soft, vintage, matte, or antique look. It nourishes the wood and enhances the patina but offers the least resistance to water or heavy wear.
- Polyurethane/Varnish: Provides the highest level of protection, making the piece suitable for high-traffic areas (like a dining table). It is durable and water-resistant, though it can give a slightly more modern sheen compared to wax.
Application: Apply the chosen sealant in thin, even coats. Use a soft cloth or brush and ensure you cover the distressed areas and crevices thoroughly. Curing Time: Allow the sealant to cure fully. Do not rush this process. Depending on the product, curing can take 24 to 72 hours before the piece can be used or handled heavily.
Materials and Tools Checklist
Having the right supplies makes the process infinitely easier. Do not attempt this project without gathering all necessary tools and materials beforehand.
- The Paints: Milk paint (powdered form), and optional contrasting colors for dry brushing.
- Prep & Cleaning: Chemical paint stripper (if needed), wood filler, various grits of sandpaper (80, 120, 180, 220), mineral spirits or tack cloths, clean rags.
- Application Tools: High-quality synthetic brushes (various sizes), foam rollers (for large, flat surfaces), small mixing container.
- Distressing Tools: Putty knives or scrapers, stiff-bristled brushes (for dry brushing), steel wool (optional).
- Finishing: Chosen sealant (wax, polyurethane, or varnish), lint-free cloths.
Design and Color Pairing Tips
The color choices you make determine the emotional tone of the finished piece. Milk paint is versatile, but understanding undertones and how light affects the color is key to achieving a cohesive look.
Understanding Undertones: When selecting colors, pay attention to the undertones. A “gray” paint might lean blue or green depending on its undertone. If your room has warm lighting or natural wood tones, choosing a gray with warm, beige undertones will look more harmonious than a cool, icy gray.
Light and Sheen: The natural light in the room is critical. A color that looks perfect in bright daylight might appear dull or washed out in low evening light. For maximum depth, consider using a matte or satin finish, as these sheens absorb light, making the distressed texture more visible.
Pairing Colors: For a classic farmhouse look, pair soft, creamy whites with muted greens or pale blues. For a coastal feel, stick to whites, soft grays, and dusty aqua tones. Always test swatches directly on the actual piece of furniture, not just on scrap wood, to account for the wood’s natural stain.
Common Mistakes to Avoid
Even experienced DIYers can make mistakes when distressing. Knowing these pitfalls can save you hours of sanding and repainting.
- Skipping Prep Work: The biggest mistake is failing to strip or sand down to the bare wood. If old paint remains, the new milk paint will adhere unevenly, resulting in patchy, peeling sections.
- Rushing the Drying Time: Milk paint and sealants require time to cure. Applying a second coat or sealant before the first one is fully dry will cause the layers to mix or peel, ruining the surface.
- Over-Distressing: Don’t scrape or sand so aggressively that you remove all the original wood character. The goal is to suggest wear, not to destroy the piece entirely. Leave some areas slightly more protected to maintain depth.
- Ignoring Ventilation and Safety: Never work with chemical strippers or solvents without excellent cross-ventilation and proper protective gear.
Safety and Practical Notes
Safety must always be the top priority when working with paints, chemicals, and abrasive materials. Take these precautions seriously:
- Ventilation: Always work in a well-ventilated area. Open windows and use fans to ensure fresh air circulates, especially when using strippers or solvents.
- Protective Gear: Wear a respirator mask (especially when sanding or using chemicals), safety goggles, and gloves to protect your lungs and eyes from dust and fumes.
- Lead Paint Warning: If you suspect the furniture piece was painted before 1978, assume it contains lead paint. Do not sand or strip it without following local guidelines for lead paint disposal and containment. Call a professional if you suspect lead content.
- Professional Help: If the furniture piece is large, structurally unsound, or requires the removal of heavily layered or antique finishes, consider hiring a professional restorer.
Frequently Asked Questions
What should I do if I suspect the furniture has lead paint?
If the piece was painted before 1978, assume it contains lead paint. Never sand or strip it without proper precautions. Lead paint abatement is a specialized process. You must follow local guidelines for disposal and containment, or, ideally, hire a professional restorer who specializes in lead paint removal. Safety is the top priority here.
Which sealant should I use for high-use areas, like a dining table?
For surfaces that will see regular wear, such as dining tables or chair arms, Polyurethane or a durable varnish is recommended. These sealants offer the highest level of water resistance and durability. If the piece is purely decorative and will not get wet, a wax finish can provide a more authentic, matte, vintage look, but it offers less protection.
Get the Fail-Safe Paint Color Playbook (Free PDF)
36 proven colors • 8 ready palettes • trim & sheen guide • printable testing cards.
Is sanding absolutely necessary, or can I skip some steps?
Sanding is critical. Skipping the sanding stages—especially the final fine sanding (180-220 grit)—will result in uneven paint adhesion and a patchy, rough finish. The entire purpose of the prep work is to create a stable, uniform, and smooth foundation for the new milk paint to adhere to properly.
The timeline varies greatly depending on the size of the piece and the desired level of detail, but do not attempt to rush it. The process is broken down by drying and curing times. Expect to dedicate several days, rather than just one afternoon. Key time sinks include the initial stripping/sanding, the drying time between coats, and the final sealant curing time (which can take 24 to 72 hours).
How do I achieve a natural-looking distress rather than an aggressive one?
The key is restraint and variation. Instead of scraping or sanding in straight, obvious lines, focus on random, subtle movements. Use medium-grit sandpaper to lightly feather the edges, and when scraping, vary your pressure and angle. The goal is to suggest the passage of time—a soft, worn patina—rather than to remove all the paint and expose the raw wood.
Conclusion
Distressing furniture with milk paint is a deeply rewarding journey that transforms mere objects into personalized works of art. By taking the time to plan, prepare, and execute the process thoughtfully, you gain the confidence to tackle any piece of furniture. Remember that the beauty of this technique lies in its imperfection; the chips, the wear marks, and the subtle patina are what give your piece its unique soul.
Embrace the process, experiment with color pairings and distressing tools, and enjoy the creative process. Your finished piece will not only be a stunning addition to your home decor but will also be a testament to your creativity and dedication.