
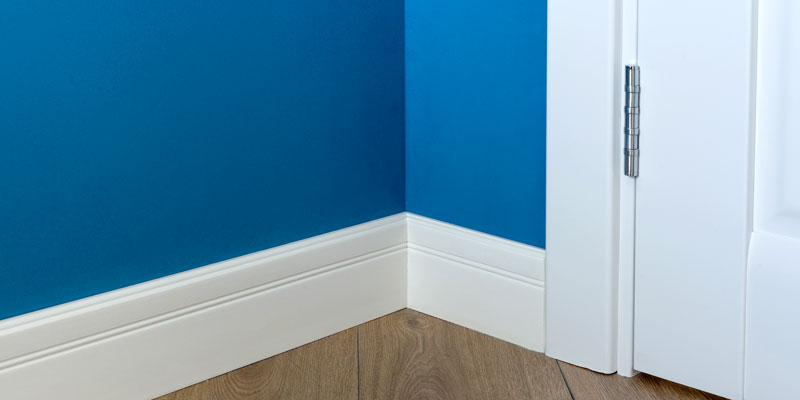
How To Paint Corners Of A Wall: A Step-by-Step Guide for Flawless Results
Painting the corners of a wall is one of those home improvement tasks that can feel intimidating. The tight angles, the need for perfect seams, and the potential for visible brush marks often make corners seem like the hardest part of any painting project. However, mastering this skill is absolutely essential for giving your room a truly polished, professional, and seamless finish.
With a structured approach, the right specialized tools, and an understanding of advanced techniques—like proper priming and feathering—painting corners transforms from a daunting chore into a rewarding, manageable skill. This comprehensive guide will walk you through every stage, ensuring you feel confident and equipped to tackle any corner, no matter the size or surface condition.
Get the Fail-Safe Paint Color Playbook (Free PDF)
36 proven colors • 8 ready palettes • trim & sheen guide • printable testing cards.
Quick answer: To Paint Corners Of A Wall, start with the safest first step for the material involved, test a small area when needed, and follow the process in thin, controlled stages. Use proper ventilation and protective gear when chemicals, sanding, spraying, or solvents are involved.
Planning and Preparation Before You Start
Before the first brushstroke hits the wall, proper planning is non-negotiable. This stage determines the success, longevity, and final appearance of your corner painting. Assess your space, calculate your materials, and understand the surface you are working with.
Assessing the Surface and Project Scope
Take a walk around the corner you intend to paint. What are you looking at? Is it drywall meeting painted wood trim? Is the corner surface porous, or is it already sealed? Knowing these details dictates your materials and prep time.
- Identify Substrate Materials: If the corner involves different materials (e.g., plaster, drywall, painted wood), you may need specialized fillers or primers for each type. Using a single primer on mixed surfaces can lead to poor adhesion and visible patchiness.
- Check for Damage: Look closely for signs of underlying issues—deep cracks, water stains, mold, or mildew. Mildew must be treated with a specialized anti-fungal wash and allowed to dry completely before any patching or painting begins. If structural damage is suspected, stop and call a licensed professional.
- Determine Paint Compatibility: If you are painting a corner that meets a trim piece, check if the trim paint and the wall paint are compatible. Mixing different paint chemistries can cause blistering or uneven curing.
Calculating Materials and Timing
Don’t guess how much paint you need. Measure the corner surface area and estimate the volume of paint required for the primer and the topcoat. For corner details, consider that the paint coverage will be highly concentrated in small areas, requiring careful calculation. Always purchase at least 10% more paint than calculated to account for touch-ups and waste.
In terms of timing, plan for multiple days. Day one is dedicated solely to prep (cleaning, patching, sanding). Day two is dedicated to priming and applying the first coat of paint. Day three, or later, is for the second coat and final cleanup. Rushing the drying time is the single biggest mistake in corner painting.
Essential Tools and Materials Checklist
Having the right equipment is half the battle. Specialized tools allow you to achieve precision that standard household items cannot match. Investing in quality supplies saves time, frustration, and ensures a professional result.
| Tool | Description |
|---|---|
| Paintbrushes | Various types and sizes of brushes suitable for corner painting, including those with angled bristles for enhanced precision. |
| Painter’s Tape | Specialized tape used to protect adjacent surfaces, ensuring clean lines and preventing paint bleed. |
| Drop Cloths | Protective coverings such as drop cloths or plastic sheets to safeguard the floor and nearby furniture from paint splatters. |
Specialized Tools
- Angled Sash Brush: This is your most critical tool. The angled shape allows you to “cut in”—painting directly along edges and corners—while maintaining control and keeping the paint confined to the desired area.
- Putty Knives/Taping Knives: Used for applying joint compound, smoothing patches, and, crucially, running a bead of sealant along the edge of painter’s tape to prevent paint bleed.
- Filler/Sanding Tools: Include a sanding block and various grits of sandpaper (e.g., 120-grit for sanding compound, 220-grit for final smoothing).
- Paint Trays and Stir Sticks: Essential for maintaining paint consistency and preventing clumping.
Consumable Materials
- Painter’s Tape: Select a high-quality, low-tack painter’s tape designed for the specific surface (drywall, wood, etc.).
- Patching Compounds: Use a dedicated filler for small chips (e.g., lightweight spackle) and a robust joint compound (e.g., drywall mud) for larger cracks or structural joints. Do not use regular caulk for deep structural cracks.
- Drop Cloths and Plastic Sheeting: Protect floors and furniture completely.
- Cleaning Solutions: Use mild detergent and clean water for general cleaning, and a specialized mildew remover/degreaser if necessary.
Step-by-Step Guide to Painting Corners of a Wall
The painting process must be executed in a specific, methodical order: Preparation, Priming, Painting, and Finishing. Skipping or rushing any step will compromise the final look.
Phase 1: Surface Preparation (The Most Important Step)
- Initial Cleaning: Use a vacuum with a brush attachment to remove all loose dust, cobwebs, and grime from the corner. If the corner has been exposed to moisture, gently scrub the area with a dilute solution of detergent and water to remove mildew or soap scum. Rinse thoroughly and allow the corner to dry completely—this can take several hours.
- Patching Structural Imperfections: Inspect the corner for cracks and holes. For small chips, apply spackle. For larger, deeper cracks (like those caused by seasonal settling), use a dedicated joint compound. Apply the compound in layers, following the manufacturer’s drying times.
- Sanding and Smoothing: Once all compounds and patches are fully dry, sand the entire patched area and the surrounding surrounding surface lightly with fine-grit sandpaper (220-grit). The goal is to create a smooth, seamless transition so that the patch is indistinguishable from the original wall surface. Wipe away all sanding dust with a tack cloth.
Phase 2: Masking and Priming
Before applying color, you must protect adjacent surfaces and seal the repaired areas.
- Masking: Carefully apply painter’s tape along all seams, trim edges, and where the corner meets the ceiling or adjacent surfaces. Use a putty knife to run a clean bead of sealant or tape adhesive along the edges of the tape. This seals the edge, preventing paint from seeping underneath and ensuring razor-sharp lines.
- Priming: Apply a high-quality, stain-blocking primer to all patched areas and the entire corner surface. The primer seals the porous patched material, ensuring the topcoat color will be consistent and preventing the patch from absorbing paint unevenly. Apply the primer in thin, even coats, working from the top down, and allow it to dry completely according to the manufacturer’s instructions.
Phase 3: Applying the Finish Coats
This is where the actual color application happens. Always use a high-quality angled brush suitable for cutting in.
- Cutting In (The Corners): Load your angled brush with paint and remove excess by tapping against the side of the tray. Start painting at the top of the corner and work downwards. Apply controlled, steady strokes, following the natural line of the corner.
- Feathering (Blending): As you approach the junction between the corner and the adjacent, already painted wall, do not simply stop the brush. Instead, use the feathering technique. This involves gradually thinning your brushstrokes, allowing the paint to overlap and transition smoothly into the adjacent surface. This overlapping motion eliminates visible lines and creates a seamless blend.
- Second Coat: Allow the first coat to dry completely. Apply the second coat, repeating the cutting-in and feathering process. Two coats are almost always necessary to achieve the depth of color and uniform appearance required for a professional finish.
Design and Color Considerations for Corners
The corner is a small, highly visible detail that can significantly impact the perceived quality of a room. Understanding color theory and paint finishes will help you make decisions that enhance, rather than detract from, your design.
Understanding Paint Sheen and Finish
The sheen (or luster) of the paint is perhaps the most critical decision. It affects how light reflects off the surface and how durable the paint appears. Corners often interact with multiple surfaces (walls, trim, ceiling), so consistency is key.
- Matte/Flat Finish: This finish absorbs light and is excellent for large wall surfaces where you want a subtle, sophisticated look. However, it is the least durable and easiest to scuff, making it risky for high-traffic corner areas.
- Eggshell/Satin Finish: This is the most common recommendation for interior walls and trim. It offers a subtle sheen that is much easier to clean and maintain than flat paint, while still looking elegant. It provides the best balance of durability and aesthetic appeal for corner detailing.
- Semi-Gloss/Gloss Finish: These high-sheen finishes are extremely durable and washable, making them ideal for areas prone to heavy scuffing or moisture (like corner bases near sinks). However, they can visually emphasize imperfections, so use them judiciously.
When painting a corner, you are essentially making a transition point. If the adjacent walls and trim are different colors, the corner paint must act as a mediator. If the difference is too stark, the corner will draw unnecessary attention. Consider the undertones of your existing paint. If your trim has a slightly warm (yellow/beige) undertone, ensure your new corner paint matches that undertone, even if you are painting a different color, to maintain harmony.
If you are using an accent color, keep the contrast dramatic but controlled. Painting a corner a dark, saturated color can make the corner itself feel heavier or narrower, while a light, complementary shade can visually expand the space.
Common Mistakes to Avoid When Painting Corners
Even experienced painters can fall into common traps when working in tight corners. Recognizing these pitfalls beforehand will save you time, effort, and paint.
- Skipping the Primer: This is the number one mistake. If you patch drywall and paint over it without a primer, the patch material will absorb paint differently than the original wall, resulting in visible, uneven “ghost” patches.
- Rushing the Drying Time: Paint, especially in corners, can take longer to cure than on open wall areas. Applying a second coat too early will lift the first coat, leading to streaks and uneven coverage. Always follow the “dry to the touch” rule, and then wait the specified recoat time.
- Forgetting to Seal the Tape: Simply applying the tape is not enough. The porous edges of the tape will allow paint to wick underneath. Always use a putty knife to run a bead of sealant or joint compound along the tape’s edge to create a waterproof, sealed barrier.
- Using the Wrong Tool: Trying to cut in a tight corner with a roller will result in paint buildup and sloppy edges. Always reserve angled brushes for the detailing work.
Safety and Practical Notes
Painting involves chemicals and physical tasks, so safety must be your top priority. Never compromise safety for a perfect finish.
When using any chemicals—especially solvents, strong fillers, or new paints—volatile organic compounds (VOCs) can accumulate. Always ensure excellent ventilation by opening windows and using fans to draw fresh air through the area. If the corner is in a confined space, wear an appropriate respirator mask designed for paint fumes. Never paint or prep in a poorly ventilated area.
Handling Structural Concerns
If you encounter signs of mold, mildew, or structural instability, do not attempt to paint over them. Mildew must be treated with professional-grade solutions and allowed to dry fully. If the corner structure shows severe signs of water damage or deep settling cracks, consult a licensed contractor before proceeding. These issues require structural repair, not just patching.
Protective Gear
Always wear appropriate personal protective equipment (PPE). This includes eye protection (safety glasses), gloves (to protect skin from chemicals), and a dust mask or respirator when sanding or mixing compounds.
Frequently Asked Questions
Do I need to use a specific primer on all patches?
Yes, absolutely. When patching drywall or plaster, you must use a stain-blocking primer (like a specialized drywall primer) over all compound and filler material. If you skip this step, the patch material will absorb the topcoat paint differently than the original wall, leading to visible, uneven discoloration or “ghosting” patches.
What is the best paint sheen for corner detailing?
For most general interior corners, an Eggshell or Satin finish offers the best balance. These sheens provide enough durability and washability to handle scuffs and wear in high-traffic areas, while still maintaining an elegant, non-glaring appearance superior to high-gloss finishes. Avoid flat finishes in corners, as they are prone to damage.
Get the Fail-Safe Paint Color Playbook (Free PDF)
36 proven colors • 8 ready palettes • trim & sheen guide • printable testing cards.
When should I call a professional painter?
You should stop and call a licensed contractor immediately if you encounter any of the following: deep structural cracks (cracks spanning the width of the corner, suggesting settling), signs of persistent water damage, active mold/mildew that cannot be treated with professional-grade anti-fungal wash, or if the corner involves complex material junctions (e.g., mixing old plaster with modern metal supports). These require structural repair, not just cosmetic patching.
How do I ensure my cut-in lines are perfectly straight?
Achieving a perfect line requires two things: the right tool and the right technique. Always use a high-quality angled sash brush. For the sharpest edges, run a bead of sealant or joint compound along the edge of your painter’s tape before cutting in. This seals the porous edge and prevents paint from wicking underneath, ensuring a crisp, professional finish.
Is it okay to mix different types of paint in the corner?
Generally, no. While it might be tempting to use different colors or types of paint (e.g., a trim paint and a wall paint), ensure they are chemically compatible. If the difference is minimal (e.g., slight undertone variation), plan to use the same brand and line of paint for all components to guarantee consistent curing and adhesion. If the difference is large, the corner will draw unnecessary attention.
Conclusion: Achieving Professional Results
Painting corners is a detailed, multi-layered process that requires patience, preparation, and attention to technique. By treating the corner not just as an angle, but as a structural seam that requires patching, priming, and careful blending, you elevate your DIY skills to a professional level.
Remember that the time spent on preparation—the cleaning, the sanding, and the precise taping—will pay dividends in the final result. Take your time, use your angled brush with steady strokes, and always remember the power of the feathering technique. With this methodical approach, your freshly painted corners will be seamless, beautiful, and built to last, significantly enhancing the overall aesthetic of your home.