
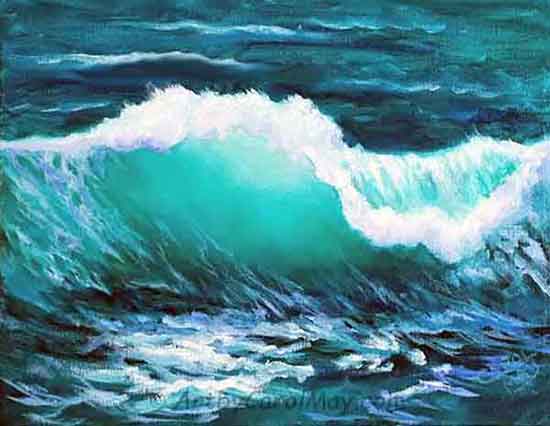
How to Paint Waves in Oil
Painting waves in oil is one of the most challenging yet profoundly rewarding subjects in the art world. It requires the artist to capture not just the visual appearance of water, but the invisible forces of energy, movement, and light that define the ocean. Whether you are tackling the soft, ethereal glow of a dawn swell or the dramatic, violent energy of a storm-tossed sea, mastering this subject demands patience, careful observation, and a deep understanding of light physics.
This comprehensive guide will walk you through the entire process, from initial composition planning and anatomical study to advanced layering techniques and color theory. We will transform the daunting task of painting water into a structured, step-by-step guide, ensuring you have the technical knowledge and confidence to bring your oceanic vision to life on canvas.
Get the Fail-Safe Paint Color Playbook (Free PDF)
36 proven colors • 8 ready palettes • trim & sheen guide • printable testing cards.
Quick answer: To Paint Waves in Oil, start with the safest first step for the material involved, test a small area when needed, and follow the process in thin, controlled stages. Use proper ventilation and protective gear when chemicals, sanding, spraying, or solvents are involved.
Planning Your Composition and Subject Matter
Before touching a single brushstroke, the most crucial step is preparation. A wave painting is fundamentally a study of light and energy, and your planning phase must reflect this. You are not just painting blue; you are painting the interaction between blue, light, and air.
Consider the narrative of the scene. Is it a calm, glassy bay, or a high-energy Pacific storm? The chosen scenario dictates your color palette, the level of contrast, and the required techniques. Always sketch your composition first, paying close attention to the horizon line, as this single element dictates the scale and depth of your entire piece.
When deciding on the time of day, remember that the light source is your greatest tool. Painting waves at dawn or dusk (the ‘golden hour’) provides soft, warm, and muted tones, while painting at midday offers high contrast, intense blues, and sharp reflections. The time of day must inform every color decision you make.
Essential Materials and Tools for Oil Painting
The right tools are non-negotiable when tackling a subject as dynamic as the ocean. Every item, from the medium to the brush, plays a role in the final texture and depth of your work.
The Paint Collection
Do not settle for standard blue. You need a sophisticated palette that captures the full spectrum of water’s color. Essential shades include:
- Blues: Ultramarine, Cerulean, Prussian Blue (for deep, cold water).
- Greens: Viridian, Phthalo Green (for tropical or shallow, mineral-rich water).
- Grays/Violets: Payne’s Gray, Dioxazine Purple (for stormy, deep, or shadowed areas).
- Highlights: Titanium White (for opaque foam/impasto) and highly transparent white (for subtle highlights).
The inclusion of transparent pigments is paramount. These are the colors you will use for glazing, allowing the underlayers to influence the final hue and giving the water its elusive luminosity.
The Brush Arsenal
A variety of brushes is needed to mimic the diverse textures of the sea, from glassy reflections to chaotic foam.
- Flat Brushes (1/2″ to 1″): Excellent for applying large, even washes of paint to establish the base layer and deep, smooth areas of water.
- Filbert Brushes: Highly versatile; perfect for blending and shaping the main body of the wave face.
- Round Brushes (Size 0-4): Ideal for fine detail, such as ripples, small droplets, and the fine lines defining the crest.
- Fan Brushes: Necessary for creating the delicate, spritzing texture of sea foam, spray, and sea mist.
- Palette Knives: Used not just for mixing, but as a structural tool to apply thick, impasto texture to the crest and break zones.
Mediums and Preparation
Never use straight paint. Mediums are the secret to depth and fluidity. Incorporate:
- Linseed Oil: A basic medium that slows drying time and enhances the transparency and flow of the paint.
- Dammar Varnish/Medium: Used to create a sticky, glossy surface for wet-on-wet blending, especially when painting the main body of the wave.
- Gesso: For preparing the canvas surface, ensuring it is stable and receptive to oil paint.
The Step-by-Step Guide to Painting Waves in Oil
The process must be approached in layers, moving from the largest, most diffuse areas to the smallest, most energetic details. Think of this as building depth, not just color.
Phase 1: Establishing the Foundation and Value
- Composition and Sketching: Lightly sketch the main wave shapes and the horizon line. Determine the primary light source (e.g., low sun to the left) and map out where the brightest highlights and deepest shadows will fall.
- The Sky and Depth Base: Begin by painting the sky and the deepest parts of the ocean. Use the lightest, most translucent colors here. This sets the atmospheric perspective and establishes the overall value contrast. The sky should reflect the mood (e.g., pale grays for an overcast day; saturated oranges/pinks for sunset).
- The Initial Water Wash: Apply a thin, diluted wash of your base water color (a mix of blue and green) over the entire water area. This thin layer establishes the underlying tone and prevents the canvas from looking flat.
Phase 2: Defining Anatomy and Structure
Now you start defining the physical structure of the waves, working from the background waves toward the focal point.
- The Trough and Face: Using slightly darker, more saturated colors, block in the main forms. The troughs should be the darkest areas, absorbing light. The faces of the waves should be the most voluminous, receiving the most light, but also showing the deepest shadows where they curve.
- Wet-on-Wet Blending: Use the wet-on-wet technique (applying wet paint onto a wet base) on the main wave faces. This allows the colors to transition seamlessly, mimicking the natural, fluid flow of water. Use large, sweeping, curved strokes to suggest movement.
- Layering for Depth: Crucially, do not paint the water in one layer. Build depth by applying successive, thin glazes. For example, lay down a dark glaze (deep blue) first, let it dry, then glaze over it with a lighter, more translucent blue-green glaze. This layered approach tricks the eye into seeing depth and varying distances.
Phase 3: Adding Energy and Detail
The final stage is where the illusion of movement and energy is perfected.
- The Breaking Crest: Focus on the point where the wave breaks. This area is the brightest and most opaque. Use thicker paint (impasto) applied with palette knives or stiff brushes. The colors here should shift dramatically—from the deep, dark blue of the wave face to brilliant, opaque whites and creams of the foam.
- Foam and Spray: Use the fan brush and small, controlled splattering techniques to add the chaotic, frothy texture of the foam. Foam is opaque and white, contrasting sharply with the translucent water beneath it.
- Highlights and Reflections: Apply the final, smallest touches of pure white paint using the tip of a small, clean brush. These “sparkling highlights” catch the light, suggesting the wet sheen on the water’s surface. Pay special attention to reflections of the sky or nearby objects on the water’s surface, as these are key to realism.
If technique is the ‘how,’ color and light are the ‘why.’ Understanding how light behaves in water is the single most important element for realism.
The Importance of Value over Hue
When mixing colors, focus less on mixing specific names (e.g., “teal”) and more on controlling the *value* (the lightness or darkness) and *temperature* (warm or cool) of the mixture. The deepest shadows must have low value, and the brightest highlights must have high value. The dramatic contrast between the shadow and the highlight is what makes the wave appear three-dimensional.
Advanced Glazing Techniques
Glazing is the application of an extremely thin, transparent layer of paint over a dry layer. It is your primary tool for creating the illusion of depth and translucency. If your water looks flat, it is likely because you skipped the glazing process. Use glazes of complementary colors (e.g., mixing a tiny touch of orange or yellow into a blue glaze) to create a more complex and natural color harmony.
The Role of Reflection and Refraction
When light hits water, two things happen: it reflects (bounces off the surface) and it refracts (bends as it enters the water). When painting, you must depict both. The surface should show clear, distinct reflections of the sky and surrounding objects. Meanwhile, the deeper parts of the wave should show the subtle, refracted colors of the seabed or the atmosphere, adding complexity beneath the surface gloss.
Even experienced artists encounter hurdles when painting water. Knowing how to diagnose and fix common problems will save you hours of frustration.
The Problem of Muddy Colors
Muddy colors happen when pigments mix on the palette and become overly saturated, losing their original vibrancy. This is particularly common when mixing many shades of blue, green, and gray. To prevent this, always clean your palette meticulously between mixing groups of colors. When mixing, introduce the color gradually, building up the desired tone slowly rather than dumping all components at once.
Dealing with Flatness
If your finished painting looks two-dimensional and lifeless, the issue is almost always a lack of value contrast. To fix this, identify the darkest point and the brightest point on the canvas and exaggerate the difference between them. Deepen the shadows by adding more cool, saturated tones, and increase the highlights with pure, unmixed white paint.
Incorrect Scale and Perspective
If the wave looks disproportionate or the horizon line feels wrong, you need to re-evaluate your composition. Use reference photos that include measurable objects (like boats or distant buildings) to help establish scale. Remember that objects in the distance should appear lighter, paler, and less detailed due to atmospheric perspective.
Safety and Studio Practices
Because oil painting involves solvents and mediums, maintaining a safe and well-ventilated workspace is mandatory. Never compromise on safety for the sake of the artwork.
- Ventilation: Always work in a well-ventilated area when using solvents, thinning mediums, or turpentine. Proper airflow is crucial to prevent the buildup of fumes.
- Protective Gear: Wear appropriate gloves and safety glasses when handling solvents and mediums.
- Medium Handling: When mixing mediums, always follow the manufacturer’s instructions regarding dilution ratios and curing times.
- Curing Time: Allow all paint and mediums to cure completely before varnishing or moving the piece. Improper drying can lead to cracking or yellowing.
Mistakes to Avoid
Do not skip assessment just because the project looks simple. Most paint, cleaning, repair, and tool-care problems come from poor prep, incompatible products, rushed drying time, or using a method that does not match the material.
Avoid working without ventilation, gloves, eye protection, or a cleanup plan when coatings, solvents, sanding dust, or business/studio supplies are involved. Test first, read manufacturer directions, and pause if the surface, tool, or client setting creates safety questions you cannot answer confidently.
Safety and Practical Notes
Work in a well-ventilated space and wear gloves, eye protection, and a respirator when needed. Keep children and pets away from wet surfaces and open containers.
Follow manufacturer drying times between coats. Dispose of rags and leftover materials according to local regulations. If the project involves heights, lead paint, or structural work, consider hiring a licensed professional.
Get the Fail-Safe Paint Color Playbook (Free PDF)
36 proven colors • 8 ready palettes • trim & sheen guide • printable testing cards.
Frequently Asked Questions
How do I achieve the look of depth and translucency in the water?
The key to depth is mastering the glaze. Never rely on a single wash of color. Instead, build depth by applying multiple, extremely thin, transparent layers (glazes) over a completely dry underlayer. Use complementary colors—for instance, adding a subtle touch of warm orange or yellow to a cool blue glaze—to make the blue appear richer and more complex, mimicking how light interacts with deep water.
What is the single most important element for making the wave look three-dimensional?
It is value contrast. Do not focus solely on the color (hue); focus on the difference between the darkest shadows (low value) and the brightest highlights (high value). The dramatic shift from the deep, saturated shadow in the trough to the brilliant, opaque white of the crest is what creates the illusion of volume and energy. Exaggerating this contrast is the fastest way to make your painting pop.
What are the essential safety practices when using mediums and solvents?
Safety is non-negotiable. Always work in a well-ventilated area to prevent the buildup of fumes from solvents like turpentine or thinners. Wear appropriate protective gear, including gloves and safety glasses, when handling these materials. Always follow the manufacturer’s instructions for mixing and curing mediums.
How should I begin the composition planning for a dynamic wave scene?
Start by defining the light source and the time of day. The light source dictates the value and temperature of every color you use. Sketching the horizon line and identifying where the sun (or moon) is positioned allows you to map out where the warm highlights will fall and where the cool, deep shadows will accumulate. This structural plan guides all subsequent color decisions.
Conclusion
Mastering the painting of waves is a journey of continuous observation and technical refinement. Approach your next canvas not just as a chance to paint blues and greens, but as an opportunity to study the physics of light, the anatomy of energy, and the endless, fluid movement of the planet. Be patient, experiment with the glaze and impasto techniques, and remember that every single wave holds a unique story. Keep practicing, and soon, the dynamic power of the ocean will flow effortlessly from your brush.