
How Thick Is 1 Mil Of Paint
Achieving a flawless, lasting paint finish is more than just mixing color and applying a coat; it is a highly technical process rooted in understanding material science. At the core of professional painting lies the concept of paint thickness, a measurement that dictates the paint’s ability to bond, cure, and withstand environmental wear. Whether you are tackling a small accent wall or refinishing an entire exterior facade, knowing the correct thickness is the single most critical step to ensuring your project’s success.
Many DIY guides focus purely on color selection, but neglecting the physical properties of the paint—such as its required thickness (measured in mils)—can lead to premature peeling, poor adhesion, and a finish that looks amateurish. This comprehensive guide will take you beyond basic color matching to provide actionable, detailed knowledge on everything from surface preparation and proper tooling to the science of wet film and dry film thickness, empowering you to achieve professional-grade results every time.
Get the Fail-Safe Paint Color Playbook (Free PDF)
36 proven colors • 8 ready palettes • trim & sheen guide • printable testing cards.
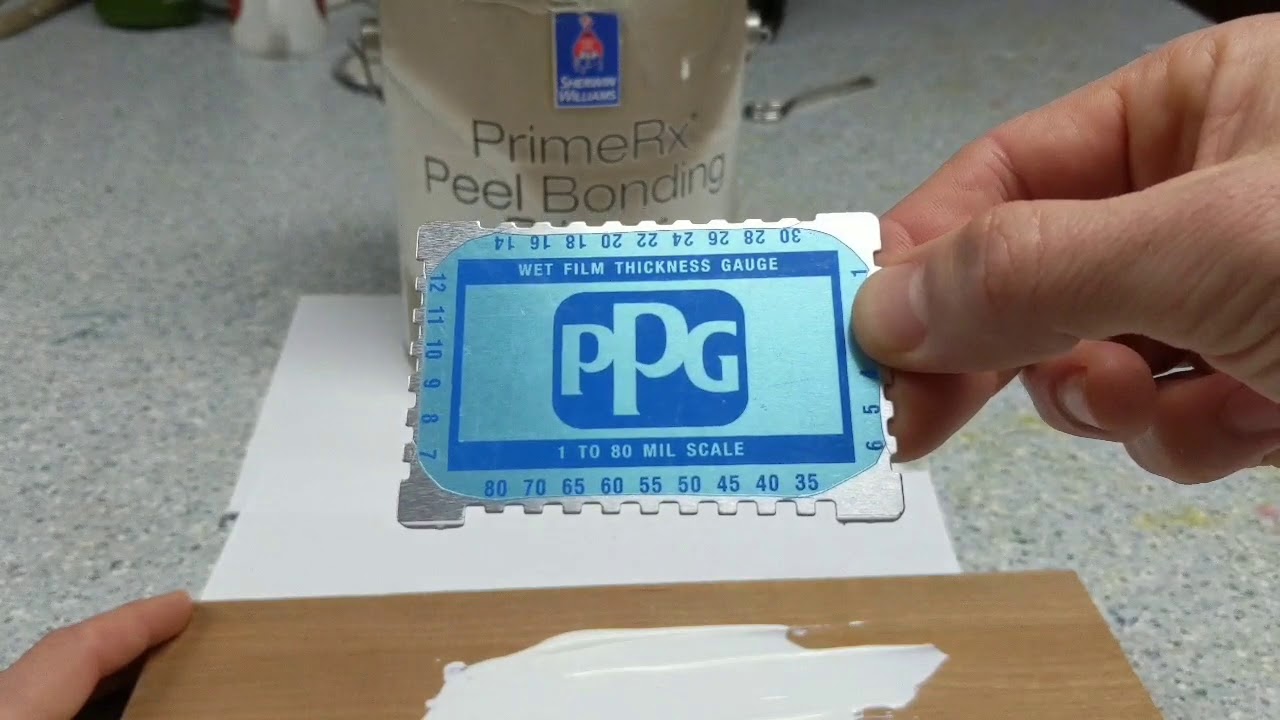
Quick answer: 1 mil of paint is 0.001 inch thick, or about 25.4 microns. Wet paint film shrinks as solvents or water evaporate, so the dry film is thinner than the wet coat. Use a wet-film gauge during application and the product data sheet’s dry-film target to confirm the coating is thick enough.
Planning Before You Start: Assessing Your Substrate and Scope
Before the roller even touches the wall, thorough planning is non-negotiable. Paint adhesion and longevity are entirely dependent on the surface you are painting. Treating the surface as a blank slate when it is, in fact, a complex mix of materials—old coatings, grease, mildew, and porous substrate—is the most common mistake. You must assess the current state of the surface to determine what level of preparation is needed.
When assessing the scope, consider not just the square footage, but the underlying material. Is it bare, porous concrete that absorbs moisture? Is it metal that requires rust stabilization? Is it wood that has been heavily stained and is prone to tannins? Each material dictates the type of primer and the minimum required thickness. For example, painting over heavily stained wood requires a penetrating stain-blocking primer to prevent those tannins from bleeding through and affecting the color of your topcoat.
Furthermore, plan for environmental variables. Will this area see high humidity (like a bathroom or basement)? Is it subject to temperature extremes (like an exterior wall)? These factors dictate the required durability and thickness, often necessitating specialized, thicker coatings like epoxy or marine-grade paints, rather than standard interior latex.
The Core Process: Achieving Optimal Paint Thickness
Achieving the right thickness requires a disciplined, step-by-step approach that addresses the surface, the bonding agent (primer), the application, and the curing time. This sequence ensures maximum adhesion and structural integrity for the paint film.
Surface Preparation: The Foundation of Thickness
Preparation is arguably the most critical phase, contributing more to the final thickness and durability than the paint itself. The goal is to create a stable, clean, and uniform surface for the paint to grip. This process must be tailored to the substrate:
- Porous Concrete: Thoroughly wash the surface to remove efflorescence (white, powdery salt deposits) and dust. Use a specialized concrete cleaner and allow it to dry completely. The high porosity requires a specialized bonding or sealing primer to prevent the concrete from sucking the paint dry and causing premature failure.
- Bare Metal: Aggressive cleaning is needed to remove all rust, grease, and loose scale. Sanding or wire brushing is necessary, followed by a rust-inhibitive primer. The primer itself builds a foundational layer of thickness that stabilizes the metal before the topcoats are applied.
- Painted Wood: Scrape away loose, flaking paint. Sanding is crucial to feather edges and create a consistent profile. If the paint is oil-based, ensure the new paint is compatible. A bonding primer designed for wood adhesion will help the new coats stick uniformly.
- Mildew/Mold Remediation: Never paint over mold or mildew. The affected area must be thoroughly cleaned with a specialized biocide solution and allowed to dry completely before any priming can occur.
Primer Selection and Application
The primer is not merely a color base; it is a specialized adhesive designed to bridge the gap between the substrate and the finish coat. The type of primer must match the substrate and the paint system. Applying the correct primer contributes significantly to the total effective thickness and adhesion.
If you are painting over a glossy, smooth surface, you might need a ‘sanding-grip’ primer to give the subsequent coats something physical to grip onto. If the substrate is highly absorbent, a sealing primer is needed to reduce porosity and ensure that the paint film develops an even, predictable thickness.
Application Methods and Thickness Control
The method you use to apply the paint affects how the material is laid down, influencing the final thickness profile. Understanding this helps you manage expectations and troubleshoot issues.
- Rolling: Rolling is generally the most efficient way to achieve uniform thickness over large, flat areas. Use rollers rated for the paint type (e.g., nap thickness for latex vs. oil). For maximum thickness and best coverage, apply the paint in a consistent “W” or “M” pattern, ensuring overlap and minimal roller marks.
- Brushing: Brushing is excellent for detailed areas like trim, corners, and intricate moldings. While it allows for precision, it tends to lay down paint unevenly, often resulting in thicker deposits on the brush marks and thinner material in the gaps.
- Spraying: Spraying (using airless or HVLP equipment) is the best way to achieve the most uniform, consistent thickness over large, complex surfaces, minimizing brush marks and roller lines. However, it requires meticulous preparation and proper ventilation.
Layering and Timing: Wet Film vs. Dry Film
When measuring paint thickness, two concepts are vital: Wet Film Thickness (WFT) and Dry Film Thickness (DFT). Understanding the difference is key to managing the job.
Wet Film Thickness (WFT): This measures the paint film while it is still wet. It is important for ensuring the paint has enough material to cover the surface adequately. WFT is often measured with a gauge and indicates the immediate coverage potential. If the WFT is too thin, the paint may not be able to adhere properly or may fail to fully encapsulate the substrate. A standard coat must have an acceptable WFT before it is deemed sufficient.
Dry Film Thickness (DFT): This is the final, cured thickness of the paint layer. DFT is the true measurement of the protective and aesthetic barrier. The manufacturer specifies a required DFT because this thickness determines the paint’s resistance to chipping, moisture penetration, and abrasion. If the DFT is too low, the paint will fail prematurely, exposing the substrate. If it is too high, it can crack or peel. Always aim for the manufacturer’s recommended DFT range.
Curing vs. Drying: Never confuse these terms. Drying refers to the solvent evaporating (the paint surface looks dry to the touch). Curing is the chemical process where the paint hardens and reaches maximum structural integrity. You can paint a second coat when the first coat is dry, but you must wait until it has sufficiently cured to ensure the adhesion is maximized and the paint film is stable. Always follow the manufacturer’s recommended curing timeline.
Materials and Tools Checklist
To achieve professional thickness and finish, investing in the right tools is essential. This list covers everything from prep to measurement.
- Surface Prep Tools: Sandpaper (various grits), sanding blocks, wire brushes, scrapers, power sanders (orbital/belt sanders), degreasers, and specialized cleaners (e.g., TSP substitutes).
- Priming/Sealing: Appropriate bonding primer (for concrete/masonry), rust-inhibitive primer (for metal), and stain-blocking primer (for wood).
- Application Tools: High-quality roller covers (choose the correct nap size for the material), angled brushes (for cutting in corners), and paint sprayers (airless or HVLP, depending on the paint viscosity).
- Measurement and Safety: DFT/WFT gauges (highly recommended for professional jobs), measuring tape, paint buckets, mixing sticks, and a reliable thermometer/hygrometer to monitor ambient conditions.
- Safety Gear (PPE): Respirator mask (N95 or higher, depending on solvents), chemical-resistant gloves, safety goggles, and proper drop cloths/plastic sheeting.
Design and Color Tips: Appearance and Sheen
While thickness is structural, the finish is aesthetic. The relationship between the paint’s sheen, undertones, and the ambient lighting is critical to how the thickness is perceived. A thick, durable coat should look beautiful, not just functional.
Sheen and Thickness Perception: The sheen (or gloss level) dramatically affects how visible the paint film is. A high-gloss or semi-gloss finish reflects light sharply, making it appear very smooth and often emphasizing any slight imperfections in thickness or prep work. Conversely, a matte or flat finish absorbs light, masking minor surface flaws but also making the paint film look less substantial and durable. For high-traffic, high-durability areas (like a kitchen backsplash), a semi-gloss or satin finish provides the best balance of cleanability and perceived durability.
Understanding Undertones: Paint color is never just “blue” or “green.” Every color has undertones—hints of yellow, purple, or gray. These undertones are heavily influenced by the underlying substrate and the natural light of the room. For instance, a cool gray paint might pick up a subtle green undertone in a north-facing room, while in a south-facing room, that same gray might take on a warmer, slightly purplish cast. Always buy sample pots and paint large swatches on the actual wall surface and observe them at different times of day.
Color Pairings and Contrast: When pairing colors (e.g., trim and wall color), consider the contrast ratio. A high contrast (e.g., stark white trim against a deep charcoal wall) makes the physical separation and the thickness of the paint layer more apparent, demanding pristine edges and perfect surface prep. Low contrast pairings offer a more monolithic, subtle look.
Mistakes to Avoid in Paint Application
Even with the best intentions, several common mistakes can compromise the paint film’s integrity and lead to costly failures.
- Skipping the Primer: This is the number one mistake. Failing to use a primer when switching paint types (e.g., from oil to latex) or over highly porous surfaces guarantees poor adhesion and premature peeling.
- Insufficient Surface Cleaning: Leaving behind grease, dust, or residual cleaners will act as a release agent, preventing the paint from bonding directly to the substrate.
- Rushing the Curing Time: Applying a second coat before the first coat has properly cured—even if it feels dry—will result in poor adhesion, leading to flaking and poor durability.
- Ignoring Environmental Factors: Painting in extreme temperatures or high humidity can cause the paint to cure incorrectly, leading to cracking or blistering.
Safety and Practical Notes
Safety must be paramount in every painting project. The chemicals involved, from solvents to heavy-duty cleaning agents, require proper handling and protective measures.
Ventilation: Always work in a well-ventilated area. When using solvent-based paints, thinners, or lacquers, open all windows and use fans to ensure fresh air circulation. The fumes can be toxic and harmful to the respiratory system.
Personal Protective Equipment (PPE): Always wear appropriate PPE. This includes chemical-resistant gloves to prevent skin absorption, safety goggles to protect eyes from splashes, and a respirator mask suitable for the specific chemicals being used. Never use paint or solvents without proper respiratory protection.
Handling and Disposal: Follow local regulations for paint waste. Latex paint can often be disposed of with household trash if solidified, but solvent-based paints and stain removers must be taken to specialized waste collection facilities. Never pour paint or solvents down the drain.
When to Call a Professional: While DIY projects are rewarding, certain tasks require professional expertise. You should call a licensed professional if the job involves: structural damage, lead paint abatement (requires specialized handling), asbestos materials, or complex electrical work that needs to be painted over.
Frequently Asked Questions
What exactly does “mil” mean when discussing paint thickness?
A mil (or thousandth of an inch) is a unit of measurement used in material science to quantify the thickness of the dried paint film. For example, a 1 mil thickness is 0.001 inches. Manufacturers specify a required Dry Film Thickness (DFT) range (e.g., 2-4 mils) because this thickness determines the paint’s structural integrity, its resistance to moisture, and its overall durability. Knowing this helps you determine if a single coat or multiple coats are necessary.
When should I use a professional painter instead of DIY?
While many tasks are suitable for DIY, you should hire a licensed professional if the job involves structural damage, lead paint abatement (which requires specialized handling), asbestos materials, or complex electrical components. Professionals also have access to specialized equipment, such as industrial DFT gauges, and possess the expertise to handle high-risk materials safely, ensuring compliance with local regulations.
Get the Fail-Safe Paint Color Playbook (Free PDF)
36 proven colors • 8 ready palettes • trim & sheen guide • printable testing cards.
What is the difference between drying and curing paint?
This is a critical distinction. Drying means the solvents (the liquid components) have evaporated, and the paint surface looks dry to the touch. Curing is the chemical process where the binders and resins harden, allowing the paint to reach its maximum structural strength and adhesion. You can apply a second coat once the first coat is dry, but you must wait until it has properly cured to ensure the paint film is stable and won’t flake off later.
Is surface preparation more important than the paint itself?
Yes, overwhelmingly so. The quality and longevity of the paint finish depend far more on the preparation of the substrate than on the paint itself. Proper preparation involves cleaning thoroughly (removing grease, dust, and efflorescence), sanding to create a consistent profile, and applying the correct bonding or sealing primer. If the surface is not stable, the paint will fail regardless of how high-quality the product is.
How can I measure the actual thickness of the paint layer?
For professional results, the best method is using a dedicated Dry Film Thickness (DFT) gauge. These specialized instruments measure the final, cured thickness of the coating. While a visual estimate or a simple gauge can provide an idea of Wet Film Thickness (WFT), the DFT gauge provides the accurate, actionable data needed to ensure the protective layer meets the manufacturer’s specifications.
Conclusion
Understanding paint thickness, measured in mils, is realizing that painting is a sophisticated, multi-step process of material science and chemistry. It is not simply about covering a surface with color; it is about building a durable, cohesive, and aesthetically pleasing protective film. By dedicating time to meticulous surface preparation, selecting the correct primers, and respecting the necessary curing and drying times, you move from simply painting to truly restoring and enhancing your space.
Remember that the greatest determinant of a beautiful, long-lasting paint job is patience. Plan your project, respect the manufacturer’s specifications for minimum thickness and cure times, and your finished space will not only look magnificent but will also possess the lasting durability you desire.