
How to Paint a Desert Landscape
The desert landscape is one of nature’s most breathtaking, yet challenging, subjects to capture on canvas. Its vastness, the harsh contrast between brilliant sunlight and deep shadows, and the silent resilience of its life forms create an atmosphere that is both mesmerizing and difficult to reproduce. Painting a desert landscape is not just about mixing colors; it is about understanding light, perspective, and the emotional weight of solitude.
This comprehensive guide will walk you through every phase of the process, from initial conceptual planning and deep color theory to mastering advanced techniques like atmospheric perspective. By following these detailed, actionable steps, you will gain the confidence and technical knowledge needed to transform your vision of the arid frontier into a stunning, deeply resonant piece of art.
Get the Fail-Safe Paint Color Playbook (Free PDF)
36 proven colors • 8 ready palettes • trim & sheen guide • printable testing cards.
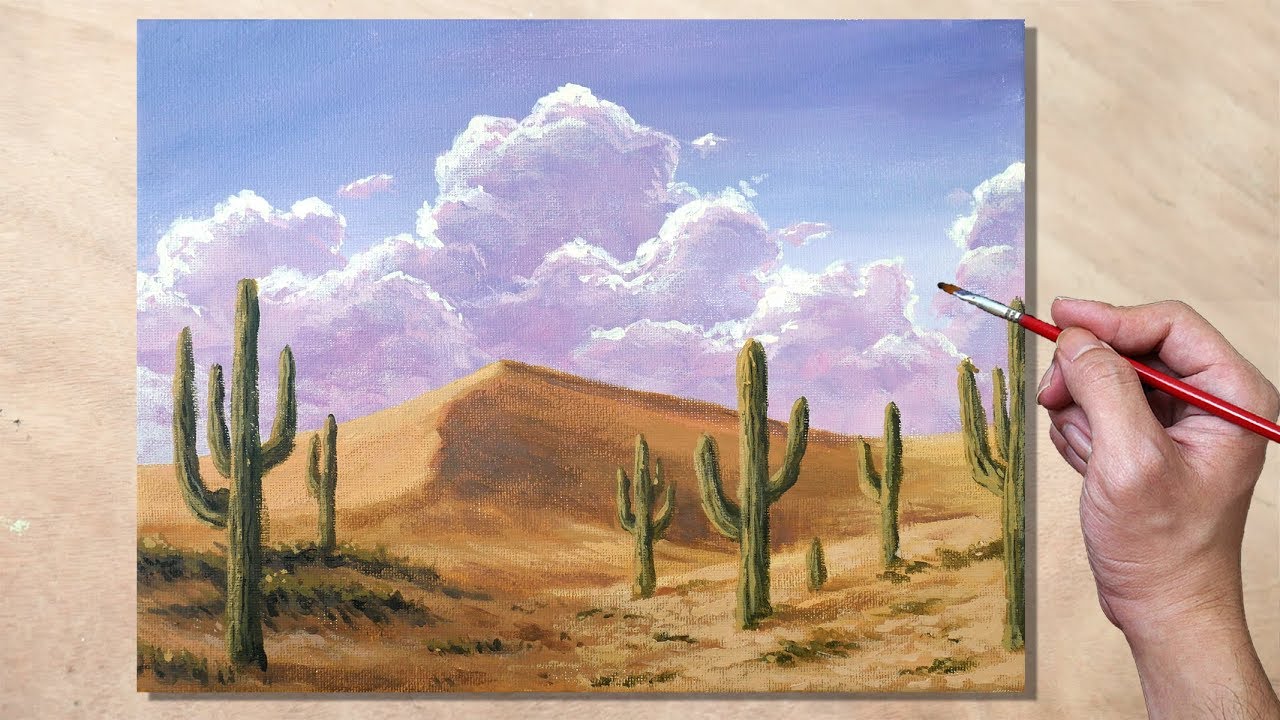
Quick answer: To Paint a Desert Landscape, start with the safest first step for the material involved, test a small area when needed, and follow the process in thin, controlled stages. Use proper ventilation and protective gear when chemicals, sanding, spraying, or solvents are involved.
Planning and Preparation Before You Start
The most successful paintings begin long before the first brushstroke touches the canvas. Thorough planning is the foundation that supports the weight of your final piece. Before you even mix a single shade of ochre, you must define your scope, your mood, and your technical challenges.
Understanding Your Subject: Desert Types and Mood
Not all deserts are created equal. The type of desert dramatically influences the color palette, texture, and even the emotional tone of the piece. Understanding this distinction is crucial for authenticity.
- Sandy Deserts (Ergs): These environments are characterized by massive, sweeping dunes and smooth, curved lines. The dominant palette is warm, focusing on gradients of tan, gold, burnt orange, and pale cream. The mood often evokes vastness, solitude, and gentle movement. Techniques should emphasize smooth transitions and subtle value changes.
- Rocky Deserts (Hamadas): These terrains are rugged, featuring exposed bedrock, jagged rock formations, and scree slopes. The palette here is cooler and more grounded, incorporating slate grays, deep siennas, rust reds, and charcoal blacks. The mood is one of raw power, permanence, and sharp contrast. Techniques must focus on hard edges, high contrast, and varied impasto textures.
- Transitional/Coastal Deserts: If your scene incorporates the ocean or mountains, the palette expands significantly. Introduce cool blues (for the sky and water) and deep greens (for sparse coastal vegetation) to contrast the dominant warm earth tones. This contrast adds dramatic visual complexity.
Consider the emotional impact you wish to convey. Is the scene about the overwhelming silence (vast negative space)? Or is it about the struggle and resilience of life (a lone cactus against massive dunes)? Defining this mood will guide your compositional choices.
Compositional Mastery: Leading Lines and Focal Points
A desert landscape, by its sheer scale, can feel empty if not guided properly. Composition is your primary tool for directing the viewer’s eye. Never let the viewer wander aimlessly across the canvas.
- Establish the Focal Point: Decide on the single most important element—it might be a dramatic rock spire, a cluster of colorful desert blooms, or the crest of a particularly massive dune. This element must be the visual anchor.
- Use Leading Lines: Incorporate natural lines into the composition—the curve of a dune, the path of a wash, or the ridge of a mountain range. These lines must subtly or dramatically guide the viewer’s eye directly from the foreground, through the middle ground, and terminating at your established focal point.
- The Rule of Thirds: Do not center your primary focal point. Instead, position it along the intersection points of the rule of thirds grid (dividing the canvas into nine equal segments). This asymmetrical placement creates immediate visual tension and balance.
Step-by-Step Guide to Painting a Desert Landscape
Once your plan is set, the physical process of painting requires a systematic approach. We will work from the largest, most atmospheric elements to the smallest, most detailed ones.
Step 1: The Sky and Atmosphere (The Background)
Start with the sky, as it sets the mood, the light source, and the overall color temperature. The sky is often the largest area of “negative space,” and its rendering dictates how the ground will feel. If it is midday, the sky will be bright and harsh, perhaps with high contrast. If it is golden hour, the sky will be bathed in warm, diffused light, pulling yellows and pinks into the foreground.
Crucially, use atmospheric perspective here. The sky and the distant horizon should appear lighter, less saturated, and cooler in value than the foreground. The distant haze is not just pale blue; it is a mix of atmospheric dust and scattered light, often leaning toward lavender or pale gray-blue.
Step 2: Establishing Perspective and Depth
Perspective is how you trick the eye into seeing depth. It is composed of two key elements: linear and atmospheric perspective.
- Linear Perspective: This involves drawing the receding lines (like the edges of dunes or roads) to appear as if they are meeting at a single point on the horizon line (the vanishing point). Ensure all parallel lines appear to converge toward this point.
- Atmospheric Perspective (Aerial Perspective): This is more subtle. As objects move further away, they lose contrast, become paler, and shift toward the color of the atmosphere (often a pale blue/gray). Do not paint the distant mountains as solid, dark shapes; paint them as silhouettes softened by distance.
Step 3: Rendering the Ground and Mid-Ground
This is where you build up the main mass of the landscape. Work in broad, layered washes of color, focusing on *value* (lightness/darkness) before focusing on pure color. Identify the main geological forms—the sweeping curves of the sand, the sharp verticality of the rocks—and use shadow to define their volume.
When painting dunes, remember that the shadow side of the dune will be cooler and darker than the sunlit side. The transition between these two areas must be gradual, using blended washes rather than sharp lines.
Step 4: Developing Texture and Foreground Detail
The foreground is where the viewer is meant to connect with the piece. Here, the details are sharpest, the contrast is highest, and the colors are most saturated. This is the time to introduce highly textured elements:
- Rocks and Bedrock: Use short, directional brushstrokes and techniques like dry brushing to simulate the rough, pitted, and eroded surface of sandstone.
- Vegetation: Depict desert flora (like cacti or hardy scrub) with deliberate intent. Study their silhouettes and how they grow in clusters or along natural ledges. Their form should feel resilient and angular, contrasting the softness of the sand.
Step 5: Mastering Light, Shadow, and Contrast
The climax of the painting is the interplay of light and shadow. Light is rarely a single color; it is the absence of shadow. The shadow is where you build depth. Never simply paint a dark area; paint the *color* of the shadow. Shadows often pick up reflected colors from the sky (e.g., a shadow on sand might have a subtle lavender or pale blue cast, even if the sun is yellow).
Pay close attention to cast shadows—the shadows thrown by objects. These cast shadows must follow the geometry of the scene and are crucial for making the landscape feel three-dimensional and grounded in time.
Materials and Tools for Desert Scenes
Selecting the right tools can fundamentally change the outcome of your painting. Since desert scenes involve vast gradients and varied textures, versatility is key.
Recommended Mediums
- Acrylics: Excellent for beginners and for large-scale work due to fast drying times, allowing you to build layers quickly. They are versatile and can mimic the washes of watercolor while providing the opacity needed for rock textures.
- Oils: Ideal for achieving the deepest, most complex color blends and subtle tonal shifts, especially when depicting the soft transition of light across massive dunes. They dry slower, giving you more time to blend edges.
- Watercolor/Acrylic Mix: Great for initial washes and achieving the subtle, hazy quality of the atmosphere and the sky. Use this for the initial, lightest layers to establish the overall value and temperature.
Essential Tools
- Brushes: A variety is needed. Use large, flat wash brushes for the sky and large, sweeping washes of sand. Use small, stiff bristle brushes (like those used for painting miniatures) for dry brushing and fine detail work on rocks and cacti.
- Palette Knives: These are invaluable for mixing thick, textural paint and for scraping out excess paint, allowing you to build impasto-like rock formations directly on the canvas.
- Reference Materials: Bring a physical color swatch book and a reliable source of reference photos taken at the exact time of day you wish to depict.
Color Theory and Palette Selection
The desert palette is deceptively simple, relying heavily on earth tones, but its depth comes from the subtle shifts between warm and cool colors.
Primary Desert Tones (The Warm Core): Focus on ochres, burnt umber, raw sienna, and golden yellows. These form the bulk of the ground and the warm glow of the sun. Use these tones to establish the sense of heat and aridity.
Secondary Desert Tones (The Cool Contrast): This is where the magic happens. Use muted blues, violets, and slate grays. These cool tones should *never* be placed randomly. Their purpose is to define the shadows, the depth of the atmosphere, and the reflected light in the canyons. The contrast between the warm highlights and the cool shadows is what makes the desert feel luminous and real.
Value Over Hue: Always prioritize *value* (the lightness or darkness) when mixing colors. A burnt orange and a pale yellow can look similar in value when dry, but they are vastly different when mixed with a cool shadow tone. Use value shifts to create depth first, and then refine the color.
Mistakes to Avoid in Desert Painting
Even experienced artists fall into predictable traps when tackling this challenging subject. Being aware of these common pitfalls allows you to correct them before they become visible errors.
- The “Flat Light” Trap: The most common mistake is painting the entire scene with uniform light. This results in a flat, lifeless piece. Always remember that the light source (the sun) is directional. Every element must have a corresponding shadow, even if that shadow is subtle.
- Ignoring Atmospheric Perspective: Treating the background as if it were painted up close. The distance makes everything paler and bluer. If your distant hills look as saturated as the foreground rocks, the painting will look like a cutout collage, not a cohesive landscape.
- Over-detailing Everything: The desert is vast, and attempting to detail every single grain of sand or every single tiny cactus leads to visual clutter and slows down the painting. Focus your meticulous detail only on the foreground focal point, allowing the middle and background to be rendered with broader, more atmospheric washes.
- Uniform Color Use: Painting only with “sand color.” The desert contains thousands of subtle hues—from the reddish tint of iron-rich rock to the pale blue-gray of sun-bleached bone. Constantly check your palette for unexpected, subtle shifts in color.
Safety and Practical Notes
While painting is a studio art, certain materials and techniques require standard safety precautions. Treat your art supplies with respect and care.
- Ventilation: When using solvents (such as turpentine or mineral spirits for cleaning brushes or thinning oils), always work in a well-ventilated area. Proper air circulation is critical for minimizing exposure to fumes.
- Protective Gear: Although not always mandatory, wearing protective gloves and eye protection is advisable when working with highly pigmented materials, heavy solvents, or if you are sanding or preparing a canvas surface.
- Drying Time: Patience is mandatory. Allow paint layers to dry fully, especially when using thick mediums or oils. Rushing the drying process can lead to cracking, warping, or poor adhesion between layers. Always follow the drying instructions provided by your paint manufacturer.
- Reference Care: Keep your physical reference photos and sketches safe and away from direct sunlight or excessive moisture to maintain their integrity.
Frequently Asked Questions
How do I achieve the illusion of extreme depth in a desert scene?
The most crucial technique is mastering atmospheric perspective. To make distant elements look far away, they must lose contrast, become paler, and shift toward a cooler, desaturated color (often a pale blue or lavender). Never paint the distant mountains as solid, dark shapes; treat them as soft silhouettes softened by the atmosphere. Additionally, use linear perspective by ensuring all receding lines, like the edges of dunes, appear to converge toward a vanishing point on the horizon.
Get the Fail-Safe Paint Color Playbook (Free PDF)
36 proven colors • 8 ready palettes • trim & sheen guide • printable testing cards.
What is the best way to handle the dramatic transition between sunlit sand and deep shadow?
Do not use harsh lines. The transition must be gradual and blended. When painting a shadow, remember that it is not simply “dark.” The shadow color will pick up reflected light from the surrounding environment—if the sky is pale blue, the shadow on the sand will likely have a subtle blue or lavender cast. Use washes and blended mixes, focusing on how the cool shadow color interacts with the warm highlight color.
If I am painting a very large canvas, which medium should I use?
For large-scale work involving vast washes and varied textures, acrylics are often recommended due to their fast drying time, which allows you to build layers quickly and maintain consistent color temperature across the entire piece. However, if you desire the deepest, most subtle tonal shifts and have ample time for blending, oils remain the superior choice for achieving the soft, gradual transitions of light over massive dune formations. Always start with thin washes regardless of the medium.
I keep painting the scene with uniform light. How do I make the desert feel dynamic?
This is the “Flat Light Trap.” The most common mistake is forgetting that light is directional. Every element—every rock, every dune, and every cactus—must be cast in a corresponding shadow. Always establish a clear light source (the sun) and ensure that all objects have cast shadows that follow the geometry of the scene. This interplay of light and shadow is what gives the landscape its three-dimensional volume and sense of time.
Conclusion
Painting a desert landscape is a deeply rewarding artistic pursuit that demands patience, meticulous observation, and a nuanced understanding of light and color. It requires you to become a student of light, learning to see the subtle shifts in value and the subtle cast of color in the shadows.
By breaking down the process into phases—from conceptual planning and compositional mapping to the careful layering of atmospheric washes and sharp foreground details—you can move beyond mere replication and begin to capture the profound spirit of the arid lands. Embrace the vastness, trust your observations, and let the unique, enduring beauty of the desert guide your hand.