
How Much Does It Cost to Fix Chipped Paint on a Car? Guide & Costs
The paint job on your vehicle is far more than just aesthetics; it acts as the primary barrier protecting the underlying metal from the relentless corrosive forces of the environment. Over time, everyday hazards—a stray rock, a parking bump, or abrasive debris—can create chips and scratches, leaving the exposed metal vulnerable to rust and corrosion. Addressing these imperfections is crucial not only for maintaining curb appeal but also for preserving the structural integrity and overall value of your car.
Understanding how to restore that flawless finish can seem daunting, primarily because the cost is not a fixed number. The expense of repair is a complex equation influenced by the damage’s size, the paint’s complexity, and the required level of finish. By approaching the repair process with knowledge, you can accurately assess the damage and budget for the right solution, whether that means a simple DIY touch-up or a major professional repaint.
Get the Fail-Safe Paint Color Playbook (Free PDF)
36 proven colors • 8 ready palettes • trim & sheen guide • printable testing cards.
Quick answer: How Much Does It Cost To Fix Chipped Paint On A Car can vary widely in price depending on brand, paint type, quality level, finish, and whether it is interior, exterior, primer, or specialty coating. Check the current product listing and calculate total project cost by adding primer, supplies, extra coats, and waste allowance.
Planning Before You Start: Assessing the Damage Scope
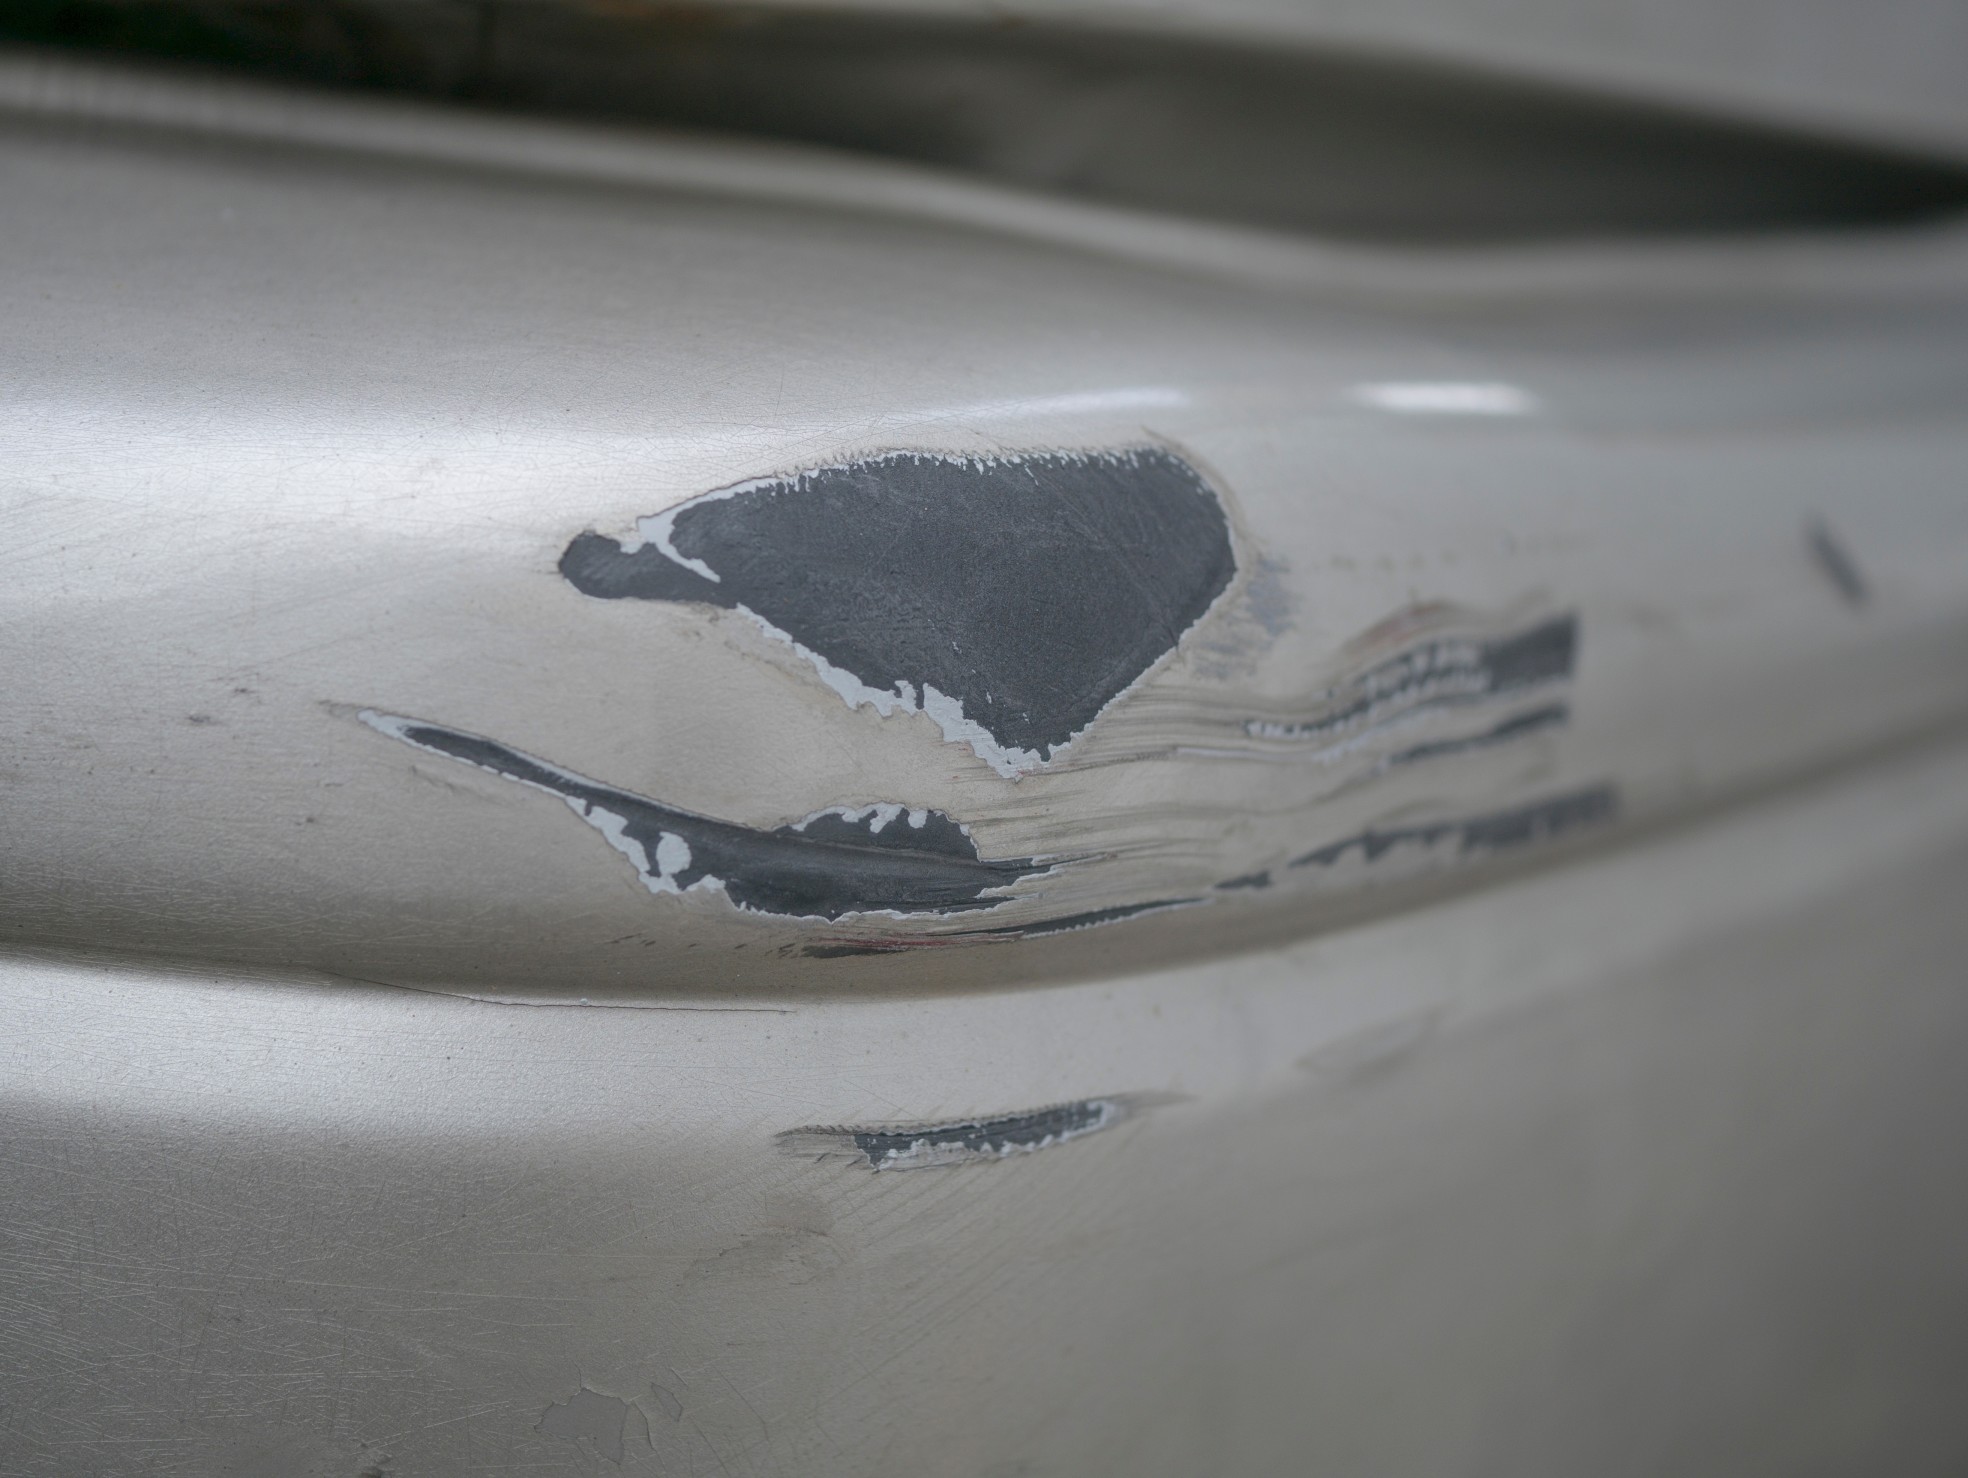
Before you even think about buying a can of paint or calling a body shop, the most critical step is a thorough damage assessment. This initial evaluation dictates the entire repair scope, the materials you need, and, most importantly, the cost. You must determine if the damage is purely superficial (a scratch on the clear coat), moderate (a noticeable chip that has exposed the primer or bare metal), or severe (deep gouges, extensive rust, or structural damage).
When assessing the damage, consider three main dimensions: Depth, Size, and Structure.
Depth: Is the damage confined to the top clear coat layer, or has it penetrated through the base color and into the bare metal? Damage that reaches the metal requires immediate rust treatment and surface prep, which significantly increases the complexity and cost. A scratch that only affects the clear coat is minor; a chip that exposes rust is a major undertaking.
Size: Is the chip a tiny speck, or is it a large gouge spanning several inches? Larger areas require more material and significantly more labor time for blending and preparation. The time required for professional blending is the biggest cost driver after the sheer amount of paint needed.
Structure: This is the most important assessment. Is the damage purely cosmetic, or has it impacted the underlying metal panel? If you see signs of rust (pitting, flaking), or if the panel feels bent, dented, or warped beneath the paint, the problem is structural, not just cosmetic. Structural repairs require metalwork, welding, and filler application—services that cannot be adequately handled by a simple paint kit.
Methods and Cost Tiers for Paint Repair
The appropriate repair method is directly tied to the damage assessment. We can categorize repairs into three main cost tiers: Touch-Up, Spot Blending, and Panel Repainting. Each method requires different skills, materials, and time investments.
Minor Damage: Touch-Up Paint Kits (DIY Focus)
Touch-up kits are designed for the simplest, most superficial chips and scratches—those that have not compromised the paint layer or the metal beneath. These kits contain small bottles of paint matching your car’s color code. The process involves carefully applying the paint directly to the chip using a fine applicator. This is the most cost-effective option, often ranging from $10 to $50. However, it is crucial to understand that touch-up paint only covers the visible surface; it does not restore the underlying protection or depth of the original paint.
Moderate Damage: Spot Repair and Blending (Professional Service)
When the chip is larger, deeper, or has exposed primer, simple touch-up paint will not suffice. This requires a professional technique called spot blending. Spot blending involves carefully sanding, filling, and then applying multiple coats of paint, blending the new material into the surrounding original paint gradient. This process is highly skilled, requiring color matching expertise and specialized blending techniques to make the repair invisible. Costs for this level typically range from $100 to $500, depending on the size of the area and the complexity of the paint finish.
Major Damage: Full Panel Repainting (Full Body Shop Service)
If the damage is extensive—for example, a large dent that has compromised a significant section of the fender, or if the metal is heavily corroded—the entire panel must be addressed. This involves stripping the old paint, repairing the metal structure, applying filler, priming, and finally, applying multiple coats of color and clear coat. This is the most labor-intensive and costly repair, often running from $500 to $2,000 or more. The cost reflects not just the paint, but the skilled labor required to restore the panel to factory-grade quality.
Materials and Tools for Restoration
The necessary supplies vary drastically depending on whether you are performing a minor DIY touch-up or a full professional repaint. Here is a breakdown of essential tools for both scenarios.
For Minor DIY Touch-Ups:
- Paint touch-up kit matching your vehicle’s color code.
- Small, fine-tipped artist brushes or cotton swabs.
- Lint-free cloths and mild soap for cleaning.
- Plastic trim or masking tape to mask off surrounding areas.
For Professional or Advanced DIY Repairs (Spot Blending):
- Multi-grit sanding paper (e.g., 80, 120, 220, 400, 600 grit).
- Body filler and specialized metal repair putty.
- Primer (self-etching or epoxy primer, depending on metal).
- High-quality paint and clear coat system.
- Paint masking tape and paper.
- Personal Protective Equipment (PPE): Respirator, gloves, safety glasses.
Achieving a Seamless Finish: Color and Paint Science
Achieving a finish that truly blends requires understanding the chemistry of modern automotive paint. Modern car paint is not a single layer; it typically consists of several critical components:
- Primer: This layer bonds the paint to the substrate (metal or filler) and prevents surface rust.
- Base Coat (Color): This is the pigment layer that provides the visible color.
- Clear Coat: This is the protective, high-gloss outer layer. It provides the depth, durability, and resistance to UV fading.
The complexity of the paint finish heavily impacts the cost and difficulty of matching. Solid colors (single pigment) are the easiest to match. Metallic finishes (which contain flakes of aluminum or mica) are significantly harder because the flakes react differently to light and wear, requiring specialized blending. Pearl or Mica finishes are the most challenging, as they contain suspended mica particles that shift color and tone based on the viewing angle and the ambient light, demanding an expert eye and advanced equipment to replicate.
Mistakes to Avoid When Repairing Paint
Even with the best intentions, amateur repairs can easily fail if common pitfalls are ignored. Avoiding these mistakes is crucial for ensuring the longevity and appearance of the repair.
1. Ignoring Structural Rust: Never simply paint over visible rust. Rust means the metal has degraded. You must scrape, treat, and chemically stabilize the underlying metal before any primer or paint can be applied. Ignoring rust guarantees that the problem will reappear under the new paint.
2. Rushing Surface Preparation: The longevity of the repair depends entirely on the surface preparation. If the area is not perfectly clean—containing grease, oil, dust, or loose rust—the paint will not adhere properly, causing the repair to fail prematurely.
3. Skipping the Clear Coat: Many DIY attempts focus only on matching the base color. However, the clear coat provides the necessary hardness and UV protection. Skipping or improperly applying the clear coat means the new paint will fade, scratch, and dull much faster than the original finish.
Safety and Professional Considerations
Automotive paint repair involves strong solvents, fine sanding dust, and chemical compounds. Safety must be the absolute priority. Never attempt these repairs without proper safeguards.
Personal Protective Equipment (PPE): Always wear a fitted respirator (rated for organic vapors), chemical-resistant gloves, and safety glasses. Sanding metal or body filler generates fine dust that can harm your lungs, and solvents are highly toxic if inhaled.
Ventilation: Work only in a highly ventilated area. Ensure that paint fumes and solvent vapors are properly dispersed. Never paint in an enclosed space.
When to Call a Professional: If the damage involves structural metal repair, significant rust, or if the paint finish is a complex metallic or pearl type, do not attempt it yourself. These tasks require specialized equipment, chemical knowledge, and professional training. A reputable body shop has the proper climate-controlled booth, chemical stabilizers, and blending expertise to guarantee the best outcome.
Safety and Practical Notes
Work in a well-ventilated space and wear gloves, eye protection, and a respirator when needed. Keep children and pets away from wet surfaces and open containers.
Follow manufacturer drying times between coats. Dispose of rags and leftover materials according to local regulations. If the project involves heights, lead paint, or structural work, consider hiring a licensed professional.
| Type of Chip Repair | Average Cost Range |
|---|---|
| Small, Shallow Chips | $100 – $300 |
| Medium-sized Chips | $300 – $600 |
| Large, Deep Chips | $600 – $1,000 |
| Extensive Chip Damage | $1,000 and above |
Cost and Quantity Planning Guide
Start by identifying the material, coating, tool condition, and finish goal before choosing a method. Clean loose residue first, then test the safest compatible product or technique in a small area. Work slowly, keep the surface or tool supported, and avoid jumping to harsh solvents or aggressive sanding unless the manufacturer directions and material condition support it.
Move through the project in controlled stages: assess, prepare, apply or clean, inspect, and repeat only as needed. Let coatings dry fully, let tools reshape naturally, and keep cleanup materials ready before the mess spreads. If the article topic involves fumes, specialty coatings, damaged surfaces, business settings, or uncertain product compatibility, pause and get qualified guidance before continuing.
Frequently Asked Questions
How do I determine if I need a simple touch-up or a professional repair?
The critical factor is the depth and structure of the damage. If the chip or scratch is purely superficial (only affecting the top clear coat) and the metal beneath is completely clean, a high-quality touch-up kit might suffice. However, if the damage has exposed the primer, the bare metal, or if the paint is flaking, you must call a professional. Any damage that has compromised the underlying metal requires rust treatment and specialized blending, which goes far beyond the scope of a DIY kit.
Get the Fail-Safe Paint Color Playbook (Free PDF)
36 proven colors • 8 ready palettes • trim & sheen guide • printable testing cards.
What is the most dangerous mistake I can make when repairing chipped paint?
The most common and damaging mistake is ignoring structural rust. Never simply paint over visible rust; the paint cannot chemically stabilize the corroded metal. You must scrape, treat, and chemically stabilize the underlying metal before any paint can be applied. Furthermore, skipping thorough surface preparation—ensuring the area is free of grease, oil, or loose debris—will cause the new paint to peel or fail prematurely.
Do metallic, pearl, or complex finishes increase the cost?
Yes, significantly. The complexity of the paint finish is one of the biggest cost drivers. Solid colors are the easiest to match. Metallic finishes (containing flakes) are harder because the flakes interact with light differently. Pearl or mica finishes are the most challenging, as the color shifts based on the viewing angle and light source. These finishes require specialized equipment and expert skill to blend and replicate, making professional service nearly mandatory for a good result.
When should I stop DIY efforts and call a professional body shop?
You should immediately call a professional if the damage is structural (the panel feels bent, warped, or dented beneath the paint), if the rust is extensive, or if the paint finish is a complex metallic or pearl type. These repairs require specialized metalwork, welding, and climate-controlled blending booths that are not available in a home setting. Calling a professional ensures the structural integrity and aesthetic quality of the repair are maintained.
Conclusion: Making the Final Cost-Benefit Decision
Deciding how to fix chipped paint involves a careful balance of cost, time, and desired outcome. For minor, cosmetic chips on a pristine panel, a professional touch-up or a skilled DIY attempt might be sufficient. However, if the damage is deep, compromises the metal, or affects a complex paint finish, the cost of a professional, full-service repair is a necessary investment to prevent costly rust and maintain the car’s structural and aesthetic integrity.
By understanding the three tiers of repair—touch-up, spot blend, and panel repaint—and prioritizing safety and structural integrity above all else, you can make a confident, informed decision that restores your car’s beauty and protects its lasting value.