
How to Paint Plaster of Paris
Painting Plaster of Paris is a rewarding process that transforms delicate, porous material into durable, stunning works of art. While the raw material is beautiful in its own right, applying paint successfully requires more than just a brush and some color; it demands meticulous preparation, specialized materials, and patience. This guide walks you through the professional techniques used by artists and crafters alike, ensuring your finished piece is resilient, beautiful, and long-lasting.
Plaster of Paris, or gypsum plaster, is highly absorbent and delicate. Because it lacks the natural sealing properties of materials like wood or metal, it requires specific steps—especially priming—to guarantee that the paint adheres properly and doesn’t flake or absorb unevenly. By following this comprehensive, step-by-step process, you can confidently turn a simple plaster mold or cast into a masterpiece.
Get the Fail-Safe Paint Color Playbook (Free PDF)
36 proven colors • 8 ready palettes • trim & sheen guide • printable testing cards.
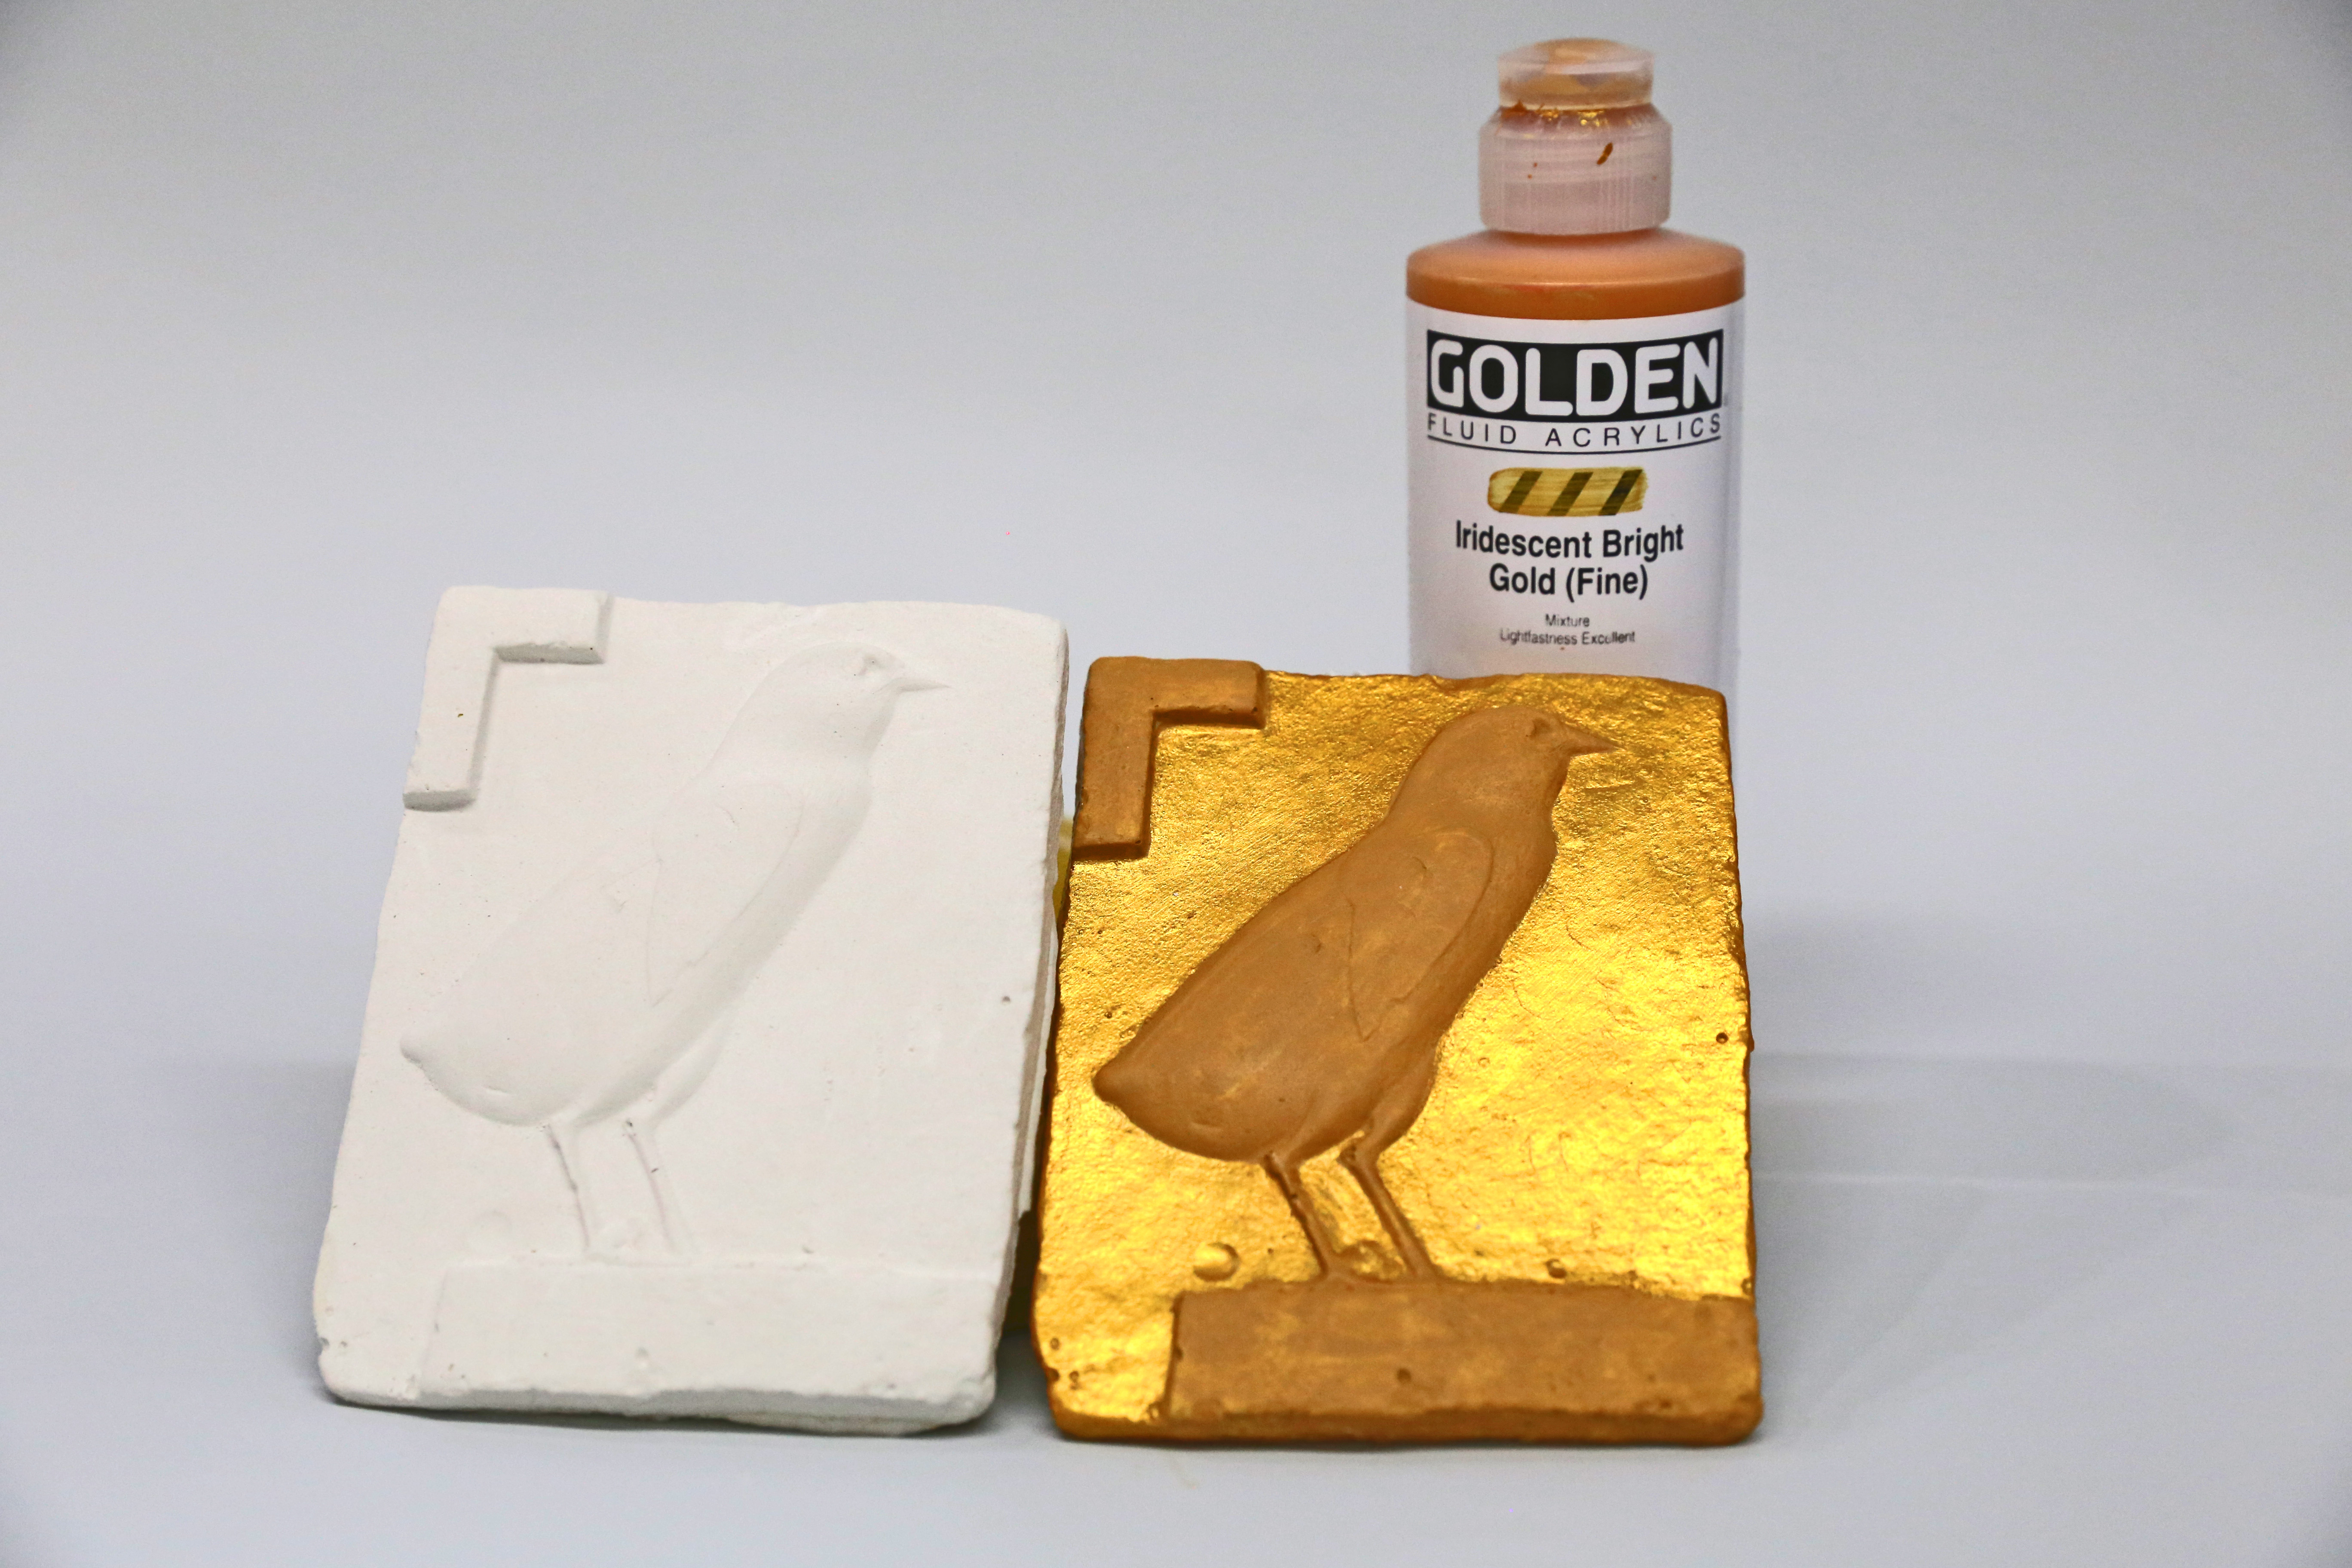
Quick answer: To Paint Plaster of Paris, start with the safest first step for the material involved, test a small area when needed, and follow the process in thin, controlled stages. Use proper ventilation and protective gear when chemicals, sanding, spraying, or solvents are involved.
Planning Before You Start: Assessing Your Project
Before you even think about touching a brush, take the time to assess your plaster piece and your working environment. Proper planning saves time, prevents costly mistakes, and ensures the longevity of your artwork. Ask yourself these questions:
- Structural Integrity and Size: Is the piece delicate? If it is large or structurally questionable, consider having a professional artisan evaluate its weight capacity and stability before you start. Note any major cracks or areas that will need specialized joint compound filling.
- Intended Environment: Where will this piece live? If it is for a bathroom, kitchen, or outdoor area, you cannot use standard interior craft paints. You must select paint and sealant designed for high moisture resistance.
- Lighting and Display Context: How will the finished piece interact with light? Is it in a brightly lit corner (which makes glossy finishes pop) or in a dimly lit, shaded area (where matte finishes absorb light beautifully)? Consider this when choosing your final sheen.
- Time Commitment: Painting porous materials is slow. Budget at least 3 to 5 days for a complex piece, allowing ample time for drying, curing, and multiple priming layers. Rushing the drying time is the most common cause of failure.
Materials and Tools Checklist
Having the right supplies is non-negotiable when working with plaster. Here is a categorized list of everything you should gather:
- Fine-grit sandpaper (220 to 320 grit): For smoothing and light abrasion.
- Utility knife or putty knife: For applying joint compound.
- Joint compound or spackle: For filling deep cracks and imperfections.
- Soft, natural bristle brushes and damp cloths: For initial cleaning.
Priming and Painting Materials
- Specialized acrylic or gypsum-based primer: Do not use standard wall primer; select one specifically formulated for porous plaster or gypsum.
- Acrylic craft paints: Water-based acrylics are the safest and most adhesive choice.
- Dilution medium (if recommended by paint manufacturer): Usually clean water.
- Paint trays and mixing sticks: For controlled mixing.
Finishing and Safety Tools
- High-quality synthetic brushes: Appropriate for acrylic paint.
- Sponge or stiff brush: For texturing techniques (sponging, stippling).
- Protective gear: N95 dust mask, safety goggles, and nitrile gloves (Crucial when sanding or mixing compounds).
- Painter’s tape and drop cloths: To protect surrounding areas.
The Step-by-Step Painting Guide: Achieving a Professional Finish
This process requires patience and adherence to the material manufacturer’s drying times. Follow these steps sequentially for the best results.
Phase 1: Deep Surface Preparation
This is the most critical stage. A poorly prepared surface guarantees paint failure.
- Cleaning: Use a vacuum cleaner with a brush attachment to remove all loose dust, plaster dust, and debris. If there are greasy residues, gently wipe the piece with a mild soap and water solution, allowing it to dry completely.
- Sanding and Smoothing: Using the fine-grit sandpaper, gently sand the entire surface. The goal is not to remove the plaster, but to create a uniform, slightly abrasive texture that gives the paint something physical to grip. Pay attention to edges and high points.
- Filling and Repairing: Apply joint compound into all cracks, deep chips, and visible imperfections. Use a putty knife to smooth the compound, ensuring the fill level is flush with the surrounding plaster. Once the compound is completely dry (this may take 24 hours), lightly sand the filled areas again to blend them seamlessly.
Phase 2: Priming and Sealing
Primer does two things: it seals the plaster’s extreme porosity, and it creates a stable, uniform surface for the paint to bond to.
Apply a thin, even coat of the specialized plaster primer. Use a brush or sponge, working in small, manageable sections. Do not overwork the surface, as this can lift the plaster dust. The primer should penetrate, not just sit on top. Once dry, allow the primer to cure completely, following the manufacturer’s recommended time—this is crucial for adhesion.
Phase 3: Base Coat Application
Once the primer is dry, you can apply your first base coat. Mix the paint thoroughly, adding only the minimum amount of water needed to achieve a smooth, paintable consistency. The base coat should cover the entire surface uniformly, filling in any remaining slight variations in tone or texture.
Apply the paint in multiple thin coats rather than one thick coat. Thin coats dry faster and build up color depth more evenly. Allow the base coat to dry fully before proceeding. This might require 2-3 coats depending on the desired coverage and the absorbency of the plaster.
Phase 4: Adding Depth and Design
This is where the artistic vision comes alive. Techniques can range from simple to complex:
- Dry Brushing: Dip a brush into a small amount of paint, wipe almost all the paint off on a paper towel (leaving only a tiny hint of color), and then lightly drag the brush over raised areas. This technique accentuates texture and creates a beautiful, weathered, or aged look.
- Sponging/Stippling: Use a natural sea sponge or a stiff brush to dab the paint onto the surface. This creates a mottled, highly textured, and organic appearance, excellent for mimicking stone or aged plaster.
- Stenciling: For precise patterns, use stencils. Secure the stencil with painter’s tape and lightly dab the paint through the openings.
Phase 5: Final Topcoat and Sealing
The final coat serves both aesthetic and protective purposes. Apply the topcoat (which can be the same color as the base coat or a complementary shade) smoothly. When this coat is dry, apply a dedicated protective sealant or varnish. This sealant locks the paint in place, providing resistance against dust, minor moisture, and handling. Choose your sealant based on desired sheen: a matte sealant for a soft, velvety finish, or a satin/glossy sealant for durability and depth.
Design and Color Tips: Achieving Depth and Dimension
The choice of color and finish dictates the mood and perceived value of the finished piece. Understanding color theory and sheen is key to achieving professional results.
Understanding Sheen (Finish)
The sheen of the topcoat drastically changes how the color is perceived. Always consider the ambient lighting when making this choice.
- Matte: Absorbs light and provides a non-reflective, velvety finish. It is excellent for mimicking natural stone or aged, dusty plaster, giving the piece a soft, sophisticated look.
- Satin: Offers a slight, gentle reflection. It is the most versatile choice, providing a balance between durability and a natural look.
- Glossy: Highly reflective and durable, offering maximum protection and color depth. Use glossy finishes with caution, as they can highlight every imperfection or dust particle.
When selecting colors, remember that the plaster itself will have an underlying tone (often warm, yellowish, or creamy). If your paint color is too cool (blue-toned), it might clash with the plaster’s warm undertone, making the piece look flat. To achieve a richer, more complex color, mix your base color with a tiny amount of earth tone (like raw umber or ochre) to harmonize with the plaster’s natural warmth.
To create an “aged” or “weathered” effect, do not use a single flat color. Instead, use a base coat of a neutral, light tone, and then use dry brushing techniques with contrasting, muted tones (e.g., deep grey, moss green, or burnt sienna) to simulate patina and time.
Even experienced crafters can run into issues. Knowing how to spot and fix common failures is invaluable.
- The Failure: Skipping the Primer.
The Problem: Paint will be sucked into the highly porous plaster unevenly, leading to patchy coverage and poor adhesion.
The Fix: Always, always prime. The primer acts as a universal sealer, creating a consistent surface tension for the paint to grab onto. - The Failure: Rushing Drying Time.
The Problem: Applying a second coat before the first has fully cured leads to paint lifting, blistering, or flaking off. This is the most common cause of failure.
The Fix: Be patient. Check the paint and primer containers for minimum drying times, and err on the side of waiting longer. - The Failure: Using Incompatible Paints.
The Problem: Using an oil-based paint on raw plaster without proper sealing can cause the paint to deteriorate or yellow over time.
The Fix: Stick to acrylics or specialized water-based paints designed for plaster/gypsum. - The Failure: Over-diluting the Paint.
The Problem: If the paint is too thin, it may not provide enough pigment or body, making the final color wash out or appear weak.
The Fix: Dilute only if the paint is too thick to apply evenly. Always test the dilution ratio on a scrap piece first.
Mistakes to Avoid
Do not skip assessment just because the project looks simple. Most paint, cleaning, repair, and tool-care problems come from poor prep, incompatible products, rushed drying time, or using a method that does not match the material.
Avoid working without ventilation, gloves, eye protection, or a cleanup plan when coatings, solvents, sanding dust, or business/studio supplies are involved. Test first, read manufacturer directions, and pause if the surface, tool, or client setting creates safety questions you cannot answer confidently.
Safety and Practical Notes
Working with plaster, joint compounds, and chemical primers requires adherence to safety protocols. Never compromise on safety gear.
- Ventilation is Key: When using solvents, strong primers, or chemical fillers, ensure the workspace is exceptionally well-ventilated. Open windows, use exhaust fans, and consider running air purifiers.
- Protective Gear: Always wear an N95 dust mask and safety goggles, especially when sanding or mixing compounds. Fine plaster dust is abrasive and can irritate the lungs and eyes.
- Handling Waste: Dispose of plaster dust and joint compound waste responsibly, following local regulations.
- Professional Help: If the plaster piece is historically valuable, extremely large, or structurally compromised, consult a master artisan or conservator before starting.
Painting Plaster of Paris is a journey of transformation. While the process involves many steps—from the initial scrape of the sandpaper to the final application of the protective sealant—each stage is an opportunity to perfect your technique and elevate the final piece. Remember that the goal is not just to cover the plaster, but to stabilize it, enhance its natural beauty, and give it a protective, art-grade finish.
By approaching your project with careful planning, investing in the right materials, and respecting the drying times, you will transform a delicate, porous surface into a durable, breathtaking piece of art that lasts for years to come. Happy painting!
Frequently Asked Questions
What kind of paint should I use on Plaster of Paris?
Always use water-based acrylic paints or specialized gypsum-based paints. Oil-based paints are generally incompatible with porous plaster and can yellow or deteriorate over time. The key is to select a paint formulated for highly absorbent, porous surfaces, as these acrylics provide the best adhesion and color stability.
How long do I need to wait between coats or between priming and painting?
Patience is your most valuable tool. Never rush the drying process. Always follow the minimum drying time specified by the primer or paint manufacturer. For porous materials like Plaster of Paris, this usually means waiting 24 hours between major stages (like priming and base coating) to ensure the material has fully cured and the previous layer has completely sealed. Rushing this process is the most common cause of paint flaking.
Get the Fail-Safe Paint Color Playbook (Free PDF)
36 proven colors • 8 ready palettes • trim & sheen guide • printable testing cards.
Do I absolutely need to prime the plaster before painting?
Yes, priming is mandatory. Because Plaster of Paris is extremely porous, paint will be absorbed unevenly, leading to patchy coverage and poor adhesion. The specialized primer acts as a universal sealant, stabilizing the surface and creating a consistent, uniform barrier that allows the paint to bond properly and last longer.
What should I do if my plaster piece has deep cracks or chips?
Before painting, all structural flaws must be addressed. Use a dedicated joint compound or spackle designed for plaster. Apply the compound into the cracks using a putty knife, ensuring the fill level is flush with the surrounding plaster. Once the compound is completely dry (check product instructions, often 24 hours), lightly sand the filled area to blend it seamlessly before proceeding to the sanding and priming stages.
Is there a difference between a matte and a glossy topcoat for this material?
Yes, the finish dictates the look and the protection. A matte topcoat is ideal for achieving a soft, natural, or aged look, mimicking raw stone or dusty plaster. A satin finish offers the best balance of durability and natural appearance. Use a glossy finish only if maximum protection and depth are required, as it will highlight every minor imperfection in the plaster.
Conclusion
How to Paint Plaster of Paris works best when the plan, materials, safety steps, and finish goals all line up before work begins. Review the surface or tool condition, choose compatible products, and leave enough time for drying, cleanup, and final checks.
Use the guidance above as a practical checklist, then adjust it to the specific surface, workspace, product directions, and risk level. When the project involves fumes, damaged materials, business liability, or uncertain conditions, slow down and get qualified help before moving forward.