
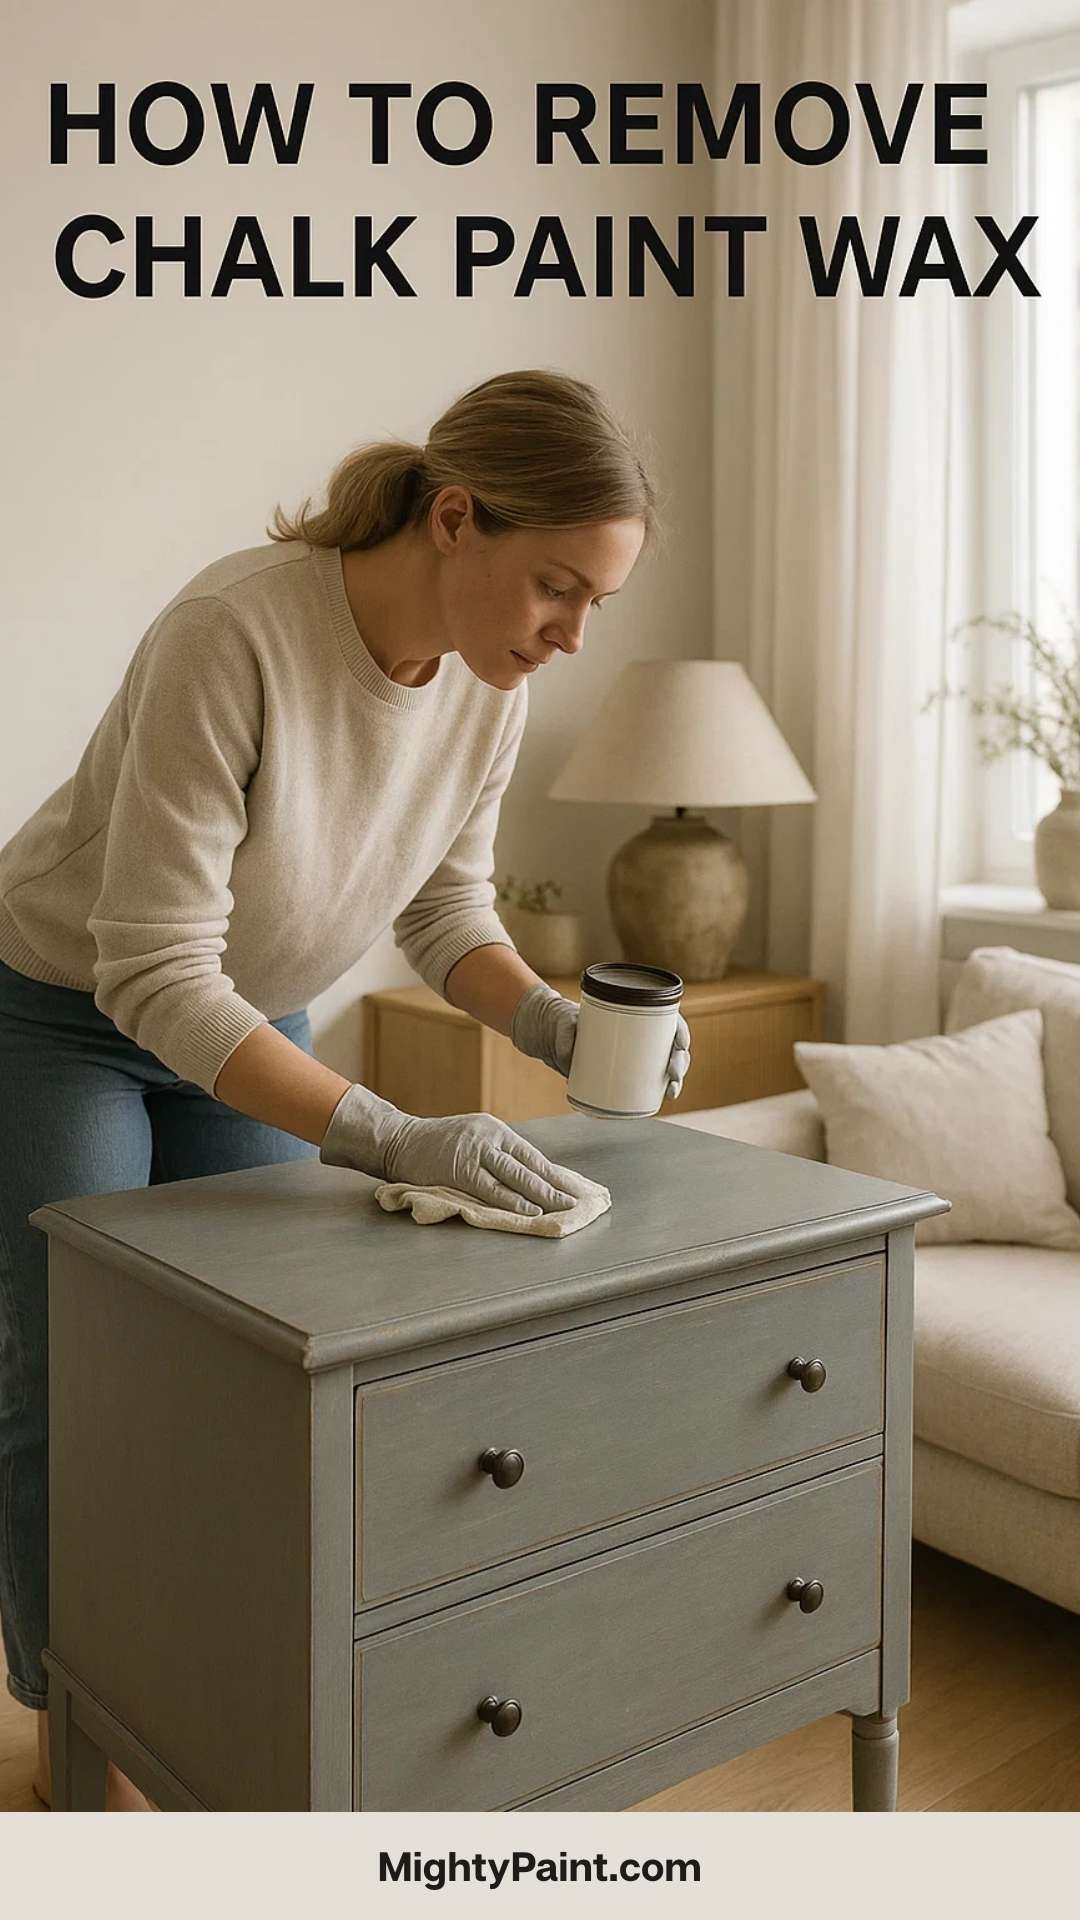
How To Remove Chalk Paint Wax Easily Without Damaging Your Furniture
If you’ve ever worked with chalk paint, you know wax is often used to protect and finish the surface. But what if you want to remove that wax? The easiest way to remove chalk paint wax is by using mineral spirits and a soft cloth or scrubber to gently break down and wipe away the wax layer. This lets you refresh your piece without sanding or damaging the paint.
Wax is designed to stick around and protect, which is great—until you want it gone. Sometimes, applying a fresh layer of wax will soften the old stuff, making it easier to remove. Once you know how to safely get rid of wax, you’re in control and can tweak your project’s look however you want.
Get the Fail-Safe Paint Color Playbook (Free PDF)
36 proven colors • 8 ready palettes • trim & sheen guide • printable testing cards.
Understanding Chalk Paint Wax
Chalk paint wax is a popular finish that protects and adds texture to painted furniture. Knowing what it is, the types available, and both its good and bad points will help you care for your chalk-painted pieces better.
What Is Chalk Paint Wax?
Chalk paint wax is a soft, paste-like finish used on chalk paint to protect the surface. It seals the chalk paint and gives it a smooth or slightly glossy look without needing sanding or a topcoat.
You typically apply wax with a soft cloth or brush in thin layers. Once dry, it can be buffed to a shine or left matte. Wax also helps hide minor scratches and adds water resistance, but it doesn’t make the piece totally waterproof.
Annie Sloan’s soft wax is one of the most well-known waxes made specifically for chalk paint. It’s easy to use and remove, so it’s a solid choice if you’re new to chalk painting or working on a small project.
Types of Wax Used for Chalk Paint
The two main types of wax for chalk paint you’ll hear about are clear wax and dark wax.
- Clear Wax: This type protects your paint without changing its color. It’s great when you want to keep the original chalk paint color clean and bright.
- Dark Wax: Comes in a brown shade and deepens or ages the color of your paint. It adds an antique or rustic look by settling into cracks and details.
Both types are usually soft wax formulas but may differ in color and finish. You can also find paste waxes or harder waxes, but those aren’t as common for typical chalk paint projects.
Benefits and Drawbacks of Wax Finishes
Wax finishes are popular because they’re simple to apply and don’t require sanding. You can revive a piece just by adding a fresh coat—this wakes up the oils and brings back the finish.
Wax creates a soft feel that a lot of people love, and when you buff it, the colors get richer and details pop.
But wax isn’t super tough. Heavy use, heat, or moisture can wear it down, and you’ll need to reapply now and then. It’s a bit sensitive to water and stains, so be gentle when cleaning. If you want to repaint or change the finish, mineral spirits or a wax remover usually do the trick—no sanding required.
Preparing for Wax Removal
Before you start stripping wax off your chalk-painted surface, check out the condition of your painted finish, gather what you’ll need, and make sure you’re set up to work safely. It’s worth taking a minute to avoid headaches and messes.
Assessing the Painted Surface
Take a close look at your piece—maybe it’s kitchen cabinets or an old table. Is the wax thick, patchy, or worn out? On distressed finishes, wax can be sneaky and hard to spot.
Test a small hidden spot with a damp, lint-free cloth. If the wax softens, great. If not, you might need to try something else. If you think some sanding could help, use fine sandpaper and only if your paint feels solid enough to handle it.
Gathering Essential Tools and Materials
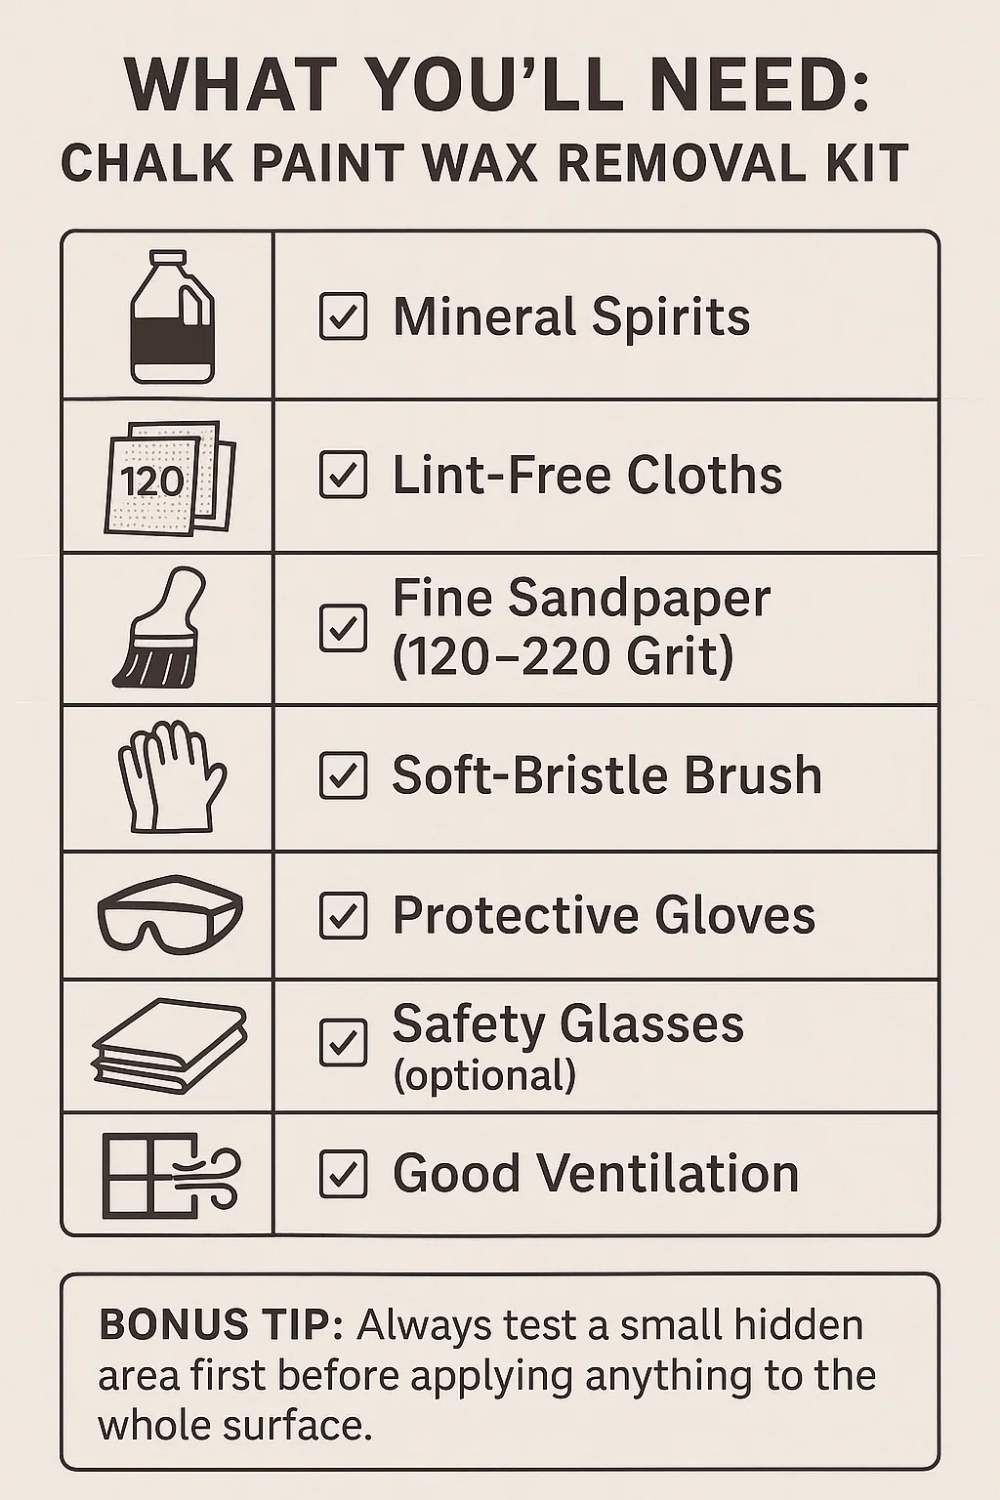
Here’s what you’ll want on hand:
Get the Fail-Safe Paint Color Playbook (Free PDF)
36 proven colors • 8 ready palettes • trim & sheen guide • printable testing cards.
- Mineral spirits or wax remover—these break down the wax
- Lint-free cloths—for gentle wiping
- Fine-grit sandpaper—for stubborn spots
- Soft-bristle brush—for corners and crevices
- Gloves—save your hands from chemicals
Have everything ready before you start. The right tools make the work cleaner and help you avoid scratching up your piece. Skip harsh scrubbers—they’ll just mess up your paint or wood.
Ensuring Workspace Safety
Work somewhere with good airflow—outside or by an open window is best. Mineral spirits and wax removers can smell pretty strong, and you don’t want to breathe that in.
Cover your work area with newspaper or an old sheet to catch any drips. Gloves are a must, and if you’re using mineral spirits, maybe grab some eye protection too.
Keep kids and pets far away. When you’re done, dispose of used cloths safely—they can catch fire if you’re not careful.
Step-by-Step Guide: How To Remove Chalk Paint Wax
Taking wax off your chalk-painted furniture isn’t too complicated. First, clean the surface. Then use mineral spirits to dissolve the wax. If there’s stubborn residue, light sanding helps. Finish by buffing for a smooth, fresh look.
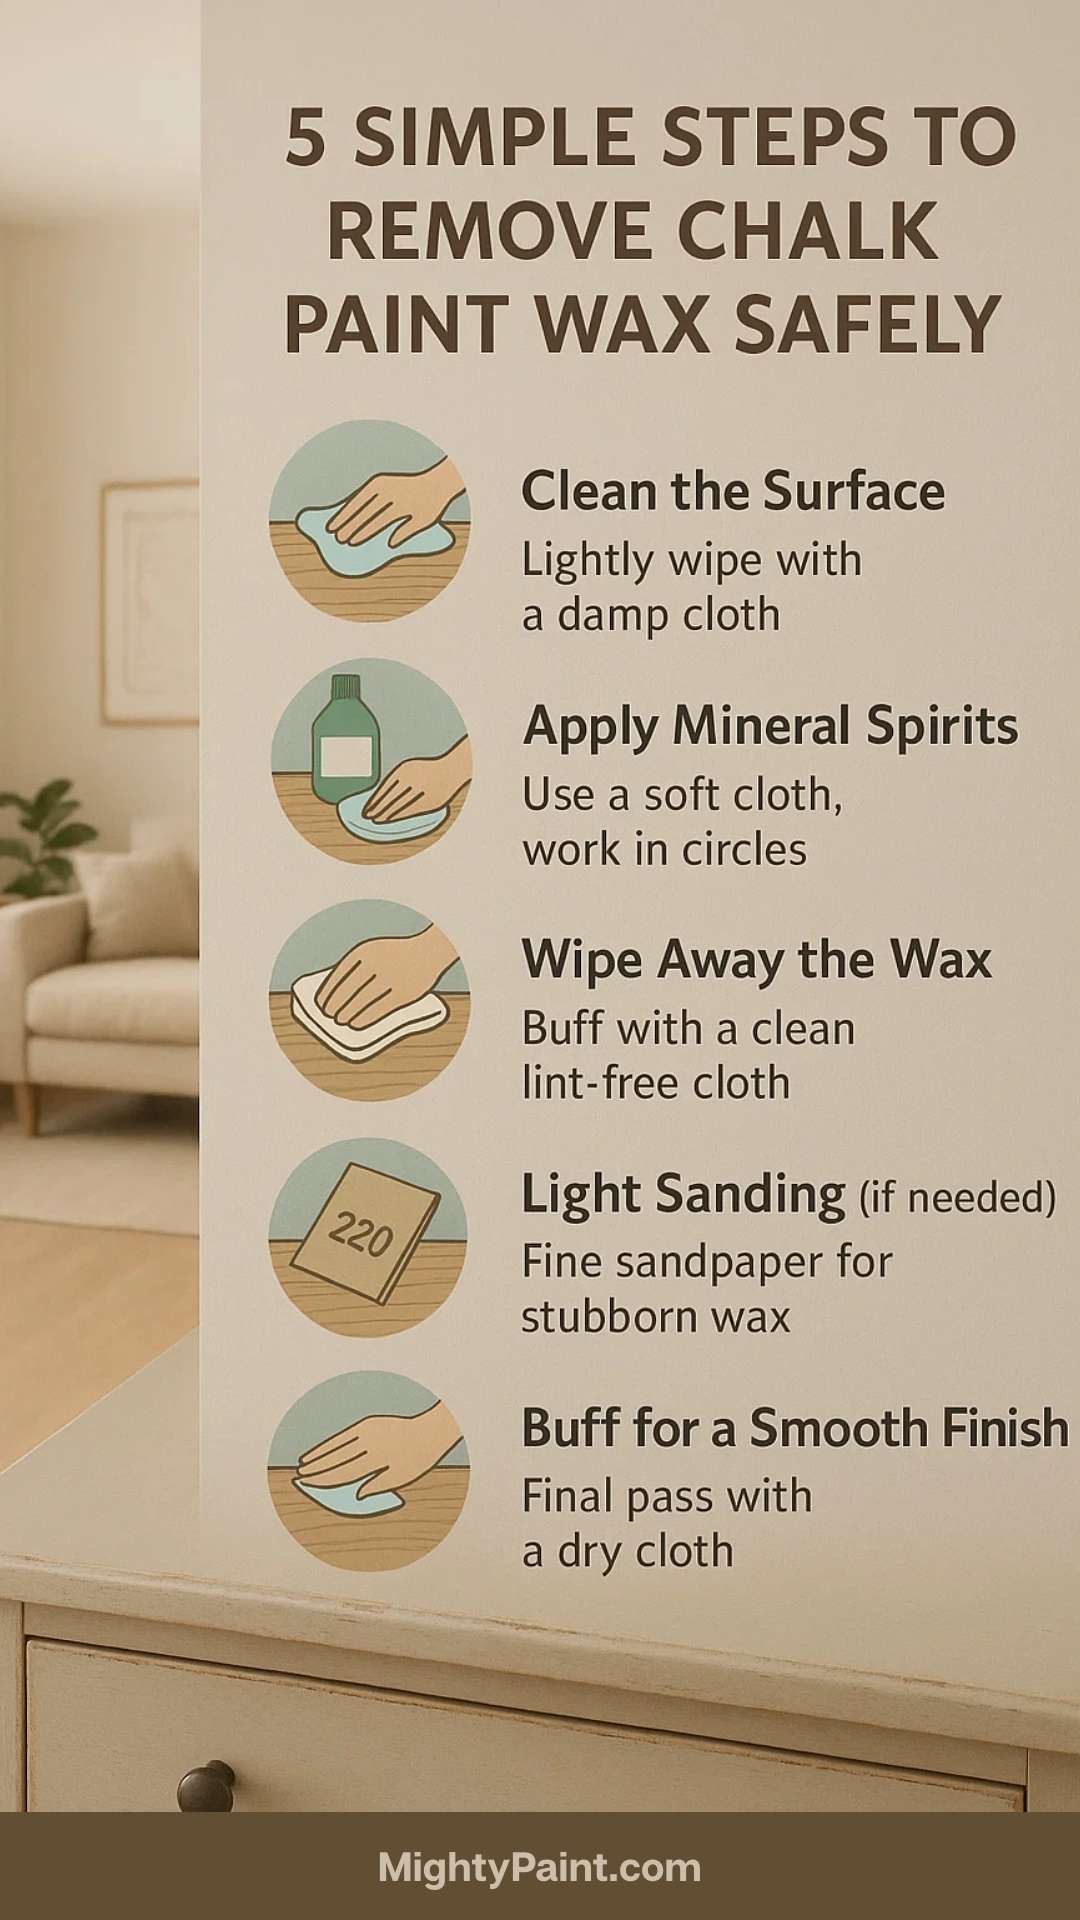
Cleaning the Surface
Give your furniture a wipe-down with a soft, clean cloth to get rid of dust and dirt. If you need to, use mild soap and water, but don’t soak the wood. This step makes wax removal way easier.
Let everything dry completely. If the surface isn’t dry, mineral spirits won’t work as well on the wax. And please, keep the room aired out if you’re using any cleaning products.
Using Mineral Spirits for Wax Removal
Mineral spirits work well for breaking down wax without hurting your painted finish. Pour a little onto a soft cloth or a waxing brush. Rub gently in circles to dissolve the wax.
Don’t drench the surface—too much liquid can mess up your paint. Wipe away the loosened wax right away with a dry cloth. Sometimes you’ll need to repeat this step a few times. Gloves are a good idea, and again, keep the air moving.
Sanding Techniques to Strip Wax
If there’s still wax hanging on after cleaning, sanding can get rid of it. Start with coarse sandpaper (about 120 grit) for thick wax or sticky spots.
Switch to fine sandpaper (220 grit or higher) to smooth things out and avoid scratches. Sand lightly, just enough to get the wax off without digging into your paint.
Get the Fail-Safe Paint Color Playbook (Free PDF)
36 proven colors • 8 ready palettes • trim & sheen guide • printable testing cards.
Buffing Away Residues
Buffing is the last step. Use a clean, dry cloth or a soft buffing brush and move in small circles. This takes care of any leftover wax and brings back a nice smooth feel.
Alternative Methods for Removing Wax
There are a few other ways to get wax off your chalk paint. Some people go manual, others use heat. It really depends on what you’ve got handy and the finish you’re after.
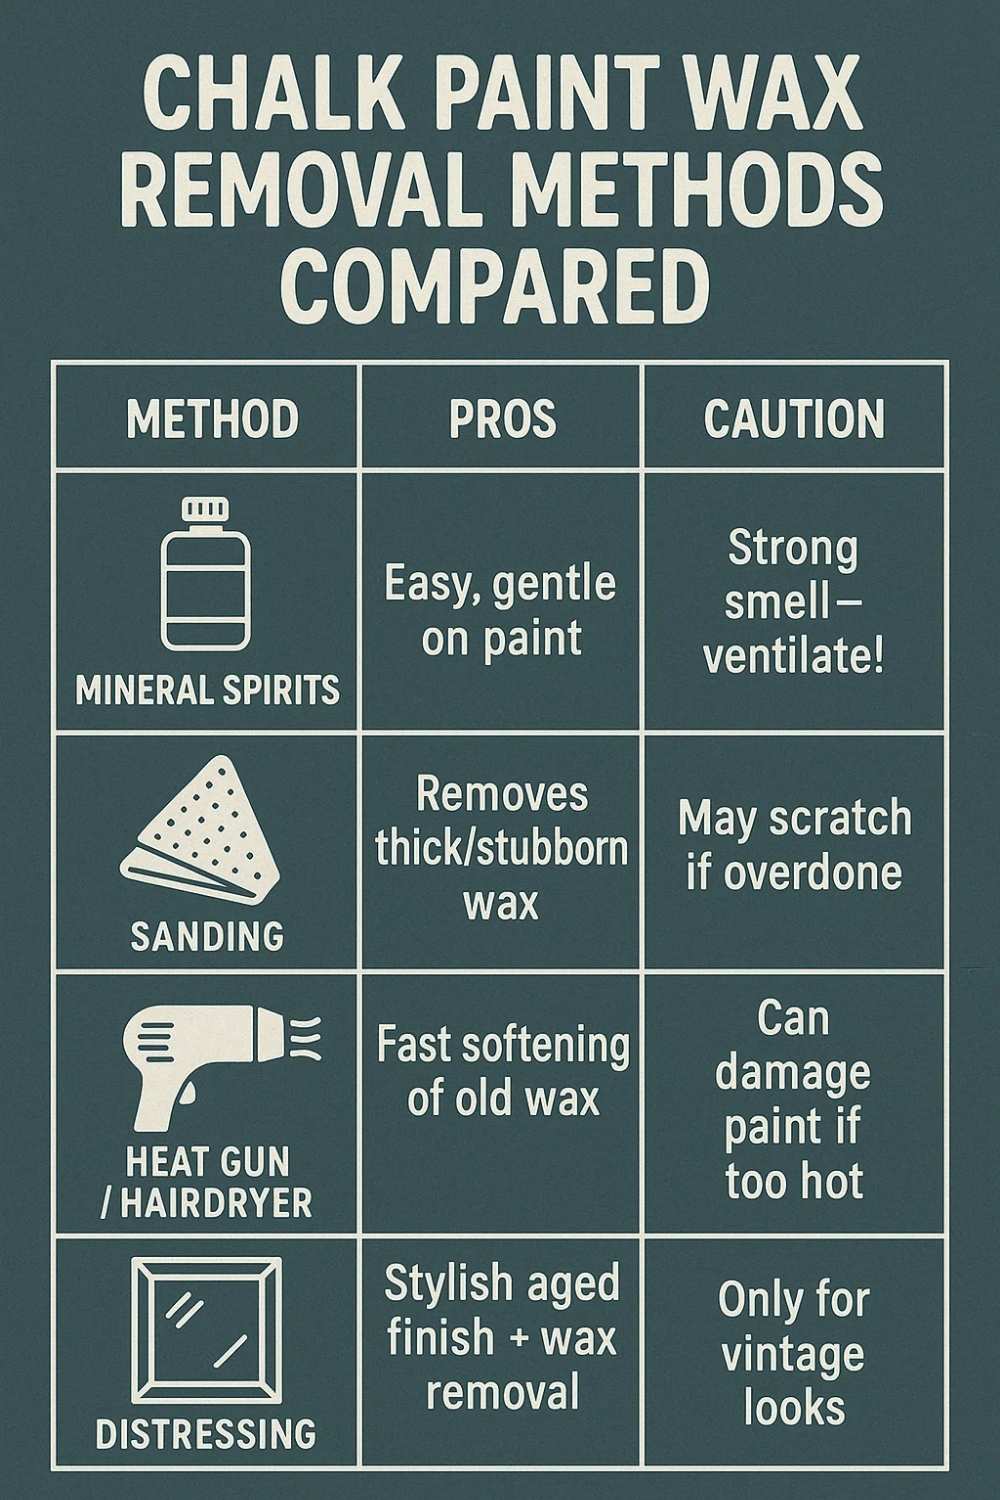
Distressing to Remove Wax Layers
If you like a vintage or worn look, distressing can help strip away wax. Use fine sandpaper or a sanding block to rub down thick or sticky areas.
Focus on corners, edges, and spots that get touched a lot for a natural, aged effect. This removes wax and gives you that distressed vibe at the same time.
Be gentle—take off the wax, not the paint. When you’re done, wipe everything down with a soft cloth to clear away dust and loose wax.
Utilizing Heat in Wax Removal
Heat can soften wax so you can wipe it off more easily. Grab a hairdryer or a heat gun set to low and hold it a few inches from the surface.
Move it slowly over the waxed area. As the wax warms up, wipe it off with a clean cloth or paper towel.
Don’t overdo it—too much heat could mess up your paint. Always test a small, hidden spot first to see how things react. Heat is fast and works especially well on thick or old wax.
Tips for Protecting Your Surface Post-Removal
Once the wax is gone, you’ll want to prep and protect your surface. This keeps your paint looking smooth and helps prevent stains or damage. Think ahead about how you’ll reseal your work to make it last.
Get the Fail-Safe Paint Color Playbook (Free PDF)
36 proven colors • 8 ready palettes • trim & sheen guide • printable testing cards.
Achieving a Smooth Finish
After removing wax, the surface might feel rough or patchy. Grab a fine sanding sponge or 220-grit sandpaper and go over the area lightly in circles until it feels soft.
Wipe away dust with a damp cloth. This step helps your next layer of paint or finish stick better. Heavy sanding isn’t your friend here—it can wreck your paint or wood.
Using a tack cloth after sanding grabs leftover dust and leaves a cleaner surface for your next finish.
Dealing With Bleed Through and Stains
Sometimes, old stains or weird marks pop up after you remove wax. That’s because the wax was hiding them. To fix it, use a stain-blocking primer on those spots.
Pick a primer that blocks stains and odors—shellac-based or oil-based ones work well. Brush or roll it on and let it dry completely.
If the paint lifts anywhere, sand lightly and touch up with chalk paint before sealing things up again.
Reapplying a Seal or Finish
Once your surface feels smooth and stain-free, it’s time to reseal. You’ve got options here—polyurethane (poly) or polycrylic both work as a protective topcoat.
Polycrylic’s water-based, dries clear, and is a solid choice for light colors or chalk paint. Polyurethane is oil-based and tougher, but it can yellow over time, especially on lighter surfaces. It’s a tradeoff, honestly.
Brush on thin coats, letting each one dry before the next. Usually, two or three coats do the trick.
It’s wise to check the paint manufacturer’s recommendations for sealing chalk paint. That way, your finish stays protected and looks good for longer.
Applying New Finishes After Wax Removal
After you’ve stripped the wax from your chalk-painted surface, you get to pick from a bunch of new finishes. You can repaint, go for oils to keep things natural, or try creative techniques—maybe an aged effect or some fun color blends.
Painting Over Chalk Paint Without Wax
If you’re painting over chalk paint that’s had the wax removed, start by cleaning it well. Grab a soft cloth and some mild cleaner or mineral spirits. This clears out leftover wax and dust so your new paint actually sticks.
Pick a chalk or latex paint made for furniture. Apply it in thin, even layers, letting each coat dry before the next. If you want a matte look or plan to use a different sealer, skip the wax at the end.
Get the Fail-Safe Paint Color Playbook (Free PDF)
36 proven colors • 8 ready palettes • trim & sheen guide • printable testing cards.
Classic shades like Old Ochre can give you that timeless vibe. A light sanding between coats helps smooth things out and gives you a cleaner finish. It’s a little extra work, but it helps the paint last and look sharp.
Using Danish Oil for a Natural Look
Danish oil is a solid pick if you want a natural, slightly shiny finish without wax. It soaks right into the wood and chalk paint, showing off the texture and protecting the surface.
Before you start, make sure the surface is dry and totally free of wax. Use a clean cloth to work in thin layers of oil. Let it sit for about 15 minutes, then wipe away any extra.
Add more coats if you want a deeper finish. Danish oil gives you a warm, soft sheen—no waxy buildup. It’s especially nice if you want to highlight wood grain or create a subtle, aged effect.
Experimenting With Creative Techniques
Try mixing colors or layering paint to get a creative, aged vibe on your chalk-painted pieces. Maybe use Old Ochre with darker tones on corners and edges to fake that natural wear.
You can grab a sanding block or steel wool to gently pull back some paint after your new finish dries. That way, you reveal layers underneath and add some real texture.
Some folks like to combine clear wax with colored waxes after the main finish to highlight details. Keep your tools clean, and always test on a small spot first—nobody likes surprises.
Creative finishes make your furniture stand out. Why settle for cookie-cutter?
Troubleshooting Common Issues When Removing Chalk Paint Wax
Wax removal from chalk paint isn’t always smooth sailing. Sometimes you’re left with stubborn residue or weird brush marks. Knowing a few tricks can help you get that clean, smooth finish you’re after.
Handling Stubborn Wax Residue
If you feel leftover wax after your first try, don’t panic. Grab a lint-free cotton cloth and gently rub the spot again. Don’t press too hard or you’ll risk messing up the paint.
To check for leftover wax, scratch lightly with your fingernail. If you see clear wax, you’ve still got work to do. Use small circles with your cloth and a bit of warm water or chalk paint wax remover.
Repeat as needed. Rushing or using harsh chemicals can really mess up your painted surface. Take your time—it’s worth it.
Correcting Brush Strokes
Sometimes you’ll spot brush strokes after waxing or during removal. Usually, this happens when wax isn’t buffed properly or goes on unevenly.
Buff the area with a soft, dry lint-free cloth in small circles. This smooths things out without stripping paint. Brushes at this stage? Not your friend—they’ll just leave more marks.
If marks are deep, try a super fine sandpaper for a gentle touch-up, then reapply wax with care. Always finish with a gentle buff for a smooth surface.
Maintaining Your Chalk Painted Furniture
To keep your chalk painted furniture looking its best, you’ll want to clean it gently and protect it over time. Paying attention to dust, spills, and wax really does help your paint job last.
Regular Cleaning Tips
Dust with a dry or just barely damp soft cloth. Skip harsh cleaners or scrubbing pads—they can scratch up your chalk paint finish.
If you’ve got Annie Sloan chalk paint on kitchen cabinets, go easy when cleaning. Mild soap and water are fine, just don’t soak the wood.
For waxed surfaces, like those with soft wax, clean gently so you don’t strip off the wax layer. Strong chemicals? Avoid them—they’ll dull your paint and ruin the finish.
Get the Fail-Safe Paint Color Playbook (Free PDF)
36 proven colors • 8 ready palettes • trim & sheen guide • printable testing cards.
Long-Term Surface Protection
When you apply wax the right way, it helps shield your painted furniture from stains and scratches. Grab a lint-free cotton cloth, dab on soft wax in thin layers, and buff it out gently. You’ll get a nice, smooth finish—nothing too fancy, just effective.
If your furniture gets a lot of use—think kitchen cabinets or tables—it’s a good idea to re-wax every few months. That way, you keep that layer of protection going strong.
For spots like leather drawers or inserts next to painted wood, skip the wax. It can build up or even mess up the leather. Instead, go for a cleaner made for leather to take care of those areas.