
How To Transition Paint Colors On The Same Wall: A Seamless Guide
If you want to add a fresh look to your room without sticking to just one color, transitioning paint colors on the same wall is a great option. This technique lets you blend two colors smoothly, creating a unique effect that can change the feel of your space. You don’t need to be a pro painter, either—just the right tools and a bit of patience will do.
You’ll figure out how to pick colors that work together and how to blend them so the line between shades isn’t harsh. Whether you want a gentle fade or a bold split, this method gives you room to show off your style without a ton of hassle. Curious? Let’s get into it and see how you can make your walls stand out with some pretty simple steps.
Get the Fail-Safe Paint Color Playbook (Free PDF)
36 proven colors • 8 ready palettes • trim & sheen guide • printable testing cards.
Understanding Paint Color Transitions
When you blend two paint colors on the same wall, the way they flow into each other can really shift the mood of your room. If you get this transition right, your space looks balanced and interesting—no sharp breaks or messy lines to ruin the vibe.
Why Transitions Matter
Transitions help you pull off a smooth look when using two or more paint colors on a wall. The right blend can make a room feel bigger or more connected. When colors flow well, they set the mood—think calm with soft blues or a shot of energy with something bold.
Picking complementary paint colors (opposites on the color wheel) or contrasting ones (neighbors on the wheel) affects how dramatic or gentle your transition feels. What you choose really shapes whether the wall feels like one big canvas or two different spaces.
Common Challenges and Solutions
Blending colors on the same wall isn’t always easy. One headache is paint bleeding under painter’s tape. Press that tape down hard, and pull it off before the paint dries all the way.
Uneven blending is another issue—it can look patchy or streaky. Grab a dry brush and gently drag it where the colors meet. Try circular or back-and-forth strokes to get a soft fade going.
Don’t swap brushes or rollers between colors. Clean tools keep your colors crisp, not muddy. If you spot sharp lines or weird spots, touch up with a small brush and blend again. Honestly, patience helps—step back now and then to see how it’s coming together.
Choosing a Harmonious Color Palette
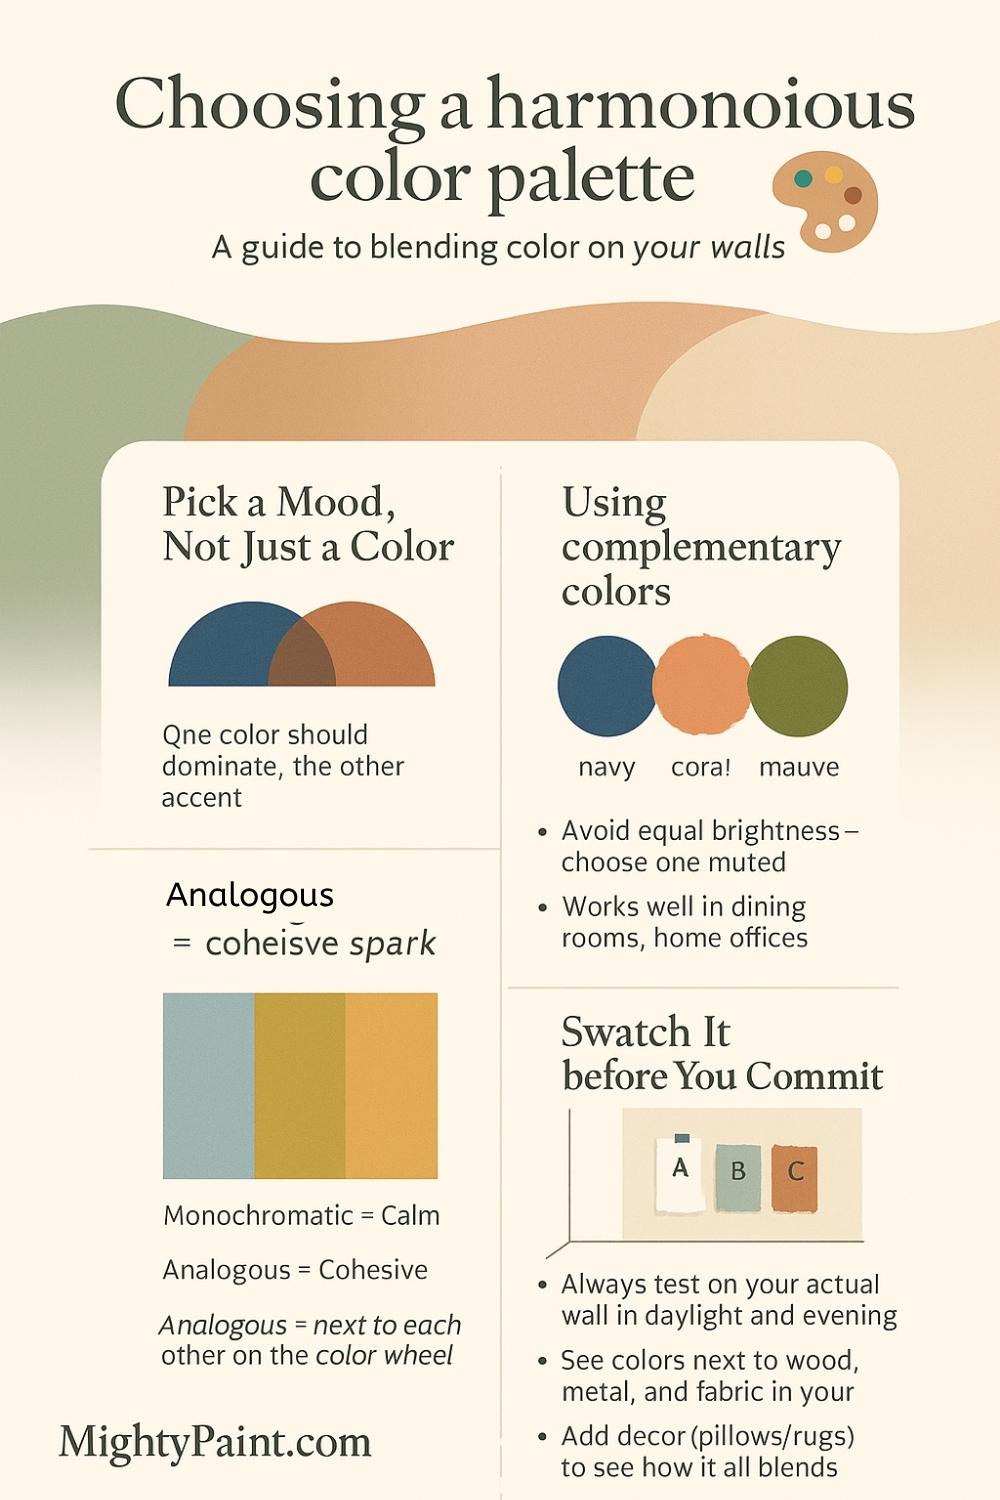
When you’re picking colors to blend on the same wall, make sure they look good together and fit the mood of the room. The right combo helps you skip harsh contrasts and clashing shades. Picture how the colors will flow—do you want something bold, or more subtle?
Selecting Complementary Colors
Complementary colors sit opposite each other on the color wheel—think blue and orange, or red and green. Using these gives you a strong but balanced look since each color makes the other pop.
Blending complementary colors gives you nice contrast that still feels connected. Usually, you’ll want one color as your main shade and the other as an accent, so things don’t get too wild.
If you’re after something softer, try muted versions of those colors. They’ll stay different, but won’t fight for attention.
Monochromatic vs. Contrasting Schemes
Monochromatic schemes use different shades of the same color—like light, medium, and dark blue. This gives a calm, flowing look since everything shares the same base. Transitions like this feel peaceful and unified.
Contrasting schemes use colors that aren’t opposites but are still different, like blue and green. These sit next to each other on the color wheel and add interest without a jarring divide. If you want some variety but still want everything to match, this is a good way to go.
It all depends on the mood you want. Monochromatic is chill and relaxed; contrasting colors add some spark but still play nice if you choose carefully.
Get the Fail-Safe Paint Color Playbook (Free PDF)
36 proven colors • 8 ready palettes • trim & sheen guide • printable testing cards.
Planning Your Transition Point
Where the two paint colors meet on your wall makes a big difference. You want it to feel natural and make the room more inviting—not weird or random. Look around your space for spots that help guide or soften the line, so the transition feels intentional and fits how you actually use the room.
Utilizing Architectural Features
Check for things like chair rails, shelves, or molding—these give you a straight line for your color split and make it easier to keep edges sharp. If you’ve got a bump-out or column, those can break up the wall and anchor your transition, too.
No features? No problem. Add a simple trim or even a painted line to break things up. It locks your color change in place and adds a little extra detail. Sometimes the smallest touch makes the wall look like you planned it all along.
Considering Visual Flow and Furniture Placement
Your color change should work with your furniture and how people move through the room. If your sofa sits against the wall, put your paint line just above or below it to avoid awkward spots.
Think about eye level and the height of the room, too. A lower transition feels more casual—nice for playrooms or hangout spaces. A higher line looks formal, which fits dining or living rooms. Try lining up the transition with windows, art, or lights to keep everything flowing and balanced.
Techniques for Seamless Color Transitions
To get smooth color transitions on the same wall, focus on how the colors meet. You can blend the colors for a soft fade or make a sharp edge for something bold. Both methods need careful prep and the right tools to pull off a pro finish.
Creating a Gradual Blend
Pick at least three shades of the same color, light to dark. Start with the darkest at the bottom. Paint the mid-tone above, letting them overlap a bit.
Use a dry brush or sponge to blur where the colors meet. Move fast—paint dries quick. Drag the brush back and forth to fade one color into the next.
Keep your strokes light and horizontal to dodge harsh lines. If you need to, grab a clean brush and soften things up a bit more. This gives you that smooth, one-color-fading-into-another look.
Achieving a Defined Line
If you want a sharp edge between two colors, start by painting the lighter color and let it dry all the way. Then put down painter’s tape right where you want the colors to meet.
Press the tape down hard to stop paint bleed. Paint the darker color up to the tape, working carefully to keep the line straight.
Get the Fail-Safe Paint Color Playbook (Free PDF)
36 proven colors • 8 ready palettes • trim & sheen guide • printable testing cards.
While the paint’s still wet, peel the tape off slowly at an angle. If any paint sneaks under, touch it up with a small brush.
Good tape and a steady hand are your best friends for a crisp dividing line between colors.
Preparation and Painting Tips
If you want a smooth transition between paint colors, prep is everything. Get the surface ready, pick the right finish, and use careful masking. These steps help keep lines clean and colors blended.
Surface Preparation Essentials
Start by wiping the wall down—dust, dirt, grease, all of it has to go. Use some mild detergent and water, then let the wall dry.
Check for holes or dents. Fill them with spackle or filler, then sand smooth when dry.
If your wall is glossy, give it a quick sand so the paint sticks better. Wipe away sanding dust with a damp cloth.
Cover furniture and floors with drop cloths. Trust me, prep saves you from annoying cleanup later.
Choosing the Right Paint Finish
The finish you use changes how the wall looks and how easy it is to clean.
Flat or matte hides flaws but is tough to clean. Satin or eggshell has a bit of shine and wipes down easily.
Get the Fail-Safe Paint Color Playbook (Free PDF)
36 proven colors • 8 ready palettes • trim & sheen guide • printable testing cards.
If you want depth, try using different finishes for each color. Maybe go flat on one side and satin on the other for some subtle texture.
Test finishes on a small spot first to see how they look in your light before you commit.
Masking and Taping for Clean Results
Painter’s tape is key for clean lines where colors meet. Press it down tight, especially along the edges, to block paint bleed.
Paint the first color and let it dry fully before taping for the second. That way, the tape won’t peel up your paint.
Take the tape off while the paint’s still a little tacky for the cleanest edge.
For a softer edge, after you pull the tape, gently blend where the colors meet with a dry brush.
Go slow and steady to keep your transitions sharp and straight.
Enhancing Cohesion Across Spaces
If you want your rooms to feel connected, use color choices and details that create a smooth visual flow. This really helps if you can see more than one room at once or if spaces are right next to each other.
Incorporating Transition Colors in Decor
When you pull paint colors from your wall transitions into your decor, your rooms start to feel more connected. Toss in some throw pillows, a rug, or a piece of art that echoes the colors from your color palette—it’s a simple move, but it really ties things together beyond just the walls.
Say you’ve got a dark blue fading into a light gray on your walls. Maybe you grab a cushion with a streak of blue, or slip in a gray accent table. Suddenly, the spaces seem to flow into each other. Your eye just gets it, you know?
Get the Fail-Safe Paint Color Playbook (Free PDF)
36 proven colors • 8 ready palettes • trim & sheen guide • printable testing cards.
It helps to choose decor that actually shows off the main transition shades, so nothing feels out of place. This way, the balance feels intentional and your paint colors blend together in a way that just works.
Creating Flow in Open Concept Areas
Open floor plans really call for some smart thinking about color flow since rooms sort of bleed into each other. Without doors to mark boundaries, it just makes sense to pick a color palette that shifts gently from one area to the next. That way, you can define different zones but still keep everything feeling connected.
Say you go with a soft green in the living room, then let it deepen into a richer green for the dining space. Gradual color fades or even a diagonal break on the wall can subtly separate areas, but they won’t chop up the space visually. It’s a nice trick—maybe a bit unexpected, but it works.
Honestly, subtle transitions matter more than you’d think. Harsh lines can make things feel boxed in, which kind of defeats the purpose of open concept. Sometimes, even the ceiling color or the way you choose your flooring can help carry that flow from one zone to the next. It’s not always about the walls.