
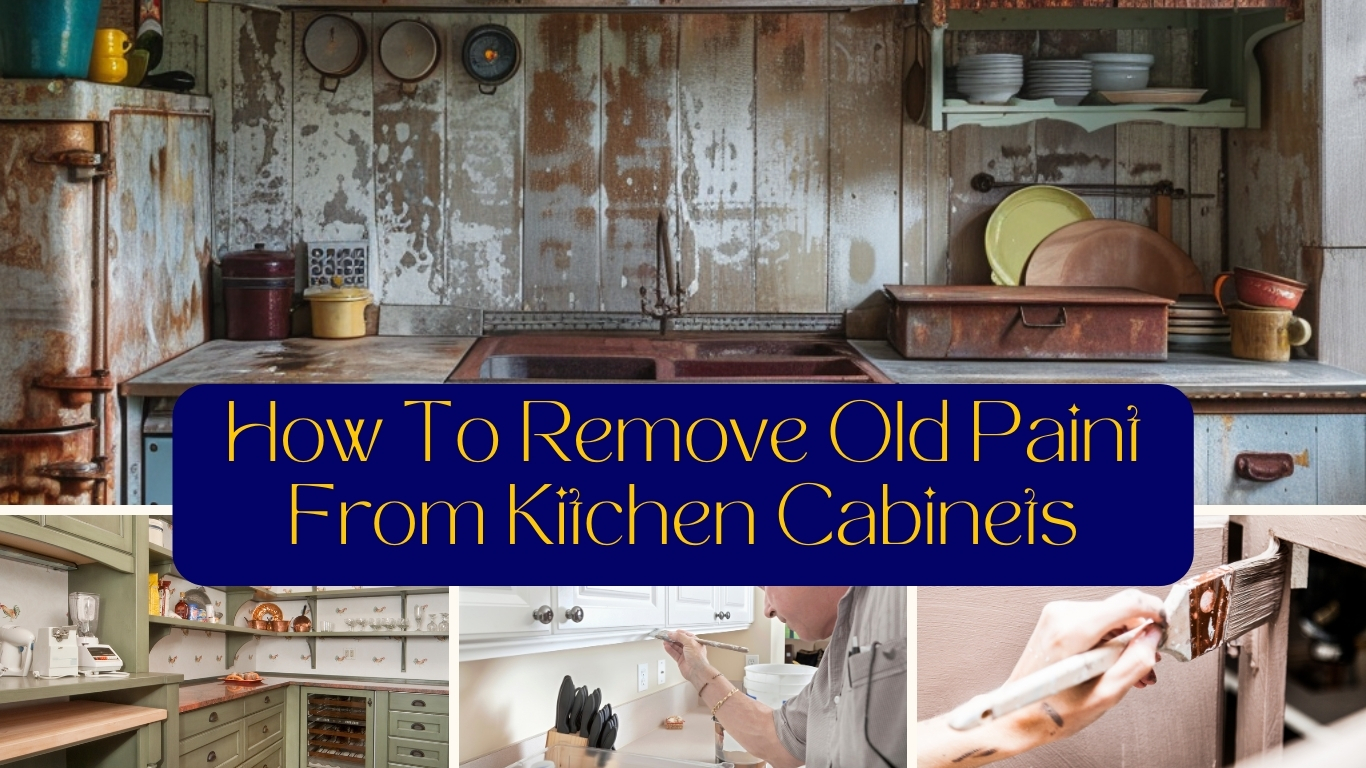
How To Remove Old Paint From Kitchen Cabinets: Simple Steps for a Fresh Look
Removing old paint from kitchen cabinets doesn’t have to be a daunting task. With a few simple steps, you can transform outdated cabinets into stunning focal points for your kitchen.
Start by gathering your supplies: sandpaper, a good-quality paint stripper, paintbrushes, and plastic wrap.
Get the Fail-Safe Paint Color Playbook (Free PDF)
36 proven colors • 8 ready palettes • trim & sheen guide • printable testing cards.
Clean the cabinets thoroughly to remove any dirt or grease that could interfere with the stripping process.
Use sandpaper to remove the top layer of sealant from the cabinets. This will help the paint stripper adhere better.
Apply the paint stripper with a paintbrush, ensuring even coverage. Then, cover the treated area with plastic wrap to prevent the stripper from drying out and allow it to do its job more effectively.
After the recommended waiting period, use a scraper to remove the loosened paint.
After stripping off the old paint, clean the surface with a damp cloth to remove any residue. Then, allow the cabinets to dry completely before considering a new finish.
This process not only preps the surface for a fresh coat of paint or stain, but also ensures a smooth and professional-looking result.
So, if you’re ready to give your kitchen a fresh look without breaking the bank, this guide is your best starting point!
Safety First
Before diving into the paint removal process, it’s critical to ensure your safety and prepare the workspace effectively. Taking these steps can prevent accidents and ensure a smooth project.
Protect Yourself
When removing old paint from kitchen cabinets, personal protection is essential.
Wear gloves for shielding your hands from chemicals.
Then, safety glasses protect your eyes from splashes.
Masks can help prevent inhalation of dust and fumes. Using ones rated for paint fumes is best.
For added safety, wear long sleeves and pants to minimize skin exposure.
It’s equally important to work in ventilated areas. Open windows and use fans to circulate air.
If working indoors, a respirator with a chemical filter can be helpful. Proper lighting also helps you see what you’re doing, reducing mistakes.
Remember: Safety gear may seem excessive, but it protects you from serious health risks associated with chemicals.
Prepare the Area
Preparing your workspace is as crucial as protecting yourself.
Start by removing all items from your kitchen cabinets and surrounding surfaces. This includes dishes, utensils, and any appliances.
Then, cover counters and floors with plastic sheets or old newspapers to catch any drips or debris.
Make sure to label cabinet doors and hardware if you’re taking them off. This simple step prevents frustrating mix-ups during reassembly.
Ensure there’s enough space to move around comfortably. This helps prevent accidents and makes the process smoother.
Keep all your necessary tools and materials within easy reach to avoid leaving your work area frequently.
Gather Your Materials
Before starting your kitchen cabinet paint removal project, having the right materials on hand will make the process smoother. You’ll need to choose the best tools and select the appropriate chemicals for effective paint removal.
Choosing the Right Tools
Selecting the right tools can make a significant difference.
Start with sandpaper, which can help remove the top layer of sealant. Look for sandpaper with a medium to coarse grit, around 80 to 120 grit.
You will also need a paintbrush to apply the paint stripper or any chemical solvent you plan to use.
Make sure the paintbrush is sturdy and of good quality to avoid bristle loss during the application.
A scraper is essential for removing the paint. Opt for one with a comfortable grip and a sharp edge to make the job easier.
In addition to this, plastic wrap can be used to cover the applied stripper, allowing it to work more effectively by preventing it from drying out.
Other useful items include gloves, safety goggles, and masks to protect yourself from fumes and dust.
Keeping all these tools ready will help you complete the task efficiently.
Selecting the Correct Chemicals
Choosing the right chemicals is vital for removing paint.
Citristrip is a popular choice because it is less toxic and has a pleasant scent. It is effective at removing multiple layers of paint and varnish.
For a more natural approach, you can use a mixture of vinegar and baking soda.
This paste can be applied to the painted surface and left to sit for about 30 minutes before scraping off. It’s an eco-friendly option but may require more effort.
For tougher jobs, a chemical paint stripper might be necessary. These can be harsher, so always follow the manufacturer’s instructions.
Ensure proper ventilation in your workspace and wear protective gear to avoid any health issues.
Boiling water can also be useful for softening paint before scraping. Pouring hot water over the paint can help loosen it, making the scraping process easier.
Identify the Paint Type
Knowing whether your kitchen cabinets have an oil-based or water-based paint can help you choose the right method for removing it. Each type of paint requires specific techniques and materials for the best results.
Oil-Based Paint
Oil-based paints are durable and resistant to wear, but they are also harder to remove.
You can start by rubbing a small area with a cloth dipped in denatured alcohol. If the paint does not come off, it is likely oil-based.
Things to look for:
- Durability: Oil-based paint is known for its hard finish.
- Yellowing: Over time, it might turn yellow.
- Solvents: Often cleaned up with mineral spirits or turpentine.
When removing oil-based paint, chemical strippers are usually effective. Sanding may also be necessary to get the surface smooth.
Water-Based Paint
Water-based paints are more common nowadays due to their easy cleanup and low VOCs (volatile organic compounds).
To identify them, use a cloth with denatured alcohol; if the paint comes off easily, it’s water-based.
Characteristics:
- Ease of Use: Dries quickly and is simple to apply.
- Environmentally Friendly: Contains fewer harmful chemicals.
- Cleaning: Soap and water are usually sufficient.
To remove water-based paint, you can often use a mixture of vinegar and baking soda. This combination creates a paste that can strip the paint after it sits for a bit.
Alternatively, sandpaper can also be used for stubborn areas.
Manual Removal Techniques
When it comes to removing old paint from kitchen cabinets, manual methods can be very effective. These techniques often involve tools and materials that you can easily find at home or in a local hardware store.
Sanding the Surface
Sanding is a common method for paint removal.
Begin by using medium-grit sandpaper, about 80-120 grit, to strip away the top layers of paint.
It’s essential to sand with the grain of the wood to prevent damage.
Once the bulk of the paint is removed, switch to a fine-grit sandpaper (220-grit) for a smoother finish.
This type of sandpaper ensures that any remaining paint and imperfections are thoroughly smoothed out.
Use a sanding block or an electric sander for better control and efficiency.
Always wear a dust mask and goggles to protect yourself from dust particles.
After sanding, wipe the surface with a damp cloth to remove any dust or residue, ensuring a clean surface for further treatments.
Chemical Paint Strippers
Chemical paint strippers are a popular choice for removing old paint from kitchen cabinets. They effectively break down layers of paint, making them easy to scrape off.
Applying the Stripper
Before starting, make sure to wear gloves, goggles, and a mask to protect yourself.
Pour the chemical stripper into a paint pan.
Then, using a disposable paintbrush, apply a thick, even layer of the stripper to the cabinet surface.
Follow the manufacturer’s instructions for the best results, usually allowing the product to sit for about 15 to 30 minutes.
Chemical strippers often have a strong smell, so ensure good ventilation in your workspace. Open windows or use fans to improve air circulation.
It might take more than one application depending on how many layers of paint you need to remove.
Removing the Paint
Once the paint starts to bubble and peel, it’s time to remove it.
Use a paint scraper to gently lift the paint off the cabinet.
Work patiently and carefully to avoid damaging the wood underneath.
For any difficult spots, a scrubbing pad or steel wool can be helpful.
Dip the pad in some more stripper if needed and gently scrub the area.
If the paint doesn’t come off easily, you might need another round of stripper application.
Cleanup After Stripping
After getting all the paint off, it’s cleanup time. You’ll want to neutralize the stripper residue.
Many products suggest using a mixture of water and vinegar or denatured alcohol. Dampen a cloth with the neutralizing solution and wipe down the cabinet surfaces thoroughly.
Let the cabinets dry completely before any further treatments like sanding or painting. Dispose of any waste materials, such as leftover stripper and stripped paint, according to your local hazardous waste disposal guidelines.
You’ll have a clean slate to either repaint or refinish your kitchen cabinets.
Heat Application Methods
Using heat to remove old paint from kitchen cabinets can be very effective. This method often involves a heat gun, which can soften the paint, making it easier to scrape away. Safety is essential to avoid burns and damage.
Using a Heat Gun
A heat gun emits hot air, which can soften paint on kitchen cabinets. To start, plug in the heat gun and set it to the proper temperature.
Hold the gun a few inches away from the painted surface, moving it back and forth. This ensures even heating.
When the paint begins to bubble, use a scraper to remove it. Keep the heat gun moving to prevent scorching the wood. Be careful around corners and edges, as these areas can burn easier.
After removing most of the paint, you may still have some residue left. Use fine-grit sandpaper to smooth out the surface. This will prepare the cabinets for the next steps, like repainting or applying a new finish.
Safety with Heat
Remember that a heat gun can reach very high temperatures and burn skin or ignite flammable materials. Always wear heat-resistant gloves and safety goggles to protect yourself.
Keep a fire extinguisher nearby in case of accidents. Make sure the work area is well-ventilated to avoid inhaling fumes from heated paint. Never leave a plugged-in heat gun unattended as it can be a fire hazard.
Reading the user manual before using the heat gun will provide important safety information specific to your model. Following these precautions can help you safely remove paint without damaging your cabinets or harming yourself.
Primers and Sealers
When removing old paint from kitchen cabinets, applying primers and sealers is a crucial step.
Primers help new paint adhere to the cabinet surface. Without a primer, the paint might peel off over time.
Popular choices include latex-based primers for wood and shellac-based primers for particularly stubborn surfaces. Applying a primer can also help cover any stains or discoloration.
Sealers protect the paint and provide a smooth finish. They prevent moisture from seeping into the wood, which can cause damage over time.
Polyurethane sealers are commonly used for their durability. If a matte or satin look is desired, water-based sealers are a great option.
Steps to Apply
- Clean the Cabinets: Before applying primers or sealers, ensure the cabinets are clean and dry.
- Apply Primer: Use a brush or roller to apply a thin, even coat of primer. Let it dry completely.
- Sand Lightly: For a smooth surface, lightly sand the primed cabinets with fine-grit sandpaper.
- Apply Paint: Once the primer is dry and sanded, apply your chosen paint color.
- Seal the Paint: Finally, apply a thin layer of sealer to protect the paint job.
Tips
- Always work in a well-ventilated area.
- Use protective gear like gloves and masks.
- Follow the manufacturer’s instructions for drying times between coats.
Using primers and sealers guarantees a long-lasting, beautiful finish on your kitchen cabinets. Proper application ensures your hard work pays off with excellent results!
Finishing Touches
Getting the final steps right ensures a professional and long-lasting finish. This stage involves sanding for smoothness and applying new paint to give your kitchen cabinets a fresh look.
Sanding for Smoothness
Start by using fine-grit sandpaper (220-grit) to lightly sand the surface of the cabinets. This step removes any lingering paint residue and creates an even texture.
Sand in the direction of the wood grain to avoid scratches.
After sanding, it’s crucial to clean off the dust. A damp cloth or tack cloth works well for this task. This ensures that the next layer of paint or finish adheres properly.
If there are any imperfections or dents, consider using a wood filler before the final sanding.
Apply the filler with a putty knife and let it dry completely. Sand the filled areas until they are flush with the surface. Your cabinets should now be smooth and ready for the next step.
Applying New Paint
Before applying new paint, ensure the surface is clean and dry.
Choose a high-quality paint that suits the material of your cabinets.
For best results, consider a semi-gloss or gloss finish, which is easier to clean and more durable in a kitchen environment.
Use a primer if you’re covering old dark paint or stains. This helps the new paint to stick better and enhances the color.
Apply the primer evenly and let it dry completely before painting.
When applying paint, use a good brush or roller to avoid streaks and brush marks.
Paint in thin, even coats, allowing each layer to dry before applying the next. Usually, two to three coats are sufficient for complete coverage.
Don’t forget the cabinet doors and drawers. It’s best to paint these separately to ensure edges and corners are well-covered. Once everything is dry, reassemble the cabinets carefully.
Maintenance Tips
After removing paint from kitchen cabinets, regular maintenance is key to keeping them looking fresh.
1. Regular Cleaning:
Wipe your cabinets weekly with a damp cloth to remove dust and grime. Use mild soap for tougher stains.
2. Avoid Harsh Cleaners:
Stay away from bleach or ammonia-based cleaners. These can damage the finish on your cabinets.
3. Use Protective Products:
Apply a wood polish or conditioner every few months. This helps maintain the shine and prevents drying and cracking.
4. Handle with Care:
Be gentle with your cabinet doors and handles. Avoid slamming or hanging heavy items that could cause damage.
5. Touch-Ups:
Keep some matching paint or stain on hand for minor touch-ups. Fix nicks and scratches as soon as they appear.
6. Prevent Moisture Damage:
Install a dehumidifier in your kitchen if humidity is high. This helps prevent moisture damage and wood warping.
7. Check Hinges and Hardware:
Inspect hinges and handles regularly. Tighten any loose screws and replace worn-out hardware to keep cabinets functional.
8. Sunlight Protection:
If your kitchen gets a lot of direct sunlight, consider applying a UV-protective film to your cabinet surfaces to prevent fading.
Here’s a quick reference table for cabinet maintenance tools:
| Tool | Purpose |
|---|---|
| Mild Soap | Cleaning tough stains |
| Wood Polish | Maintaining shine |
| Matching Paint | Quick touch-ups |
| Dehumidifier | Preventing moisture damage |
| Screwdriver | Tightening hinges and handles |
Frequently Asked Questions
Removing old paint from kitchen cabinets can be a bit tricky, but with the right techniques and materials, it’s definitely doable. The following questions address common concerns and offer practical solutions for a smooth paint removal process.
What’s the best technique to strip paint from wooden kitchen cabinets without resorting to sanding?
Using a paint stripper is often the best technique if you want to avoid sanding. Chemical strippers are designed to break down the paint, making it easier to peel off.
One highly recommended option is Citristrip, a safer alternative that doesn’t produce harsh fumes.
Can a heat gun be effectively used to remove layers of paint from kitchen cabinet surfaces?
Yes, a heat gun can be very effective for this purpose. By softening the paint with heat, you can then scrape it off more easily.
Just be cautious to avoid overheating the wood, as this can cause damage. Always keep the heat gun moving to prevent burning.
In case of a paint spill, what methods should you follow to clean it off your cabinets without damaging the surface?
For wet spills, it’s best to use a damp cloth to wipe up the paint quickly.
If the paint has dried, try applying a mixture of vinegar and baking soda. Let it sit for a while before gently scrubbing with a non-abrasive sponge. This should help remove the paint without scratching the surface.
When prepping cabinets for repainting, is sanding off the old paint necessary or is stripping a better option?
Sanding is not always necessary. Stripping the paint can be just as effective and often less labor-intensive.
Stripping agents break down the paint, making it easier to remove. Sanding, on the other hand, can be more time-consuming and messy, but it helps ensure a smooth finish.
How can I remove paint from laminate kitchen cabinets without causing harm to the material?
Removing paint from laminate requires special care to avoid damaging the surface.
Instead of using harsh chemicals, opt for a milder solution like vinegar and baking soda paste. Apply the paste, let it set, then carefully scrape off the paint with a plastic scraper.
Get the Fail-Safe Paint Color Playbook (Free PDF)
36 proven colors • 8 ready palettes • trim & sheen guide • printable testing cards.
What are the steps to take if you want to restore your kitchen cabinets to their natural wood finish?
First, remove any existing paint using a paint stripper or other chosen method.
Next, clean the surface thoroughly to remove any residue.
Once dry, sand the wood lightly to achieve a smooth finish.
Finally, apply a clear wood finish to protect the surface and enhance the natural look.